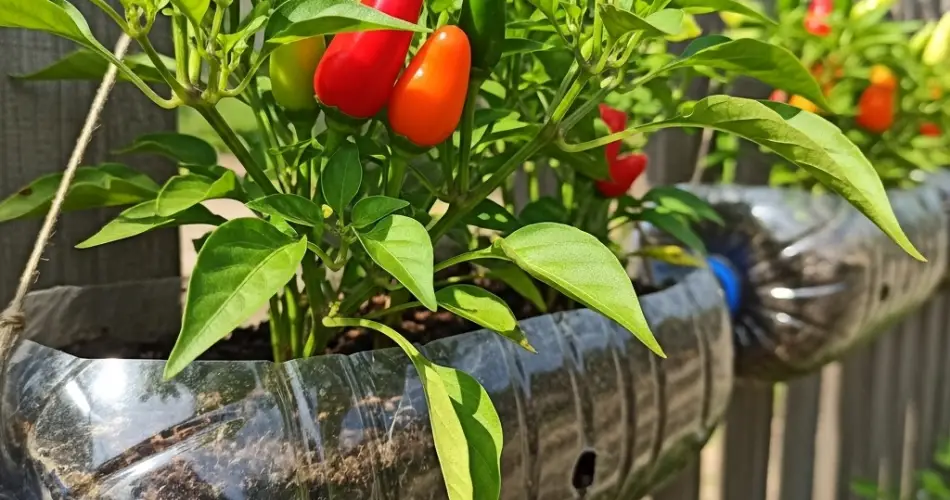
Chili peppers are one of the most popular and versatile crops to grow at home. Whether you’re spicing up dishes or preserving them for later use, there’s something satisfying about harvesting your own hot peppers. And the best part? You don’t need a garden or even a lot of space. By using hanging plastic bottles, you can grow chili peppers right on your balcony, terrace, or even a sunny wall.
This hanging bottle method is ideal for urban gardeners, apartment dwellers, or anyone looking for a sustainable and compact way to cultivate peppers. It’s simple, space-saving, and environmentally friendly—all while producing a flavorful harvest.
Why Choose Hanging Bottles for Chili Peppers?
Using hanging bottles as plant containers offers several benefits:
-
Space efficiency: Utilize vertical space on walls, fences, or balconies.
-
Recycling: Give used plastic bottles a new purpose.
-
Cost-effective: Avoid the need to buy pots or planters.
-
Good drainage and airflow: Easily modified to suit plant needs.
-
Attractive: Create a green, edible wall with bright, colorful chilies.
Chili peppers adapt well to container growing, and with enough sun, they’ll thrive even in limited spaces.
Materials You’ll Need
To start your hanging chili garden, gather the following:
-
2-liter or 5-liter plastic bottles
-
Sharp knife or scissors
-
Drill or heated nail for drainage and hanging holes
-
Good-quality potting soil
-
Organic compost or slow-release fertilizer
-
Chili pepper seeds or seedlings
-
Twine, wire, or sturdy string for hanging
-
Optional: black cloth or paint to shield roots from light
Preparing the Bottles
-
Clean the Bottles
Wash the bottles thoroughly, removing labels and any residue. -
Cut the Planting Window
Cut a large opening on the side of the bottle, wide enough to insert soil and care for the plant. Keep the base intact to hold soil. -
Add Drainage Holes
Drill or poke several small holes at the bottom to allow excess water to escape. -
Make Hanging Holes
Punch two holes near the top of the bottle, opposite each other, and thread string or wire through them for hanging. -
Light Protection (Optional)
If your bottles are clear, wrap them in dark fabric or paint them to protect roots from sun exposure and prevent algae buildup.
Choosing the Right Chili Variety
Chili peppers come in all shapes, sizes, and heat levels. For hanging bottles, choose compact or dwarf varieties that don’t grow too tall or heavy.
Recommended types include:
-
Thai Chili
-
Bird’s Eye
-
Cayenne (slim-fruited)
-
Jalapeño
-
Numex Twilight (colorful and ornamental)
Choose based on your taste preferences and the amount of space and sunlight you have available.
Soil and Nutrient Requirements
Chili peppers need well-draining, fertile soil to thrive.
Ideal mix:
-
50% potting mix
-
30% compost or organic matter
-
20% perlite or coarse sand for drainage
Pre-moisten the soil before planting to help young plants settle in.
Planting Your Hanging Chili Garden
-
Fill the Bottle
Add the prepared soil up to 2 inches below the cut opening. -
Plant the Seed or Seedling
-
Seeds: Plant 1–2 seeds about ¼ inch deep and keep moist until germination.
-
Seedlings: Place gently into the soil, ensuring the roots are covered and firm the soil around the base.
-
-
Water Carefully
Water until the soil is moist but not soaked. Hanging bottles can dry out faster, so monitor moisture regularly. -
Hang in a Sunny Spot
Position the bottle where it gets at least 6–8 hours of sunlight daily—balcony rails, sunny walls, or fence posts work well.
Maintenance and Growing Tips
-
Watering: Chili plants prefer consistent moisture but dislike soggy roots. Check soil daily, especially in hot weather.
-
Feeding: Once flowering starts, apply a diluted liquid fertilizer or compost tea every 2–3 weeks.
-
Support: As chilies grow, some may need light support. Tie stems gently to the bottle or hang near a trellis.
-
Pruning: Pinch the top of the plant when it reaches 6–8 inches tall to encourage bushier growth and more fruit.
Pest Management
Chili peppers are relatively resistant to pests, but occasional problems like aphids or whiteflies can occur. Use neem oil or a gentle soap spray to control pests naturally. Keep an eye out for yellowing leaves or curled growth, which could indicate stress or infestation.
Harvesting Your Chilies
Chilies can usually be harvested 60–90 days after planting. You can pick them when they are green for a milder flavor or wait until they fully ripen to red, orange, or yellow for extra heat and sweetness.
Use clean scissors to snip the fruits from the plant, taking care not to damage the stems. Frequent harvesting encourages continued fruit production.
Reusing the Bottles
After harvesting, remove the old plant and roots. Refill the container with fresh compost and soil if replanting. You can also rotate crops with herbs, lettuce, or compact root vegetables to maintain soil health and interest in your vertical garden.
Small Space, Big Flavor
Growing chili peppers in hanging bottles is a fun and practical way to enjoy homegrown spice—even in the smallest of spaces. It’s perfect for balconies, sunny patios, and vertical gardens, offering sustainability, beauty, and flavor all in one clever setup. With just a few tools and some care, you’ll be harvesting your own fiery fruits in no time.


