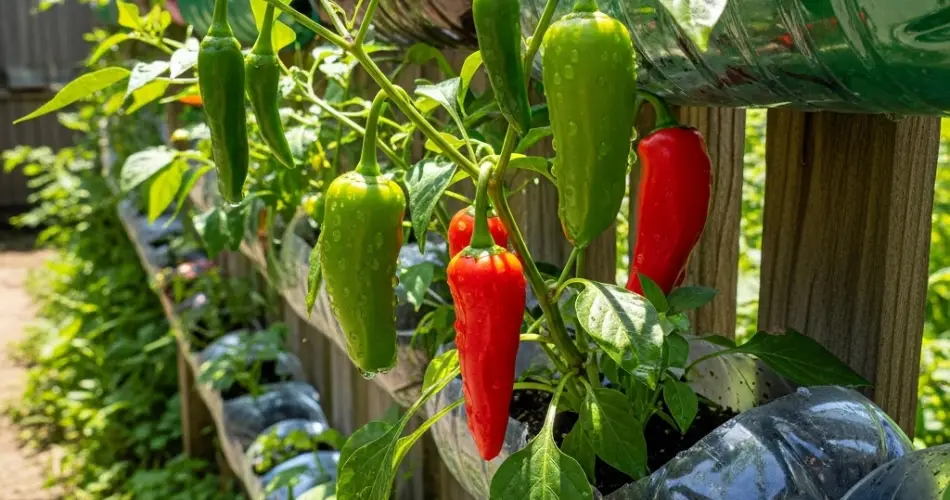
If you love the fiery kick of fresh chilies but lack garden space, there’s good news—you can grow your favorite spicy peppers right on a wall using recycled plastic bottles. This vertical gardening method transforms unused vertical surfaces into productive pepper patches, perfect for balconies, fences, or compact outdoor areas.
Plastic bottle wall gardens are eco-friendly, easy to set up, and ideal for growing compact chili varieties. With a bit of care and creativity, you can enjoy a vibrant wall of green foliage and bright red, yellow, or purple chilies that are as beautiful as they are flavorful.
Why Grow Chilies in a Plastic Bottle Wall Garden?
This method offers numerous benefits for urban or space-limited gardeners:
-
Maximizes vertical space – Ideal for patios, balconies, and tight outdoor areas
-
Eco-conscious – Recycles plastic waste into useful planting containers
-
Great airflow – Helps prevent fungal diseases common in potted plants
-
Organized setup – Easy access for watering, pruning, and harvesting
-
Aesthetic value – Adds color and greenery to plain walls
-
Scalable and modular – Easily expand or reconfigure your garden
Plus, chilies are naturally well-suited to containers, making them perfect for vertical bottle gardening.
Best Chili Varieties for Wall Gardens
Chilies come in a wide range of heat levels and sizes. For bottle gardening, select compact or ornamental varieties that thrive in smaller containers. Great options include:
-
Thai Chili – Compact, high-yielding, and quite hot
-
Cayenne – Long, slender, and productive in vertical setups
-
Jalapeño – Mild heat and easy to grow
-
Tabasco – Upright fruiting habit and colorful
-
Hungarian Wax – Slightly larger, but suitable for bottles with more soil depth
-
Numex Twilight – A beautiful ornamental pepper with multicolored fruits
Look for bushy varieties that don’t require extensive root space.
Materials You’ll Need
Before starting your chili bottle garden, gather these items:
-
1.5 to 2-liter plastic bottles (clean, with caps)
-
Sharp scissors or utility knife
-
Quality potting mix with compost and perlite
-
Chili seeds or young seedlings
-
Screws, wire, or string for mounting
-
A sunny wall, fence, or pallet frame
-
Optional: mulch for moisture control and trellis string for support
Step 1: Prepare the Bottles
-
Clean and dry each bottle, removing any labels.
-
Cut an opening on one side, around 4–5 inches long and 2–3 inches wide.
-
Puncture small holes in the base and cap for drainage.
-
Make two holes near the top and bottom of each bottle for mounting to the wall using wire, string, or screws.
-
Optional: Add gravel or pebbles to the bottom for additional drainage.
Step 2: Fill with Soil and Plant
Fill the bottle with a lightweight, well-draining potting mix rich in organic matter. Avoid heavy garden soil, which compacts easily and restricts root development.
If starting from seed, plant 1–2 seeds per bottle about ¼ inch deep. For transplants, place one seedling per bottle, gently pressing the soil around the root ball. Water lightly to settle the soil.
Step 3: Mount the Bottles on a Wall
Choose a wall or structure that receives 6–8 hours of direct sunlight daily. Chilies are sun-loving plants that need warmth to thrive.
Mount the bottles in vertical rows or staggered patterns using screws, wires, or strong string. Ensure each plant has enough space around it for air circulation and light penetration.
You can also add a vertical string or support for taller varieties to help keep them upright as they grow.
Step 4: Watering and Feeding
Chilies in bottles need regular watering but don’t tolerate soggy roots. Check soil moisture daily—water when the top inch of soil feels dry. Ensure drainage holes allow excess water to escape.
Feed your chili plants every two weeks with an organic liquid fertilizer or compost tea. A balanced NPK (nitrogen-phosphorus-potassium) ratio supports strong foliage and fruitful blooms.
Step 5: Maintenance and Pest Control
Chilies are relatively low-maintenance but keep an eye out for pests like aphids or whiteflies. Use insecticidal soap or neem oil if needed.
Remove yellowing leaves and pinch back excessive growth to promote branching and more fruit production. If leaves curl or drop, check for overwatering or poor drainage.
Mulching the surface with coco coir, straw, or dried leaves can help retain moisture and regulate soil temperature.
Step 6: Harvesting Your Chilies
Chilies are ready for harvest when they reach full color and desired size. Most varieties take 60 to 90 days from transplanting to harvest, depending on the type.
Use scissors or garden snips to harvest without damaging the plant. Leaving a bit of stem attached helps chilies store longer.
Frequent harvesting encourages more blooms and a prolonged fruiting season.
Step 7: Refresh and Replant
At the end of the growing season, remove old plants and refresh the soil with compost. Rotate in other crops like basil, lettuce, or radishes to prevent soil fatigue and diversify your wall garden.
You can also start new chili plants from seeds indoors and transplant them into your bottles when they’re about 4–6 inches tall.
Final Thoughts
Growing spicy chilies in a plastic bottle wall garden is a brilliant way to enjoy fresh, flavorful peppers without needing traditional garden space. It’s a fun, sustainable, and productive gardening method that suits urban dwellers, beginners, and experienced gardeners alike.
With sunshine, a little care, and the right setup, your vertical chili garden will soon be filled with vibrant plants and fiery fruits—proof that big flavors can grow in small, recycled spaces.


