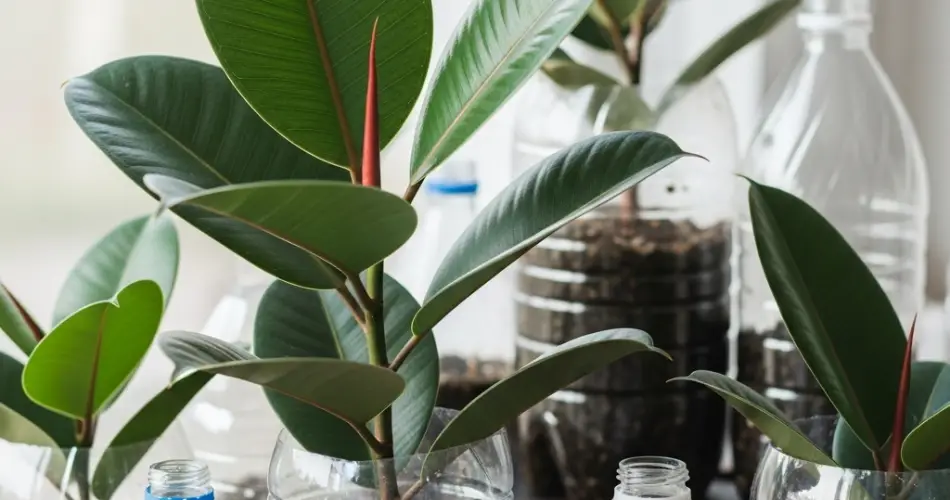
The rubber plant (Ficus elastica) is a classic indoor plant known for its large, shiny leaves and easygoing nature. While it’s often seen in decorative ceramic pots or planters, you can successfully grow a healthy rubber plant using nothing more than a recycled plastic bottle. With just a bit of creativity and attention to care, your rubber plant can thrive in a simple, sustainable container.
This guide will walk you through how to grow and care for a rubber plant using a plastic bottle—perfect for small spaces, tight budgets, and eco-conscious gardeners.
Why Choose a Plastic Bottle?
Plastic bottles are abundant and often discarded after a single use. Repurposing them for gardening reduces waste and gives you a free, lightweight, and flexible container. Plus, with a few adjustments, plastic bottles can provide excellent drainage and visibility—ideal for monitoring root growth and soil moisture.
Rubber plants adapt well to various environments, making them suitable for bottle gardening. While mature specimens may eventually outgrow a bottle, small plants or cuttings thrive comfortably for many months before needing a transplant.
Materials You’ll Need
-
A clean 1.5-liter or 2-liter plastic bottle
-
Sharp scissors or a utility knife
-
A small rubber plant (starter plant or rooted cutting)
-
Well-draining potting mix (preferably for indoor foliage plants)
-
Small gravel or pebbles
-
Activated charcoal (optional, helps with odor and bacteria)
-
Decorative elements (paint, twine, cloth, optional)
-
A pin or heated nail (for making drainage holes)
Step-by-Step Guide
1. Prepare the Bottle
Wash the bottle thoroughly to remove any residue. Remove the label and allow it to dry. Cut the bottle about one-third from the top. The bottom portion will serve as your planter. You can discard or repurpose the top portion for other DIY projects.
Using a pin, nail, or heated needle, poke several drainage holes into the bottom of the bottle to prevent water buildup.
If you prefer a self-watering setup, invert the top portion and place it inside the bottom part. Be sure to remove the cap and add a mesh or cloth at the opening to prevent soil loss.
2. Create a Drainage Base
Rubber plants dislike soggy roots, so drainage is critical. Add a 1–2 inch layer of small gravel, stones, or pebbles at the base of the bottle. For indoor use, consider adding a thin layer of activated charcoal to prevent bacterial buildup and reduce odors.
3. Add Soil
Fill the bottle planter with a well-draining potting mix designed for indoor plants. A good mix typically includes peat moss or coco coir, perlite, and compost. Avoid heavy garden soil that holds too much moisture.
Fill the container about three-quarters full, leaving room to insert the plant without soil spilling over.
4. Plant the Rubber Plant
If you’re using a rooted cutting, ensure the roots are well developed before planting. Make a hole in the center of the soil and insert the plant, burying the roots and lightly pressing the soil around the base to secure it.
If transplanting a young nursery plant, gently loosen the root ball and remove any old soil before placing it in the new container.
After planting, water lightly just to settle the soil. Don’t overwater—a small amount will do.
Rubber Plant Care in a Bottle
-
Light: Rubber plants love bright, indirect light. Too much direct sunlight can scorch the leaves, while too little light can slow growth and cause leaf drop. A spot near an east- or west-facing window is ideal.
-
Watering: Let the top 1–2 inches of soil dry out before watering again. Plastic bottles retain moisture longer than clay or ceramic pots, so always check before adding more water. Overwatering is the most common cause of plant stress.
-
Humidity: These plants appreciate moderate humidity. If the air is very dry, mist the leaves occasionally or place a small water tray nearby.
-
Fertilizing: Feed once a month during spring and summer with a diluted, balanced liquid fertilizer. Skip feeding in fall and winter when the plant’s growth naturally slows.
-
Cleaning: Wipe the leaves with a damp cloth to remove dust and keep them looking glossy. This also helps the plant photosynthesize more efficiently.
Decorating Your Bottle Planter
Your upcycled bottle planter doesn’t have to look basic. Enhance its appearance by:
-
Wrapping it in natural twine or jute
-
Painting it with colors or patterns to match your decor
-
Placing it inside a decorative basket or pot cover
-
Adding a top layer of decorative pebbles or moss
These small upgrades can transform a simple plastic bottle into a chic and eco-friendly plant container.
When to Repot
Rubber plants can outgrow bottle containers in time. If you see roots circling the bottom or pushing out of the drainage holes, it’s time to repot into a larger container. You can continue the upcycling theme by using larger recycled containers, such as old buckets or tubs.
Final Thoughts
Growing a rubber plant in a plastic bottle is a practical and sustainable way to enjoy greenery indoors. This method is perfect for beginners, apartment dwellers, or anyone looking to reduce waste and garden creatively. With the right care and a touch of imagination, your rubber plant will thrive—and your space will benefit from a cleaner, greener, and more stylish vibe.


