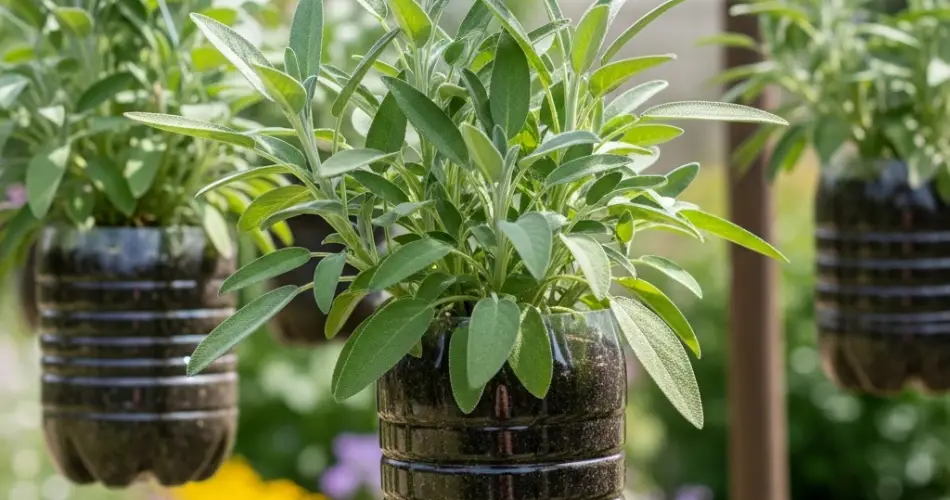
Sage (Salvia officinalis) is a beautiful, aromatic herb known for its culinary and medicinal properties. With its silvery-green leaves and earthy fragrance, sage is a wonderful addition to any home garden. Even if you don’t have a lot of space, you can still grow sage successfully by turning ordinary plastic bottles into hanging planters. This simple, eco-friendly approach allows you to grow fresh sage in small areas like balconies, patios, fences, or even sunny walls.
Hanging bottle gardens are a smart way to reuse plastic waste while creating a vertical herb garden that’s functional and space-saving. Sage thrives in containers and is well-suited for these DIY planters when given the right soil, light, and care.
Why Grow Sage in Hanging Plastic Bottles?
Using plastic bottles as planters gives a second life to everyday waste and makes herb gardening accessible even in the most compact living spaces. Hanging these bottles vertically maximizes unused vertical space while allowing proper airflow and sunlight exposure—both crucial for healthy plant growth.
Sage is an ideal herb for bottle gardening. It’s drought-tolerant, loves full sun, and doesn’t require frequent watering. Its strong scent also helps deter pests, making it an excellent companion plant in mixed vertical gardens.
Materials You’ll Need
To build a hanging sage garden using plastic bottles, gather the following:
-
1.5 to 2-liter plastic bottles (as many as needed)
-
Sharp scissors or a craft knife
-
Nail or hot needle (for making drainage holes)
-
Potting mix with good drainage
-
Small pebbles or charcoal (for a drainage layer)
-
Sage seeds or cuttings
-
Strong string, twine, or wire
-
Hooks, nails, or a railing to hang the bottles
-
A sunny outdoor wall or balcony railing
Preparing the Hanging Bottles
-
Clean and Cut the Bottles
Rinse the bottles thoroughly to remove any residue. Remove the label so the sun can reach the roots and to improve aesthetics. Use scissors or a knife to cut a rectangular window on the side of each bottle. This window will serve as the planting area. -
Make Drainage Holes
Poke several small holes in the bottom of each bottle using a nail or heated pin. This prevents water from collecting and causing root rot. -
Add a Drainage Layer
Place a small amount of pebbles or crushed charcoal at the bottom to improve drainage and prevent soil from clogging the holes. -
Add Potting Mix
Fill the bottle with a well-draining potting mix. A mixture of compost, garden soil, and sand or perlite works well. Sage prefers slightly dry, loose soil that doesn’t stay soggy.
Planting Sage
From Seeds:
-
Lightly scatter sage seeds over the soil surface in the bottle.
-
Cover with a very thin layer of soil (about ¼ inch).
-
Mist the surface gently with water.
-
Keep the bottle in a warm, bright area. Seeds germinate in 10–20 days.
From Cuttings:
-
Cut a healthy stem 4–6 inches long from an established sage plant.
-
Remove leaves from the bottom half of the cutting.
-
Place the cutting in water for 7–10 days until roots form.
-
Plant the rooted cutting into the bottle’s soil and water lightly.
Hanging Your Bottle Garden
Once the bottles are planted, it’s time to hang them. Use strong string, wire, or twine to create a hanger by making holes near the top of the bottle (above the planting window). Tie a loop and hang the bottle from a railing, wall-mounted hook, or horizontal bar.
Be sure to leave enough space between each bottle for airflow and access to sunlight. If hanging multiple bottles vertically, stagger them so the upper bottle doesn’t shade the one below.
Caring for Hanging Sage
-
Sunlight:
Sage needs at least 6 hours of direct sunlight daily. Position the bottles where they receive plenty of sun, ideally a south- or west-facing wall or balcony. -
Watering:
Water only when the top inch of soil feels dry. Sage is drought-tolerant and does better when slightly dry rather than too wet. Be careful not to overwater in bottle containers. -
Pruning:
Pinch back new growth regularly to encourage a bushier shape. Remove flowers to focus the plant’s energy on leaf production. -
Feeding:
Fertilize once every 4–6 weeks with a diluted organic liquid fertilizer or compost tea. Too much fertilizer can reduce the flavor of the leaves.
Harvesting Sage
You can begin harvesting sage once the plant is well-established and has several inches of growth. Snip leaves or stems just above a node (where leaves join the stem). Harvest in the morning after the dew dries for the best flavor.
Avoid harvesting more than one-third of the plant at a time to keep it healthy and productive. Sage leaves can be used fresh, dried, or frozen for future use.
Final Thoughts
Creating a hanging plastic bottle garden for sage is a rewarding, low-cost, and sustainable way to grow your own herbs at home. It’s perfect for small spaces and urban dwellers who want to enjoy fresh, homegrown flavor while reducing plastic waste.
With just a few simple tools and a bit of sunlight, you can transform old bottles into living herb planters. Sage thrives in this setup with minimal care and will reward you with fragrant leaves and a touch of green wherever you hang your garden.


