Chives are among the easiest and most rewarding herbs to grow at home. With their mild onion-like flavor, they’re perfect for garnishing soups, salads, and egg dishes. The good news is you don’t need a garden or large pots to enjoy fresh chives—just a few recycled plastic bottles, some soil, and a sunny window.
Growing chives in plastic bottles is a practical, space-saving, and eco-friendly method. It’s perfect for apartment dwellers, beginners in herb gardening, or anyone looking to make the most of limited space.
Why Grow Chives in Plastic Bottles?
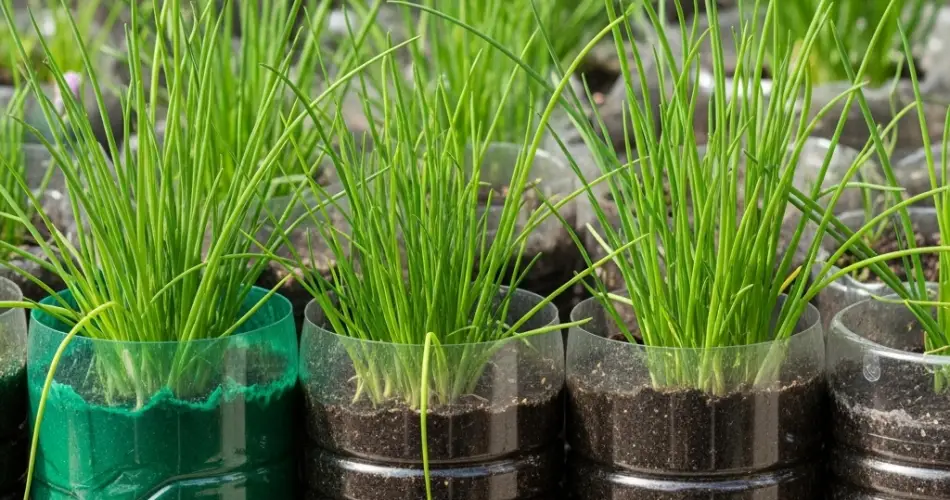
Plastic bottles are readily available and surprisingly effective as planters for herbs like chives, which don’t require deep soil. Their compact root systems make chives perfect for shallow containers, and bottle planters can be arranged on windowsills, shelves, or even hung vertically.
This method also promotes sustainability by reusing plastic waste and turning it into functional, attractive containers. Best of all, it allows you to grow herbs right in your kitchen—so fresh flavor is always within reach.
What You’ll Need:
-
1.5- or 2-liter clear plastic bottles
-
Chive seeds or small seedlings
-
Scissors or a utility knife
-
Heated nail or screwdriver (for drainage holes)
-
Potting mix (light and well-draining)
-
Pebbles or gravel (optional for better drainage)
-
Spray bottle or small watering can
-
String or wire (if you want to hang the bottles)
-
A sunny windowsill or balcony space
Step 1: Prepare the Plastic Bottles
Begin by cleaning the bottles thoroughly to remove any residue. Remove the label and cut a large rectangular window along one side of the bottle using scissors or a utility knife. Leave enough plastic on the edges for structural support.
Using a heated nail or screwdriver, make several drainage holes in the bottom of each bottle to allow excess water to escape. If you plan to hang the bottles, poke two small holes near the top and loop through some twine or wire for easy suspension.
Step 2: Add Soil and Drainage
If you’re concerned about overwatering, place a small layer of pebbles or gravel at the bottom of the bottle to improve drainage. Next, fill the bottle with a well-draining potting mix, ideally one that contains perlite or sand to promote airflow around the roots.
Fill the bottle about two-thirds full, and avoid compacting the soil too tightly—chives prefer loose, fluffy soil to help their roots spread easily.
Step 3: Planting Chives
If using seeds:
Sprinkle chive seeds across the surface of the soil and cover with a thin layer (about ½ cm) of soil. Mist gently with water to moisten the top layer. Chive seeds typically germinate in 7–14 days.
If using seedlings or divisions:
Gently transplant the seedling into the center of the soil. Pat the soil around the base to hold it in place, and water lightly to help the plant settle in.
Place your planter in a sunny spot that gets at least 5–6 hours of light per day. A south-facing window or well-lit balcony is ideal.
Step 4: Watering and Light Needs
Chives enjoy moist soil, but not soggy conditions. Water whenever the top inch of soil feels dry. Use a spray bottle for delicate seedlings and a small watering can for mature plants. Ensure that water can freely drain from the bottom of the bottle.
If your home doesn’t get much sunlight, consider using a grow light for a few hours each day to support healthy growth.
Step 5: Maintenance and Growth Tips
Chives are relatively low-maintenance. Once they’re about 4 inches tall, you can begin trimming the leaves to encourage new growth. They also grow back quickly after harvesting.
You can feed your chive plants with a diluted liquid organic fertilizer once every 3–4 weeks during the growing season. Avoid over-fertilizing, as this can cause the leaves to grow too quickly and become weak or flavorless.
Keep an eye out for pests like aphids, though chives are generally resistant to most garden pests due to their strong aroma.
Step 6: Harvesting Chives
You can begin harvesting once the chive leaves are about 6 inches tall. Use clean scissors to cut the leaves about 1–2 inches above the soil. Cutting too close to the base can damage new shoots.
Harvest only a third of the plant at a time to ensure continuous regrowth. The more you harvest chives, the more robustly they grow—making them one of the most productive herbs you can keep at home.
The leaves can be used fresh or chopped and frozen for later use. You can also dry them, though they lose some flavor during drying.
Creative Ideas for Bottle-Grown Chives
-
Hang multiple bottles vertically to create a mini herb wall.
-
Label each bottle with the planting date or herb type.
-
Use colorful string or decorate the bottles for a personalized kitchen garden.
-
Pair chives with other herbs like parsley, basil, or oregano in nearby bottles for a full indoor herb setup.
Conclusion
Growing and harvesting chives in plastic bottles is a smart, space-saving, and eco-friendly way to enjoy fresh herbs year-round. With just a few supplies and a bit of sunlight, you can turn everyday plastic waste into a productive mini herb garden. Whether placed on a windowsill or hung on a balcony, your bottle-grown chives will provide ongoing flavor, greenery, and satisfaction—all from a tiny space.


