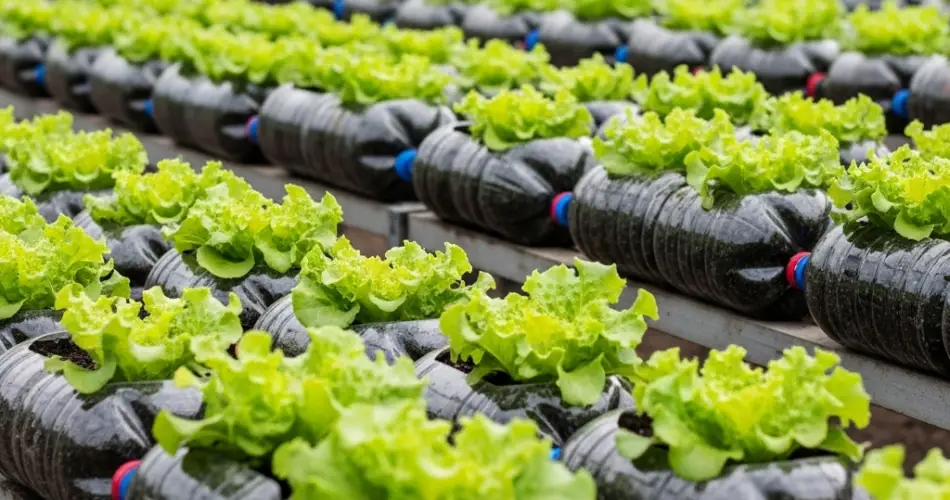
Recycling household waste into something useful not only helps the environment but also allows you to grow your own food affordably. One practical and sustainable way to do this is by turning old plastic bottles into mini lettuce farms. This method is perfect for small spaces and is especially beneficial for city dwellers, balcony gardeners, or anyone who wants to start growing leafy greens without needing a backyard or traditional pots.
With just a few simple materials and steps, you can grow crisp, fresh lettuce using old plastic bottles. Here’s how to do it while staying eco-conscious and frugal.
Why Use Plastic Bottles for Growing Lettuce?
Plastic bottles are one of the most common types of household waste. Instead of sending them to landfills or recycling centers, you can reuse them to grow plants like lettuce, which has shallow roots and doesn’t require deep containers. This reduces plastic waste and also saves you the cost of buying planters.
Lettuce is an ideal vegetable for beginners. It grows quickly, doesn’t require much maintenance, and thrives even in limited spaces. Combining lettuce growing with bottle gardening offers a double win for sustainability and food security.
Materials You’ll Need
-
1 empty 2-liter plastic bottle (or any size you prefer)
-
Potting mix (preferably organic or compost-rich)
-
Lettuce seeds (loose-leaf types like romaine, oakleaf, or butterhead)
-
A cutter or sharp knife
-
Nail or heated screwdriver (for making holes)
-
Watering can or spray bottle
Optional: A few small stones or charcoal pieces for added drainage.
Step 1: Prepare the Bottle
Begin by thoroughly washing the plastic bottle to remove any residue. Peel off any labels for a cleaner appearance.
Using a cutter, create a horizontal rectangular window along one side of the bottle, large enough to allow you to plant and water easily. Be careful not to cut too close to the bottom or top—leave about 2 inches of space on each end for stability.
Poke 4–5 drainage holes at the bottom of the bottle using a nail or screwdriver. This prevents water from pooling, which can lead to root rot.
Step 2: Improve Drainage (Optional but Helpful)
To enhance drainage and keep the soil well-aerated, place a layer of small stones or activated charcoal at the base of the bottle. This is particularly useful if you tend to overwater or if the potting mix is too dense.
Step 3: Fill with Soil
Add potting mix into the bottle, filling it just below the cut-out window. Use loose, fertile, and well-draining soil rich in organic matter. If you’re using regular garden soil, consider mixing it with compost or coco peat for better results.
Make sure the soil is evenly spread and not compacted. Lettuce roots prefer soft soil where they can spread easily.
Step 4: Sow Lettuce Seeds
Sprinkle the lettuce seeds evenly across the surface of the soil. Lightly press them in and cover them with a thin layer of soil—not more than 1/4 inch.
Water gently using a spray bottle or a watering can with a narrow spout. The soil should be moist but not soggy.
Step 5: Provide the Right Conditions
Place the bottle in a bright area where it gets indirect sunlight for at least 4–5 hours a day. Lettuce prefers cooler growing temperatures and doesn’t do well in strong, direct heat.
Keep the soil consistently moist. Because the bottle is small, it can dry out quickly, especially in hot weather. Monitor moisture daily and water as needed.
Step 6: Thin and Maintain
Once the seedlings appear and grow to about 2 inches tall, thin them out to give each plant space. Remove weaker seedlings and keep the healthiest ones spaced about 2 inches apart. This allows them to grow fuller and reduces competition for nutrients.
You can use organic compost tea or a diluted liquid fertilizer every two weeks if needed, though in most cases, a good potting mix will suffice for lettuce growth.
Step 7: Harvesting
Lettuce can be harvested in about 30 to 45 days after planting, depending on the variety and growing conditions.
Use the “cut and come again” method to harvest: snip off the outer leaves first, leaving the central growing tip intact. This allows the plant to continue producing new leaves for several weeks.
Alternatively, if you want a full harvest, cut the whole plant at the base when it reaches the desired size.
Additional Tips
-
Grow multiple bottles in succession by planting new seeds every 10–14 days to ensure a continuous harvest.
-
Avoid waterlogging by always checking for proper drainage.
-
Rotate the bottles occasionally if one side receives more light than the other, ensuring even growth.
-
Reuse the same bottle for multiple planting cycles—just refresh the soil or add compost between uses.
Conclusion
Eco-friendly lettuce farming with old plastic bottles is an accessible and sustainable gardening practice. It allows you to grow fresh, healthy greens while repurposing waste materials, reducing your environmental footprint. This method doesn’t require much space or effort, making it ideal for urban gardeners, beginners, and anyone looking to live more sustainably. With a few old bottles and some lettuce seeds, you can start your own mini farm right at home.