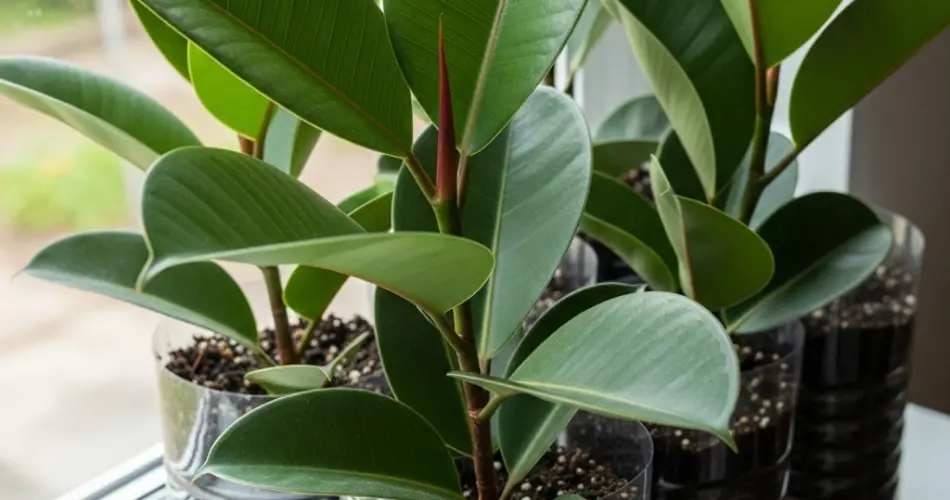
Rubber plants (Ficus elastica) are a favorite in indoor gardening thanks to their glossy, oversized leaves and low-maintenance nature. Whether you’re propagating a new plant or starting one from a nursery cutting, using recycled plastic bottles as pots is a creative and sustainable way to grow your rubber plant collection.
Instead of buying new containers, upcycling plastic bottles into plant pots is both cost-effective and environmentally friendly. It’s an excellent method for beginners or anyone looking to reduce plastic waste while adding some greenery to their living space. In this article, we’ll explore how to create DIY recycled bottle pots specifically for rubber plant starters and how to care for your new plant using this method.
Why Use Recycled Bottles for Rubber Plants?
Rubber plants can adapt to various indoor environments, and their moderate growth rate makes them ideal for compact, makeshift pots—especially in their early stages. Using recycled plastic bottles offers several advantages:
-
Eco-friendly: Reduces plastic waste and promotes sustainable gardening.
-
Affordable: No need to purchase separate seedling pots or containers.
-
Customizable: Bottles can be cut, painted, or decorated to suit your home’s aesthetic.
-
Practical: Transparent bottles allow you to monitor root development and soil moisture levels.
Materials You’ll Need
To create your own DIY recycled bottle pot for a rubber plant starter, gather these items:
-
1–2 liter plastic bottle (soda or water bottles work well)
-
A small rubber plant cutting or starter
-
Sharp scissors or utility knife
-
Well-draining potting mix (preferably a mix for indoor foliage plants)
-
Small pebbles or gravel (optional, for drainage)
-
Activated charcoal (optional, to prevent odor and mold)
-
Nail or hot pin (to poke drainage holes)
-
Decorative materials (optional, like twine or paint)
Step-by-Step Instructions
1. Cut the Bottle
Cut the bottle horizontally about one-third of the way down from the top. You will be using the bottom part as your planting container. Save the top section for another project or use it as a humidity dome during early propagation stages.
2. Make Drainage Holes
Use a nail, hot pin, or scissors to poke 4–5 holes in the bottom of the bottle. Proper drainage is essential for rubber plants, which don’t like to sit in waterlogged soil.
3. Create a Drainage Layer (Optional)
Add a thin layer of small pebbles or gravel to the bottom of the bottle to improve drainage. This can help prevent water buildup and root rot. You can also add a small amount of activated charcoal to absorb excess moisture and prevent odors or mold.
4. Prepare the Soil
Fill the bottle pot with a well-draining potting mix. A mix made for indoor foliage or one with peat, perlite, and a little compost works well. Rubber plants like moist but well-aerated soil that doesn’t become soggy.
Planting the Rubber Plant Starter
Whether you’re starting from a nursery seedling or a cutting, follow these steps:
-
For cuttings: Ensure the stem has at least one healthy leaf and a visible node (a bump where roots will grow). Let the cutting dry for a few hours to reduce the risk of rot before planting.
-
Planting: Make a hole in the soil and gently insert the cutting or seedling. Cover the base with soil, ensuring the plant stands upright and stable.
Water lightly and let excess water drain completely from the bottom of the bottle.
Placement and Lighting
Rubber plants prefer bright, indirect light. Place the bottle pot near a sunny window, but avoid direct sun that can scorch the leaves—especially since plastic bottles can magnify heat. If your space is low-light, consider placing the plant closer to a light source or rotating it occasionally to encourage even growth.
Watering and Maintenance
-
Water only when the top inch of soil feels dry. Overwatering is a common mistake with rubber plants.
-
Since bottles have limited soil volume, check moisture levels more frequently.
-
Avoid letting water pool at the base—if you don’t have a saucer, tip the bottle gently to drain excess water.
Rubber plants are relatively pest-resistant, but keep an eye out for common indoor pests like spider mites or scale. Wipe the leaves regularly with a damp cloth to remove dust and keep them glossy.
Fertilizing
Feed your rubber plant once a month during the growing season (spring and summer) with a balanced, water-soluble fertilizer. Skip fertilizing in fall and winter when growth slows down.
Transplanting to a Larger Pot
As your rubber plant outgrows its bottle pot, you’ll need to repot it. Signs it’s time to transplant include:
-
Roots growing out of the drainage holes
-
The plant becoming top-heavy or unstable
-
Soil drying out too quickly
Move it into a slightly larger pot with fresh soil to encourage continued healthy growth.
Decorating Your Bottle Pot
You can turn your recycled bottle into a charming planter with a little creativity:
-
Paint the exterior with plant-safe acrylic paint
-
Wrap it in jute twine or fabric for a rustic look
-
Add a name tag or care label for a personal touch
-
Create a set of bottle planters for a windowsill garden
Final Thoughts
Using recycled bottles to grow rubber plant starters is a smart, sustainable choice that combines gardening with eco-conscious living. Not only does this method cut down on waste, but it also makes plant care more accessible and affordable. With proper care, your rubber plant will thrive in its DIY container and eventually become a striking addition to your indoor garden.
This approach proves that with a little creativity, even plastic waste can be transformed into something green, beautiful, and beneficial for both your home and the planet.


