Rubber plants (Ficus elastica) are bold, glossy, and elegant—making them a favorite choice for adding greenery and structure to indoor spaces. Known for their deep green (or sometimes variegated) leaves and upright growth, rubber plants thrive in containers and are surprisingly low-maintenance once established. While they are typically grown in large pots, you can creatively grow young rubber plants in upcycled plastic bottles. This method is not only space-saving but also a sustainable way to practice indoor gardening.
Bottle gardening with rubber plants is perfect for small apartments, desks, windowsills, or minimalist interiors. With a few simple tools and some basic plant care, you can transform a discarded bottle into a stylish planter and grow a healthy, thriving rubber plant right at home.
Why Choose Rubber Plants for Bottle Gardening?
Rubber plants are robust and adaptable. Their relatively slow growth, thick stems, and tolerance for low humidity make them suitable for unconventional containers like plastic bottles—especially during early growth stages.
Advantages of growing rubber plants in plastic bottles:
-
Sustainable: Recycles plastic waste into something useful and beautiful
-
Affordable: Saves money on buying planters
-
Customizable: Bottles can be decorated to match your home style
-
Compact: Ideal for rooting cuttings or growing juvenile plants
-
Educational: Transparent bottles let you observe root growth and water levels
While mature rubber plants will eventually need to be transferred into larger pots, bottles are great for propagation and initial growth.
Materials You’ll Need
Before starting your bottle gardening project, gather the following supplies:
-
A healthy rubber plant cutting or young plant
-
A clean plastic bottle (1.5 to 2 liters)
-
Sharp scissors or utility knife
-
High-quality potting mix (or clean water for rooting)
-
Small stones or pebbles (for drainage)
-
Activated charcoal (optional, for odor control)
-
Optional: cotton wick (for self-watering setup)
-
Decorative supplies (jute, paint, fabric, etc.)
Preparing the Bottle Planter
1. Cut the Bottle
Cut the plastic bottle about one-third from the top. The bottom section will serve as your planter. If you’d like a self-watering system, invert the top part into the bottom like a funnel and thread a cotton wick through the cap.
2. Add a Drainage Layer (for soil-based method)
If growing in soil, place small pebbles or gravel at the bottom of the bottle to prevent water from pooling at the roots. You can also add a layer of activated charcoal to keep the soil fresh and discourage mold or odor.
3. Clean and Dry
Ensure your bottle is thoroughly cleaned and completely dry before adding soil or water.
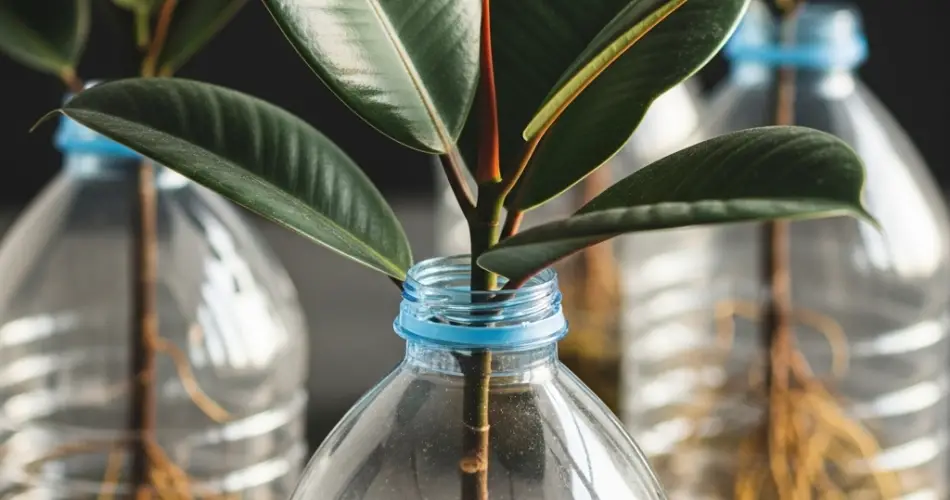
Growing from a Cutting: Water Propagation Method
Rubber plants can be propagated from stem cuttings placed in water.
Steps:
-
Take a 6–8 inch cutting with at least one node and one healthy leaf.
-
Let the cutting sit for a few hours so the cut end can callous over.
-
Fill your bottle with filtered or distilled water and insert the cutting with the node submerged.
-
Place the bottle in a bright, indirect light location.
-
Change the water every 5–7 days to keep it fresh and prevent rot.
Roots typically begin forming in 2–4 weeks. Once roots are 1–2 inches long, the cutting can be transferred to soil.
Planting in Soil: Bottle Garden Method
If starting with a rooted cutting or young plant, you can plant directly in soil.
Steps:
-
Add your drainage layer of stones or pebbles.
-
Fill the bottle two-thirds full with a well-draining potting mix. A good blend for rubber plants includes:
-
2 parts potting soil
-
1 part perlite or coarse sand
-
1 part coco coir or peat for moisture retention
-
-
Gently place the cutting or plant into the soil and fill around it.
-
Press the soil lightly to support the plant.
-
Water until the soil is evenly moist but not soggy.
Light and Temperature Requirements
Rubber plants thrive in bright, indirect sunlight. They can tolerate moderate light but won’t grow as quickly.
Tips:
-
Avoid direct midday sun, which can scorch the leaves.
-
Rotate the bottle occasionally for even growth.
-
Maintain indoor temperatures between 18°C to 26°C (65°F to 78°F).
Watering and Feeding
Watering:
-
Water when the top inch of soil feels dry.
-
Use a narrow spout to control watering in bottle planters.
-
Ensure excess water can drain or be wicked away.
Feeding:
-
Fertilize every 4–6 weeks during the growing season with a diluted houseplant fertilizer.
-
Do not fertilize in winter when the plant is dormant.
Styling Your Bottle Garden
Turn your recycled bottle into a stylish accent piece:
-
Wrap with jute or twine for a rustic look.
-
Paint the bottle in matte black, white, or earthy tones for a minimalist vibe.
-
Use macramé hangers or small stands for display.
-
Group several bottle planters together on a tray or windowsill for a lush effect.
Maintenance Tips
-
Wipe dust from the leaves with a damp cloth to help the plant breathe.
-
Trim any leggy or damaged growth.
-
If the plant becomes too large for the bottle, transplant it to a more spacious pot.
Conclusion
Bottle gardening with rubber plants is an excellent way to practice sustainability while adding elegance to your indoor space. With just a plastic bottle, a bit of soil or water, and a rubber plant cutting, you can create a stylish, low-maintenance indoor garden that brings nature into your home. Not only does this method reduce waste, but it also turns an everyday object into a chic planter—proving that gardening can be simple, affordable, and beautifully green.


