Dill (Anethum graveolens) is an aromatic herb best known for its feathery green leaves and distinctive flavor that enhances pickles, soups, fish, and salads. Easy to grow and fast to germinate, dill is a wonderful addition to any home herb garden. Even better, you don’t need a large space or expensive containers to cultivate it. With a little creativity and a recycled plastic bottle, you can create a compact, productive dill garden right at home.
Upcycling plastic bottles into planters is a smart, eco-conscious way to grow herbs in limited spaces. Whether you’re gardening on a balcony, windowsill, or countertop, this method provides a convenient and cost-effective way to enjoy fresh dill whenever you need it.
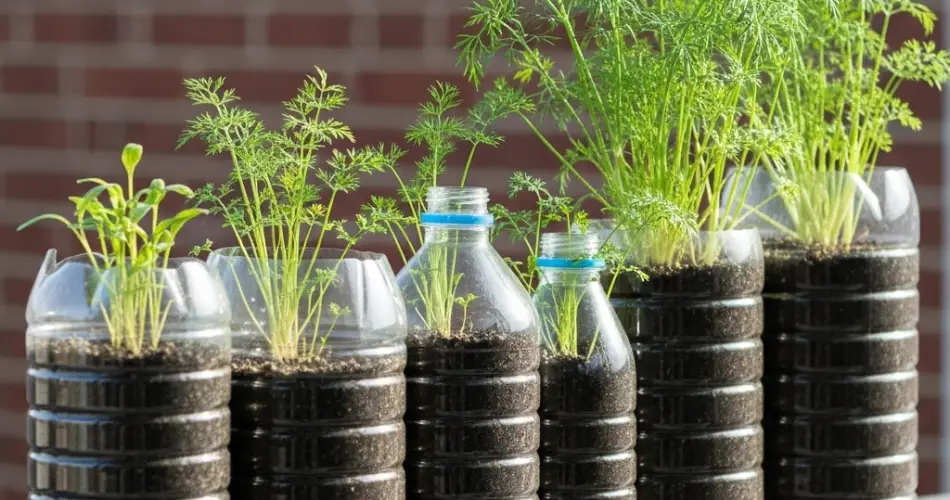
Why Use Plastic Bottles to Grow Dill?
Plastic bottles offer an excellent solution for growing herbs like dill, especially for gardeners working with limited space or a tight budget. Here’s why they’re ideal:
-
Eco-friendly: Reuses plastic that would otherwise contribute to waste.
-
Compact: Perfect for small apartments, balconies, and indoor gardens.
-
Cost-effective: No need to buy new pots—just repurpose what you already have.
-
Customizable: Easy to decorate or arrange vertically.
-
Great for dill’s root system: Dill has a long taproot, so a deep bottle can support healthy growth.
A well-designed bottle planter can provide all the conditions dill needs—sunlight, drainage, and space for its roots to grow freely.
Materials You’ll Need
To create your own DIY dill planter, gather the following:
-
1 clean plastic bottle (1.5 to 2-liter size)
-
Scissors or craft knife
-
Dill seeds
-
Lightweight potting mix (herb or vegetable blend)
-
Perlite or coarse sand (optional, for drainage)
-
Mesh, coffee filter, or breathable fabric (for lining)
-
Marker for cutting guide
-
Spray bottle or watering can
-
String or wire (optional for hanging)
Step-by-Step Guide
Step 1: Prepare the Bottle
Clean your plastic bottle thoroughly and remove the label. Once dry, use a marker to draw a line about one-third from the bottom. Cut carefully along this line with scissors or a craft knife.
You’ll be using the bottom portion of the bottle as the planter. If you prefer a horizontal layout (especially if you’re planting multiple seeds), you can cut a window on one side of the bottle instead.
Step 2: Create Drainage
Poke several small holes in the bottom of the bottle using a hot nail or skewer. This allows excess water to drain out, preventing root rot. Place a piece of mesh, coffee filter, or fabric over the holes inside the bottle to keep the soil from escaping.
Step 3: Mix and Add the Soil
Dill prefers light, well-draining soil. You can use regular potting mix with added perlite or coarse sand. A good mix might include:
-
2 parts potting soil
-
1 part perlite or sand
-
Optional: 1 part compost for nutrients
Fill the bottle planter with this soil mix, leaving about an inch of space at the top.
Step 4: Sow the Dill Seeds
Dill grows best when sown directly into the container because it doesn’t transplant well due to its long taproot.
-
Sprinkle 4–6 dill seeds evenly over the surface.
-
Gently press them into the soil or cover with a thin layer of soil (about ¼ inch).
-
Mist the surface with water to keep it moist.
Place your planter in a warm, sunny spot for germination. Dill seeds typically sprout within 7–14 days.
Step 5: Provide Ideal Growing Conditions
Light: Dill thrives in full sun, so place your bottle garden where it can receive at least 6 hours of sunlight daily. A sunny windowsill, balcony, or porch is ideal.
Watering: Keep the soil evenly moist but not waterlogged. Check the soil daily, especially if the planter is in direct sunlight, as bottle containers can dry out faster than traditional pots.
Thinning: Once the seedlings are about 2 inches tall, thin them by snipping weaker ones at the base. Leave the strongest 1–2 plants to grow with enough space between them.
Caring for Your Dill Plant
-
Fertilizing: Dill doesn’t require heavy feeding. A light application of diluted organic fertilizer once a month is enough.
-
Pruning: Snip off flower buds if you want to prolong leaf production. However, allowing some plants to flower can attract pollinators and provide seeds for next season.
-
Harvesting: Begin harvesting once the plant reaches about 6 inches in height. Use clean scissors to cut the leaves from the outer stems. Regular harvesting encourages new growth.
-
Support: As dill grows tall, it may benefit from a support stick, especially if grown in a windy area.
Creative Display Tips
Your DIY dill planter doesn’t need to be plain. Consider these fun ideas to make it attractive:
-
Paint the bottle in cheerful colors or natural tones.
-
Wrap it in twine or burlap for a rustic look.
-
Hang several bottle planters to create a vertical herb garden.
-
Label your planter with a wooden stick or chalk tag.
Final Thoughts
With a little time and creativity, you can transform an ordinary plastic bottle into a productive, attractive herb planter for fresh dill. This DIY project not only gives you a sustainable way to grow your own herbs, but also allows you to bring greenery into even the smallest living spaces.
Fresh, fragrant, and flavorful—your homegrown dill will add a burst of taste to your cooking while offering the satisfaction of sustainable gardening. All it takes is a bottle, some seeds, and a sunny spot to get started.


