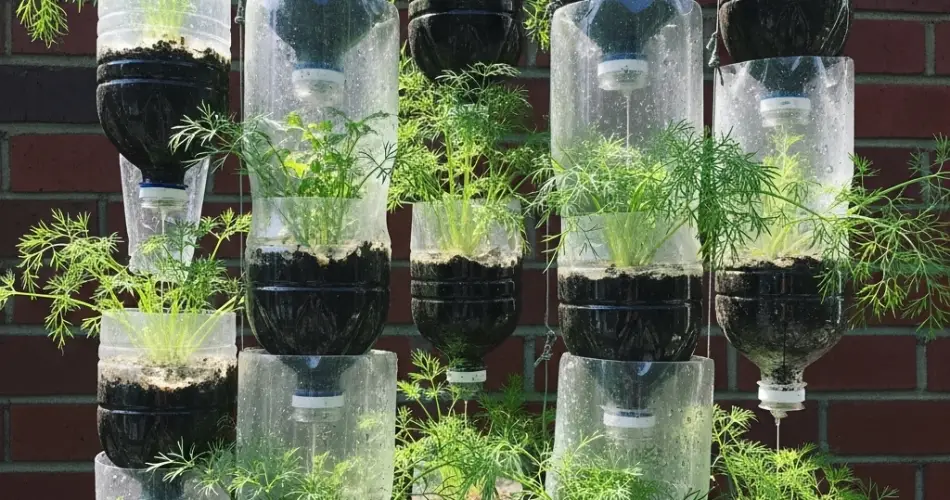
Dill is a delightful herb that adds a burst of flavor to soups, salads, fish dishes, and pickles. Known for its feathery leaves and aromatic seeds, dill is easy to grow, making it a great choice for both beginner and experienced gardeners. If you love cooking with fresh herbs but lack garden space, a vertical dill garden made from recycled bottles offers the perfect solution. This project not only provides a steady supply of fresh dill at your fingertips but also helps reduce plastic waste and adds a touch of greenery to your home.
Why Grow Dill on a Vertical Garden Wall?
Growing dill vertically comes with a host of benefits:
-
Space-saving – Perfect for small balconies, patios, or kitchen walls.
-
Eco-friendly – Repurposes plastic bottles that would otherwise end up in landfills.
-
Convenient harvesting – Fresh dill is always within easy reach for cooking.
-
Visually appealing – The feathery green foliage creates a lush, natural wall.
-
Better air circulation – Vertical placement reduces the risk of fungal diseases common in crowded ground plots.
Choosing the Right Dill Variety
For a compact vertical garden, look for dill varieties that adapt well to container growing:
-
Bouquet – Fast-growing and great for both leaves and seeds.
-
Fernleaf – Dwarf variety that fits perfectly in small planters.
-
Dukat – Has a sweeter flavor and thrives in containers.
These varieties are well-suited for confined spaces, ensuring your vertical garden remains tidy and productive.
Materials You’ll Need
-
6–10 clean 1.5–2 liter plastic bottles
-
Sharp scissors or utility knife
-
Drill or heated nail for drainage holes
-
Potting soil mixed with compost
-
Dill seeds or young seedlings
-
Rope, cable ties, or sturdy hooks for mounting
-
Wooden frame or wire mesh (optional)
-
Non-toxic paint for decorating bottles (optional)
Step 1: Prepare the Bottles
-
Wash thoroughly – Clean each bottle and remove any labels for a neat look.
-
Cut the openings – For upright planting, cut off the top third of each bottle. For side planting, cut a rectangular section along one side.
-
Add drainage holes – Drill or poke several holes in the base to prevent waterlogging.
-
Optional decoration – Painting the bottles with non-toxic paint can improve aesthetics and protect them from sun damage.
Step 2: Set Up Your Vertical Garden Structure
You can choose between two main methods:
Wall-mounted
-
Attach bottles directly to a sunny wall or fence using hooks, cable ties, or brackets.
-
Arrange them in a staggered pattern to ensure each plant gets sunlight and to prevent excess water from dripping directly onto lower plants.
Framed structure
-
Secure bottles to a freestanding wooden frame or wire mesh.
-
This allows you to move your vertical garden to different spots if needed.
Step 3: Prepare the Soil
Dill thrives in light, well-draining soil. Mix together:
-
2 parts high-quality potting mix
-
1 part compost for nutrients
-
A small amount of sand or perlite to improve drainage
Avoid heavy clay soil, which can cause water to pool and damage the roots.
Step 4: Planting Your Dill
From seeds:
-
Fill bottles with soil, leaving 3–4 cm at the top.
-
Sprinkle 3–5 dill seeds evenly over the surface and lightly cover with soil.
-
Water gently until the soil is moist.
From seedlings:
-
Make a small hole in the soil large enough for the seedling’s roots.
-
Place the plant in and fill in with soil.
-
Press lightly around the base and water.
Step 5: Care and Maintenance
-
Sunlight – Dill needs at least 6 hours of direct sunlight daily. Place your vertical garden where it can get full sun exposure.
-
Watering – Keep the soil consistently moist but not waterlogged. Check regularly since containers can dry out faster than ground soil.
-
Thinning – If seedlings grow too close together, thin them to about 20 cm apart for better air circulation.
-
Fertilizing – Use a balanced liquid fertilizer once every 4–6 weeks to promote healthy growth.
Step 6: Harvesting Your Dill
You can start harvesting dill leaves about 6–8 weeks after planting. Snip leaves from the top to encourage bushier growth. If you want seeds for pickling or future planting, allow some flower heads to mature fully and dry before collecting them.
For best flavor, harvest leaves in the morning after the dew has dried but before the sun gets too hot.
Step 7: Extending the Season
Dill is an annual herb, but you can extend your harvest by planting seeds in stages every 3–4 weeks. This way, you’ll always have fresh plants growing even as older ones finish their cycle.
A Green and Practical Addition to Your Home
Creating a dill garden wall from recycled bottles is more than just a clever gardening hack—it’s a sustainable, space-efficient, and visually appealing way to grow fresh herbs at home. You’ll reduce plastic waste, save garden space, and always have fresh dill ready to enhance your favorite dishes.
With a little planning, you can enjoy fragrant, flavorful dill from your own vertical garden all season long.