Dill is a fragrant, feathery herb known for its bright flavor and culinary versatility. From pickles and salads to fish dishes and sauces, dill adds a fresh, slightly tangy note that enhances many recipes. Fortunately, it’s also an easy herb to grow at home. With just a wooden crate, a bit of soil, and a sunny spot, you can start your own dill garden and enjoy fresh sprigs whenever you need them.
Crate gardening is perfect for herbs like dill. It’s ideal for small outdoor spaces such as balconies, patios, or backyards and offers a neat, portable growing solution. A crate adds rustic charm to your herb garden while keeping everything organized and accessible.
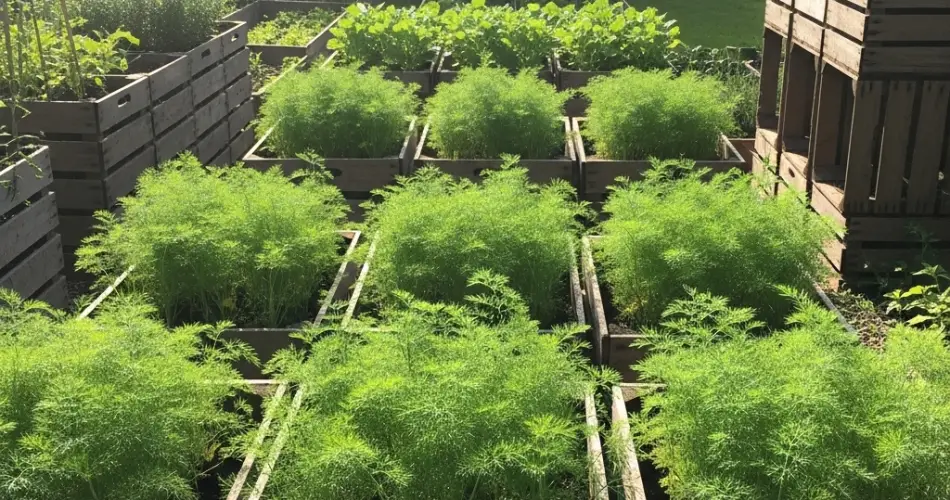
Why Grow Dill in Crates?
Dill thrives in containers, and wooden crates provide just the right balance of air circulation and drainage. These crates allow the roots to breathe while preventing water from pooling, which is crucial for avoiding rot and mildew.
Crates are also portable, making it easy to move your dill garden into the sun or away from heavy winds or rain. Their shallow depth and flexible design make them ideal for growing herbs with relatively short root systems like dill.
Plus, crate gardens are a fun and attractive DIY project. You can customize the size and shape of the crate to suit your space, and repurposed crates give a natural, vintage aesthetic to your garden area.
Choosing the Right Dill Variety
There are a few common dill varieties to consider for your crate garden:
-
Bouquet Dill: Fast-growing with aromatic leaves and large flower heads, perfect for both cooking and pickling.
-
Fernleaf Dill: A dwarf variety ideal for containers, growing compactly while producing flavorful leaves.
-
Mammoth Dill: Taller and more robust, better suited for larger crates or outdoor beds.
If your space is limited, Fernleaf is a reliable choice. For larger crates, Bouquet and Mammoth dill varieties offer higher yields and larger plants.
Materials You’ll Need
Here’s what you’ll need to set up your crate dill garden:
-
A wooden crate (preferably untreated and with drainage slats or holes)
-
Landscape fabric or coconut fiber liner
-
Potting soil with good drainage
-
Organic compost
-
Dill seeds or seedlings
-
Small gravel or stones (optional, for extra drainage)
-
A trowel
-
Watering can or spray bottle
Setting Up the Crate
Begin by lining the inside of your crate with landscape fabric or coconut fiber. This keeps the soil in place while still allowing water to drain properly. If the crate doesn’t already have drainage slats, drill a few small holes at the bottom to prevent water buildup.
Add a thin layer of gravel or stones to the base for additional drainage (optional), then fill the crate with a blend of potting soil and compost. Dill prefers loose, well-draining soil with a slightly acidic to neutral pH (between 5.5 and 7.0).
Avoid heavy soils that retain too much moisture, as this can lead to root problems.
Planting Dill
Dill can be grown from seed or transplanted from seedlings, though it grows best when sown directly into its final location. Dill does not like to be moved once it starts growing due to its long taproot.
Sow seeds about 6 mm deep and 2.5 cm apart, covering lightly with soil. Keep the soil evenly moist until germination, which usually takes 7–14 days. Once seedlings emerge, thin them to about 15–20 cm apart to allow room for full growth.
If using seedlings, plant them gently and try not to disturb the root system. Space them as you would with direct-sown plants.
Light and Watering
Dill loves sunlight. Place your crate in a spot that receives at least 6 hours of full sun daily. In cooler climates, more sunlight is better. In hotter areas, providing some afternoon shade may help prevent early bolting.
Water consistently to keep the soil lightly moist, especially during early growth. Dill doesn’t like soggy soil but does need regular watering to develop lush leaves. Avoid letting the soil dry out completely.
Harvesting and Pruning
Dill leaves, or “dill weed,” can be harvested once the plant is about 20 cm tall. Use clean scissors to snip off outer stems, leaving the central growth intact so the plant can continue producing.
Frequent harvesting encourages more growth and delays flowering. However, once dill begins to flower, leaf production slows. The flower heads, while beautiful, signal the end of the leafy harvest, so it’s best to trim them early if your goal is to grow dill weed.
That said, dill flowers attract pollinators and can be harvested for seeds, which are also edible and commonly used in pickling.
Maintenance and Common Issues
Dill is generally low-maintenance, but it can attract pests like aphids or caterpillars. A gentle spray of water or neem oil can help manage infestations.
To avoid diseases like mildew, ensure good airflow by spacing plants properly and watering at the base rather than overhead.
In windy locations, tall dill plants may need support. Use small stakes to keep them upright without disturbing the roots.
Conclusion
A DIY crate garden is a charming and practical way to grow flavorful dill outdoors. With basic materials and a sunny spot, you can enjoy fresh, homegrown dill for cooking, pickling, and garnishing throughout the growing season. Whether you’re an experienced gardener or just starting out, growing dill in crates adds beauty, fragrance, and culinary freshness to your outdoor space—all from a compact, movable herb garden.


