Spicy, colorful, and full of flavor, chili peppers are a rewarding crop for home gardeners—especially when grown in small spaces using recycled materials. One of the easiest and most eco-friendly ways to grow chili peppers is by reusing old plastic bottles as planting containers. This DIY approach is perfect for balconies, windowsills, and patios, offering both space savings and sustainable gardening benefits.
Whether you’re a seasoned gardener or a beginner, turning household waste into productive chili pots is simple, affordable, and satisfying. With just a few steps, you can enjoy your own homegrown peppers straight from a bottle.
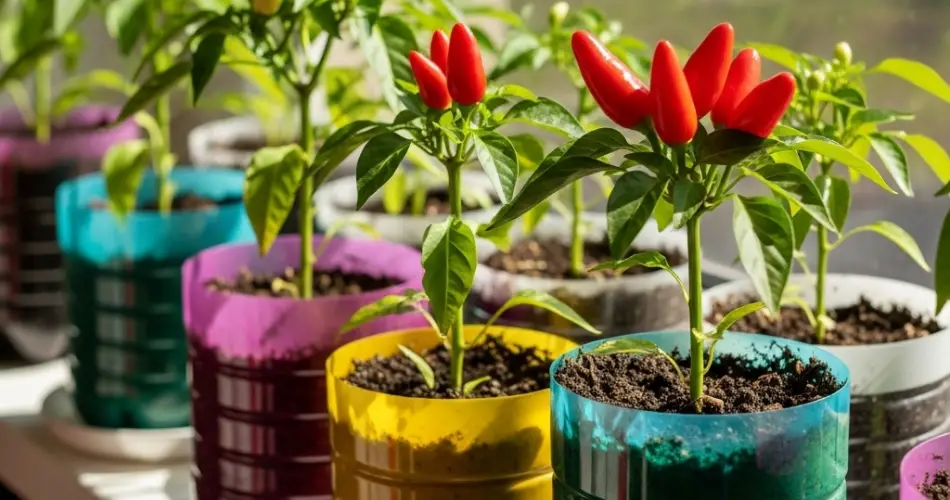
Why Grow Chili Peppers in Old Bottles?
Plastic bottles make surprisingly efficient containers for chili pepper plants. Here’s why:
-
They’re readily available and cost nothing.
-
They reduce waste by repurposing single-use plastics.
-
They fit well in tight spaces, such as balconies or kitchen windows.
-
They offer mobility, allowing you to move the plants for optimal sunlight.
-
They can be used vertically or horizontally, ideal for space-saving gardening.
Chili peppers are well-suited for container gardening due to their relatively compact root systems and their preference for warm, sunny conditions.
What You’ll Need
To set up your chili pepper pots, gather the following materials:
-
2-liter or 5-liter plastic bottles
-
A sharp knife or strong scissors
-
Drill or heated nail for drainage holes
-
Quality potting soil
-
Compost or organic fertilizer
-
Chili pepper seeds or seedlings
-
Watering can or spray bottle
-
Optional: dark cloth or paint to wrap clear bottles and block sunlight
Preparing the Bottles
-
Clean Thoroughly
Wash bottles inside and out, removing any labels and residues. -
Cut a Planting Window
On one side of the bottle, cut a rectangular flap wide enough to access the interior for soil and planting. -
Add Drainage Holes
Drill or melt several holes at the base to ensure excess water can escape. -
Wrap or Paint Bottles (Optional)
If your bottles are clear, consider painting them or wrapping them in dark fabric. This protects plant roots from direct sunlight and reduces algae growth. -
Position the Bottles
You can hang the bottles vertically, align them horizontally on shelves, or place them upright in a tray. Make sure each container will receive at least 6–8 hours of sunlight daily.
Choosing the Right Chili Variety
Most chili pepper plants grow well in containers, but some varieties are especially suited to small spaces. Consider:
-
Thai Chili – compact and highly productive
-
Cayenne – long, slender fruits and good for drying
-
Jalapeño – great for salsas and pickling
-
Bird’s Eye – fiery and fast-growing
-
Numex Twilight – colorful and ornamental
Choose based on your space, spice preference, and growing conditions.
Soil and Fertilizer Needs
Chili peppers require well-draining, nutrient-rich soil for strong growth and fruit production.
Recommended soil mix:
-
50% quality potting mix
-
30% compost or worm castings
-
20% perlite or coarse sand for aeration
Pre-moisten the soil before planting to help roots settle in well.
Planting Your Chili Peppers
-
Fill the Bottle
Add the prepared soil, filling the bottle to about 2 inches below the cut window or top opening. -
Sow Seeds or Transplant Seedlings
-
Seeds: Sow 1–2 seeds ¼ inch deep. Keep moist and warm until germination (typically 7–14 days).
-
Seedlings: Dig a small hole, insert the plant, and press the soil gently around it.
-
-
Water Lightly
Water gently right after planting. Keep the soil evenly moist but never soggy. -
Place in Full Sun
Position the container in a spot where it gets at least 6 hours of direct sunlight per day.
Maintenance and Care
-
Watering: Check soil moisture regularly, especially in hot weather. Bottles can dry out faster than traditional pots.
-
Feeding: Once flowering begins, feed with compost tea or a diluted organic fertilizer every two weeks to support fruit development.
-
Support: Some pepper varieties benefit from a small stake or tie for support as they grow and produce heavy fruits.
-
Pest Control: Watch for aphids and whiteflies. Use neem oil or insecticidal soap if needed.
Harvesting Your Peppers
Depending on the variety, chili peppers are usually ready to harvest within 60 to 90 days. Peppers can be picked green or allowed to ripen to red, yellow, or orange for fuller flavor and heat.
Use scissors or shears to cut the fruit, leaving a small portion of the stem attached. Regular harvesting encourages more fruit production.
Reusing the Bottles
After the harvest, remove old plant material and refresh the soil. Bottles can be reused for another chili cycle or other crops like herbs, lettuce, or radishes. Rotate crops seasonally to maintain soil health and reduce disease risk.
A Simple, Spicy Balcony Garden
Creating a chili pepper garden using old plastic bottles is an easy, sustainable way to grow fresh produce at home—even in tight spaces. This DIY project helps reduce plastic waste while offering a steady supply of flavorful peppers. With the right care, sunlight, and a few basic materials, your homemade bottle garden can become a spicy, green success.


