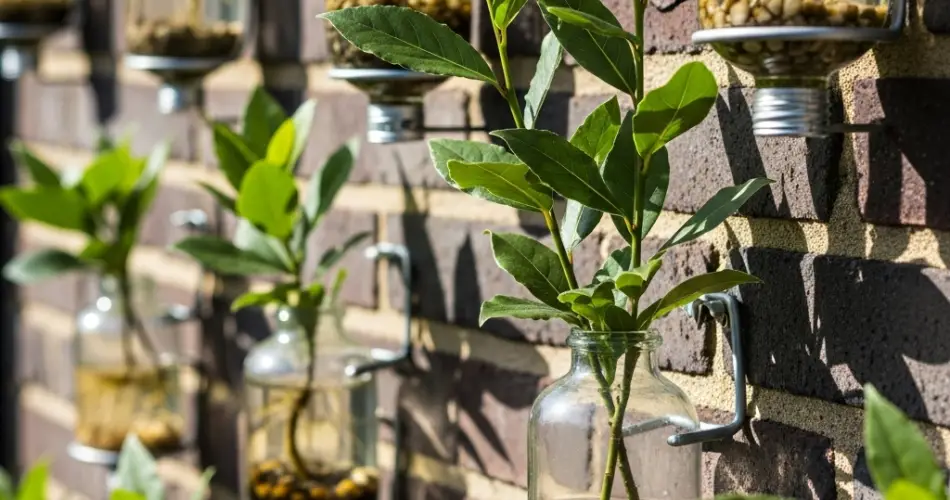
Bay laurel, also known as Laurus nobilis, is a classic culinary herb valued for its fragrant, evergreen leaves that flavor soups, stews, and sauces. Traditionally, bay laurel trees grow outdoors in Mediterranean climates, where they can reach impressive heights. However, with a little creativity, you can grow compact bay laurel plants even in small spaces using a DIY bottle wall garden.
This space-saving and eco-friendly method uses repurposed plastic bottles to create vertical planters, making it possible to grow bay laurel in apartments, kitchens, or balconies. By combining sustainability with practicality, you can enjoy fresh bay leaves year-round while adding greenery to your living space.
Why Choose Bay Laurel for a Bottle Wall Garden?
Bay laurel is an ideal choice for vertical bottle gardening for several reasons:
-
Compact Growth: When pruned regularly, bay laurel can be kept small and bushy, making it perfect for indoor or balcony gardens.
-
Evergreen Herb: Unlike many herbs that die back in winter, bay laurel provides fresh leaves throughout the year.
-
Culinary Essential: Its aromatic leaves enhance a wide variety of dishes, making it a valuable addition to any kitchen garden.
-
Decorative Plant: Its glossy, dark green leaves add elegance and structure to vertical garden designs.
Materials You’ll Need
Creating a bottle wall garden doesn’t require expensive supplies. Gather the following materials to get started:
-
1.5- or 2-liter plastic bottles (as many as needed for your design)
-
Scissors or a craft knife
-
A wooden pallet, metal grid, or sturdy wall frame
-
Strong string, zip ties, or nails for mounting
-
Potting mix (rich, well-draining soil with added compost)
-
Bay laurel seedlings or small cuttings
-
A watering can or spray bottle
Step-by-Step Guide to Creating Your Bottle Wall Garden
1. Prepare the Bottles
Cut each plastic bottle to create an opening large enough to plant in. You can cut horizontally across the side for a pocket-style planter or remove the top for a simple upright container. Puncture small drainage holes at the bottom to prevent water from pooling.
2. Arrange the Bottles
Decide on your wall garden layout. Attach bottles vertically on a frame, staggered like bricks, to ensure each plant receives light and water. Use zip ties or nails to secure the bottles firmly in place.
3. Fill with Soil
Mix equal parts potting soil and compost with a handful of perlite or coarse sand to ensure good drainage. Bay laurel prefers soil that holds some moisture but does not stay soggy. Fill each bottle about three-quarters full.
4. Planting Bay Laurel
Place a small bay laurel seedling or cutting into the bottle, covering the roots well. If using cuttings, make sure they are semi-hardwood stems and dip them in rooting hormone before planting for better success.
5. Position Your Wall Garden
Bay laurel thrives in bright light, ideally with at least 6 hours of direct or strong indirect sunlight. A sunny balcony wall or an indoor spot near a south-facing window is ideal. If light is limited, supplement with grow lights to encourage healthy growth.
Caring for Bottle-Grown Bay Laurel
Bay laurel is relatively low-maintenance but requires consistent care to thrive in compact bottle planters.
-
Watering: Keep the soil lightly moist, watering when the top inch feels dry. Avoid overwatering, as limited drainage in bottles can lead to root rot.
-
Fertilizing: Feed plants every 4–6 weeks with a balanced liquid fertilizer or organic options like compost tea.
-
Pruning: Regular pruning keeps bay laurel compact and encourages bushy growth. Snip young leaves for cooking and trim back any long, woody stems.
-
Pest Management: Indoors, bay laurel is generally resistant to pests, but watch for scale insects or aphids. Wipe leaves with a damp cloth or use a mild soap spray if needed.
Harvesting Bay Leaves
You can begin harvesting once the plant is established and producing mature leaves. Pick older, darker leaves for the strongest flavor, while leaving younger leaves to continue growing. Fresh leaves can be used immediately, or dried for storage by hanging small bundles in a cool, dark place.
Advantages of a Bottle Wall Garden for Bay Laurel
Growing bay laurel in a bottle wall garden comes with several unique benefits:
-
Space Efficiency: Vertical gardens use wall space instead of floor area, perfect for small homes.
-
Eco-Friendly: Repurposing plastic bottles reduces waste and promotes sustainable living.
-
Aesthetic Appeal: A wall of glossy green bay laurel adds both beauty and function to kitchens, balconies, or patios.
-
Convenience: Having bay leaves within arm’s reach saves trips to the store and ensures fresher, more aromatic seasoning.
Final Thoughts
A DIY bottle wall garden is a creative way to grow compact bay laurel trees in limited space. This method combines sustainability with practicality, giving you access to fresh, flavorful leaves while reducing plastic waste. With minimal supplies and care, you can create a vertical herb garden that doubles as a decorative feature and a culinary resource.
Whether you live in a city apartment or simply want to maximize your gardening space, bay laurel in a bottle wall garden is a rewarding and eco-conscious project. In no time, you’ll have a thriving green wall that brings both beauty and flavor to your everyday meals.


