If you’re looking for a fun, eco-friendly way to grow fresh herbs at home, turning used plastic bottles into basil planters is a great solution. This DIY project is perfect for kitchen gardeners, urban dwellers with limited space, or anyone who wants to reduce waste while growing their own ingredients. Basil (Ocimum basilicum), a fragrant and flavorful herb, grows well in containers and thrives indoors or on sunny balconies, making it ideal for a recycled bottle planter.
This article will walk you through how to create your own basil herb garden using plastic bottles. With a few simple materials and steps, you can grow fresh basil right at home, even without a traditional garden.
Why Grow Basil in Plastic Bottles?
Plastic bottle planters are a creative and sustainable alternative to traditional pots. Here’s why they work so well for basil:
-
Recyclable and accessible: Plastic bottles are easy to find and repurpose.
-
Space-saving: Great for balconies, kitchen windows, or countertops.
-
Customizable: You can cut and design them to suit your space.
-
Affordable: No need to spend money on pots—just reuse what you already have.
-
Great drainage: Easy to modify for better water flow.
Basil, being a fast-growing and compact herb, adapts well to these improvised containers.
What You’ll Need
To get started with your DIY basil bottle planter, gather the following materials:
-
1 clean plastic bottle (1.5 or 2-liter size works best)
-
Sharp scissors or a craft knife
-
Potting mix (preferably for herbs or vegetables)
-
Basil seeds or young basil seedlings
-
A small piece of mesh or cloth (for drainage)
-
Spray paint or decorations (optional)
-
Water
-
Marker for marking cut lines
How to Make a Basil Planter from a Plastic Bottle
Step 1: Choose and Clean the Bottle
Select a plastic bottle that’s clear or slightly tinted. Wash it thoroughly to remove any residue, especially if it was previously used for soda or juice.
Step 2: Cut the Bottle
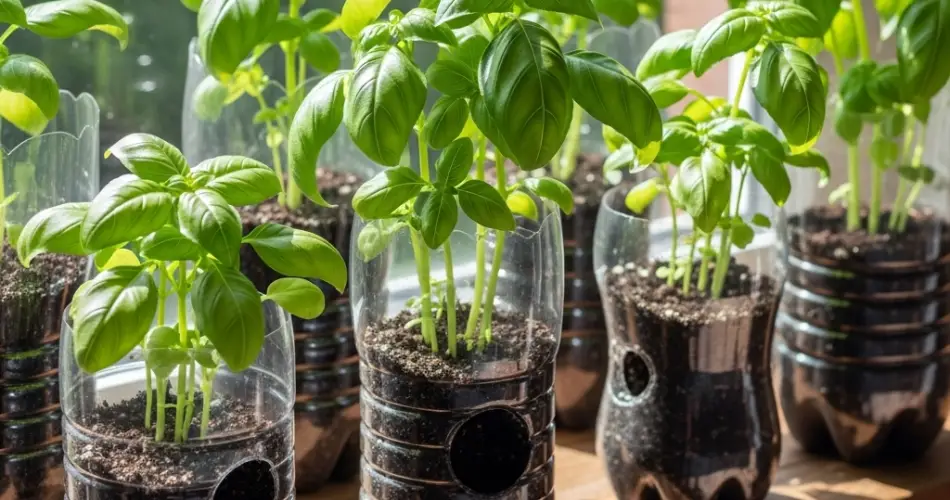
Use a marker to draw a horizontal line about one-third from the bottom of the bottle. Cut along the line using sharp scissors or a craft knife. You’ll be using the bottom section as your planter. You can discard the top or keep it to use as a water funnel or humidity dome.
Step 3: Add Drainage Holes
Poke a few small holes in the bottom of the bottle for drainage. You can use a heated needle, a small screwdriver, or a sharp blade. This step is essential to prevent soggy soil and root rot.
Step 4: Add a Mesh Layer
Place a small piece of mesh, a coffee filter, or cloth over the holes to prevent soil from washing out while still allowing water to drain.
Step 5: Fill with Potting Mix
Add fresh potting mix designed for herbs or vegetables. Basil prefers light, well-draining soil rich in organic matter. Leave about 1 inch of space at the top to avoid overflow when watering.
Step 6: Plant Basil Seeds or Seedlings
If using seeds, sprinkle a few over the surface and cover them lightly with a thin layer of soil. If planting seedlings, make a small hole and place the roots inside, gently patting the soil around the base.
Step 7: Water Lightly
Water gently until the soil is moist but not soaked. Use a spray bottle or pour slowly to avoid displacing the soil. Be careful not to overwater—your drainage holes should allow any excess to escape.
Basil Care Tips for Bottle Planters
Once planted, your basil will need a few basic conditions to grow well:
-
Light: Place the planter in a sunny spot where it receives at least 6 hours of light per day. A south-facing window or a well-lit balcony works well.
-
Watering: Keep the soil slightly moist. Water when the top inch feels dry. Bottles can dry out more quickly than larger pots, so check regularly.
-
Pruning: Once your basil grows a few sets of leaves, pinch off the top to encourage bushier growth. Regular harvesting actually helps the plant thrive.
-
Fertilizing: Feed lightly with a diluted organic fertilizer every 3–4 weeks if the soil mix doesn’t contain compost.
-
Airflow: Avoid overly humid, enclosed spaces to reduce the risk of fungal issues. Good air circulation helps keep the plant healthy.
Decorating Your Basil Bottle Planter
Your DIY basil planter can be both functional and decorative. Try these creative ideas:
-
Paint the outside with non-toxic paint or markers.
-
Wrap the bottle in twine or fabric for a rustic look.
-
Add labels or chalkboard stickers for easy herb identification.
-
Use multiple bottles to create a small vertical herb garden.
These personal touches make your recycled planters stylish additions to your home, balcony, or kitchen.
When to Repot or Replant
As basil grows, it may outgrow its plastic bottle planter. If the roots begin circling or the plant becomes too top-heavy, transfer it to a larger container with fresh soil. Alternatively, you can trim and propagate cuttings to start new plants in other bottles.
Final Thoughts
Turning plastic bottles into basil planters is a fun, sustainable way to bring fresh herbs into your home. It’s budget-friendly, easy to manage, and perfect for small spaces. With minimal materials and care, you can grow your own kitchen-ready basil while doing your part to reduce plastic waste.
Whether you’re new to gardening or just want to add more green to your space, a DIY basil bottle garden is a rewarding and practical project that benefits both you and the environment.


