Spider plants (Chlorophytum comosum) are among the easiest houseplants to propagate, thanks to their prolific production of baby offshoots, commonly known as spiderettes. These small plantlets form on long runners that arch away from the mother plant, making them perfect candidates for propagation. One of the most efficient and space-saving ways to root multiple spiderettes at once is by creating a propagation station using recycled plastic bottles.
This sustainable method transforms simple plastic waste into a functional and visually appealing propagation setup. Whether you’re a seasoned plant enthusiast or a beginner exploring indoor gardening, a bottle propagation station offers a low-cost, low-maintenance way to grow new spider plants for your home or to share with others.
Why Use Bottles for Spiderette Propagation?
Spiderettes are incredibly easy to root, often sprouting roots even before they’re detached from the mother plant. Water propagation is a popular method because it allows you to monitor root growth in real-time and reduces the risk of overwatering or rot that sometimes occurs in soil.
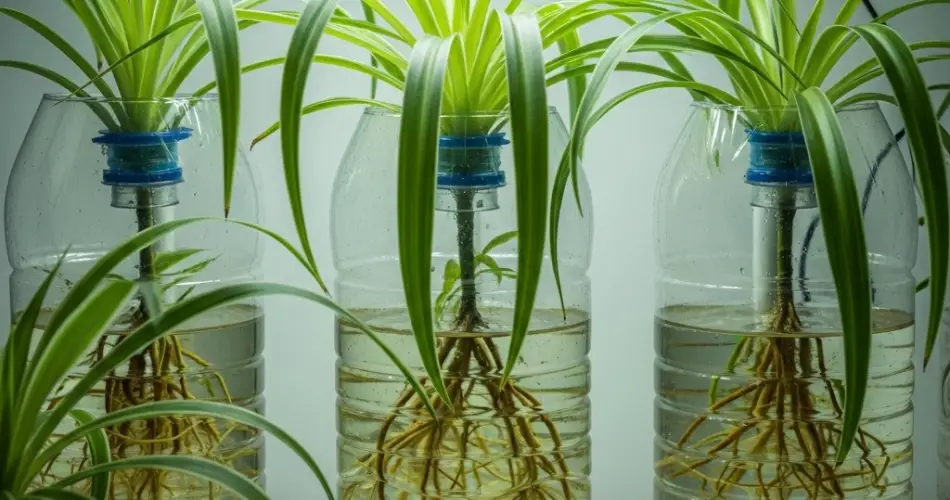
Plastic bottles are ideal for this purpose. They’re clear, allowing visibility of root development, and can be easily cut, shaped, and grouped to create a dedicated propagation station. Best of all, using recycled bottles helps reduce waste and gives a second life to everyday materials.
What You’ll Need
-
Several clean plastic bottles (500 ml to 1 liter in size)
-
Spiderettes with small root nubs (or full runners)
-
Scissors or craft knife
-
Water (filtered or dechlorinated preferred)
-
Twine, wire, or a shallow tray (for grouping bottles)
-
Optional: small labels, fabric wraps, or decorative elements
Preparing the Bottles
-
Clean and remove labels from each bottle.
-
Cut off the tops—about one-third of the way down. You’ll be using the bottom parts as small water vessels.
-
If you prefer, leave the bottle necks intact and poke holes in the caps to hold spiderette stems in place. This is especially useful for very small plantlets that need support.
-
Group bottles together in a shallow box, basket, or tray to keep them stable. You can also wrap them in jute or fabric to improve their appearance.
For a vertical option, try suspending bottles from a rack using string or wire and securing them with small hooks. This turns your propagation station into a hanging green feature.
Preparing the Spiderettes
Spiderettes can be propagated once they show tiny root nubs at the base. If they don’t have roots yet, you can still place them in water—they’ll usually begin rooting within days.
Steps:
-
Use clean scissors to snip spiderettes from the mother plant, cutting just below the base of the baby plant.
-
Remove any small leaves that might fall below the waterline to prevent rotting.
-
Rinse the base of each spiderette gently to remove any dirt or residue.
Setting Up the Propagation Station
Fill each bottle about halfway with clean, room-temperature water. Place one spiderette into each bottle, submerging just the root area. The leaves should remain above water to avoid decay.
Arrange your bottles in a bright spot that receives indirect light, such as near a window or under a grow light. Avoid direct sun exposure, which can heat the water and damage delicate roots.
If you’re using suspended bottles, ensure they’re evenly balanced and not swinging too much, as movement can disrupt root formation.
Care and Maintenance
To keep your propagation station clean and effective:
-
Change the water every 5–7 days to prevent algae and bacterial buildup.
-
Rinse the bottles and the base of the plantlets when changing the water.
-
Watch root growth: roots typically begin forming within a week and are ready for soil transfer after 2–3 inches of growth.
Labeling each bottle with the date of propagation helps you track progress and estimate when to transplant into soil.
Transplanting to Soil
Once spiderettes have developed strong roots (typically within 3–4 weeks), you can transplant them into small pots with well-draining indoor potting mix.
Steps:
-
Prepare a small pot with drainage holes.
-
Fill it with moist soil and create a small hole for the roots.
-
Gently place the spiderette into the hole and cover the roots.
-
Water lightly and place in a location with bright, indirect light.
Transplanted spiderettes may slow down slightly at first but will quickly begin to grow once established.
Styling and Expanding Your Propagation Station
A propagation station can be functional and beautiful. Try these styling ideas:
-
Use matching bottles for a uniform look.
-
Wrap bottles with washi tape, jute, or fabric for texture.
-
Place the station on a sunny shelf, windowsill, or even mount it on the wall.
Over time, you can rotate new spiderettes in, gifting rooted plants or expanding your indoor garden with multiple pots of thriving greenery.
A Green Project for Every Plant Lover
Creating a bottle propagation station for spiderettes is an easy, affordable, and eco-conscious way to multiply one of the most beloved houseplants. It not only encourages sustainable gardening practices but also provides a hands-on project that’s perfect for homes, schools, or even workplace desks. With minimal materials and a bit of care, you’ll soon have a collection of rooted spider plants ready to brighten your space—or share with others.


