Anthuriums, with their vibrant, heart-shaped spathes and deep green foliage, are among the most stunning tropical houseplants you can grow. They’re beloved for their long-lasting flowers, air-purifying properties, and their ability to thrive in indoor settings with the right care. While traditionally grown in soil, Anthuriums can also be grown hydroponically—especially in recycled plastic bottles.
Reusing plastic bottles as planters is a creative, sustainable way to display these exotic plants. Not only does this method help reduce waste, but it also adds a modern, minimalistic touch to your indoor garden. This guide walks you through how to grow Anthuriums in bottles, turning discarded containers into lush, decorative homes for your plants.
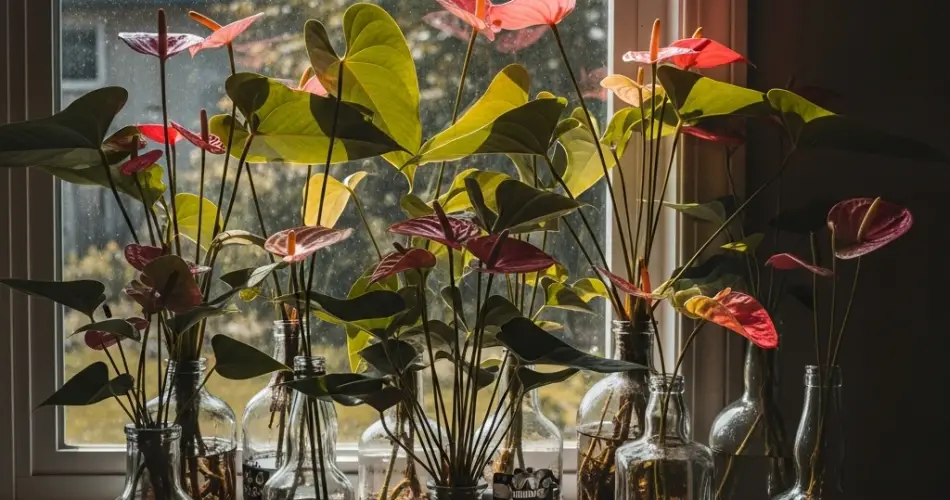
Why Use Bottles for Anthuriums?
Plastic bottles are more than just trash—they’re flexible, functional, and surprisingly stylish when repurposed creatively. Here’s why they work well for growing Anthuriums:
-
Eco-friendly: Reduces waste and cuts down on the need for store-bought planters.
-
Water-saving: When used as hydroponic containers, bottles make it easier to manage water use.
-
Root visibility: Transparent bottles let you observe root growth and water clarity.
-
Space-efficient: Great for small apartments, windowsills, and compact plant shelves.
-
Customizable: Bottles can be cut, painted, or wrapped to match any décor.
Anthuriums grown in water tend to grow slower but stay healthy and vibrant with proper care, making bottles a great hydroponic alternative to pots.
What You’ll Need
-
A healthy Anthurium plant or rooted cutting
-
A clean plastic bottle (1–2 liter size recommended)
-
Scissors or utility knife
-
Filtered or dechlorinated water
-
Optional: activated charcoal (to keep water clean)
-
Optional: decorative stones or pebbles
-
Bright, indirect light source
Step 1: Choose and Prepare Your Bottle
Select a clean plastic bottle based on the size of your plant. Bottles with wide necks or sturdy bases work best.
-
Cut the bottle about one-third from the top.
-
Smooth any sharp edges with sandpaper or a lighter flame.
-
For a more elegant look, wrap the bottle with rope, twine, or fabric, or paint the outside.
-
If using a larger plant, widen the opening to accommodate thicker roots or stems.
You can also invert the top part of the bottle into the base to create a simple support funnel—ideal for holding the plant above the water level while roots extend downward.
Step 2: Prepare the Anthurium
Choose an Anthurium with healthy roots or divide a mature plant. If removing from soil:
-
Gently shake off excess soil and rinse the roots clean.
-
Trim away any damaged or rotting roots with sterilized scissors.
-
Allow the plant to rest for a few hours to help it adjust before placing in water.
If using a cutting, make sure it has at least one node and a few aerial roots or healthy root potential.
Step 3: Set Up the Hydroponic System
-
Fill the bottom of the bottle with filtered, room-temperature water.
-
Optional: Add a pinch of activated charcoal to prevent algae and bacterial growth.
-
Insert the Anthurium into the top portion so the roots hang into the water while the base stays above the waterline.
-
Make sure no leaves are submerged to prevent rot.
Anthuriums don’t like to be overly wet, so ensure the plant is suspended with just the roots in water, not the crown.
Step 4: Find the Right Growing Spot
Place your bottle-grown Anthurium where it will receive:
-
Bright, indirect light (near an east- or north-facing window)
-
Consistent warmth between 65–80°F (18–27°C)
-
Moderate humidity, which mimics its natural tropical environment
Avoid placing the plant in direct sunlight, which can burn the leaves or cause the water to overheat.
Step 5: Maintenance and Ongoing Care
Anthuriums grown hydroponically are low-maintenance, but a regular routine is important:
-
Change the water every 7–10 days to keep it fresh and oxygenated.
-
Rinse the roots gently during each water change to remove buildup.
-
Top up water as needed to ensure roots remain submerged.
-
Wipe down the bottle periodically to keep algae at bay.
-
Trim off yellowing leaves or spent flowers to encourage new growth.
If your water is high in chlorine or minerals, allow it to sit overnight before use, or switch to distilled or rainwater.
Troubleshooting Tips
-
Drooping leaves: Could be from too little light or old water—refresh the water and move to a brighter spot.
-
Brown roots: Sign of rot. Remove damaged roots and restart in fresh water.
-
Slow growth: Anthuriums grow slowly in water. Supplement with a diluted liquid fertilizer once a month during spring and summer.
Styling Your Bottle Planter
-
Add smooth pebbles or colored glass stones to the bottom for extra flair.
-
Group several bottle-grown plants together on a tray for a mini indoor jungle.
-
Hang bottles in macramé holders or wall-mounted racks for vertical interest.
-
Label bottles if you’re growing different varieties or propagation stages.
The bottle planter can serve as both a propagation station and a long-term decorative container—especially when the setup complements your home’s style.
Final Thoughts
Growing Anthuriums in recycled plastic bottles is a clever way to blend sustainability with natural beauty. These elegant tropical plants adapt well to hydroponic conditions and, when paired with clear or decorated bottles, create eye-catching displays that brighten any room.
With minimal effort, you can transform a discarded bottle into a vibrant hydroponic planter that supports healthy plant life while reducing environmental impact. It’s a simple, lush, and eco-friendly idea that proves great design can begin with something as ordinary as a plastic bottle.


