Potatoes are one of the most satisfying crops to grow at home. Their versatility in the kitchen and high yield make them a favorite among gardeners. Even if you don’t have a backyard, potatoes can still thrive in small urban spaces. With the right techniques, container gardening allows you to grow fresh potatoes right on your balcony, providing a sustainable and space-saving harvest.
This guide covers everything you need to know about successfully growing potatoes in containers, from choosing the right pot to harvesting your own homegrown crop.
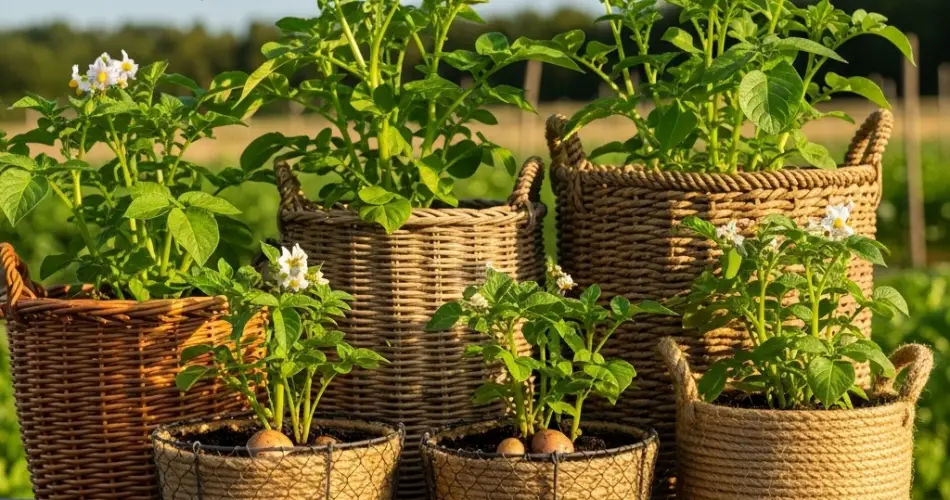
Choosing the Right Container
Potatoes grow underground, so selecting the right container is key to giving them room to develop. Look for containers that are:
-
At least 14–16 inches deep to accommodate root and tuber growth.
-
Wide enough to hold multiple seed potatoes. Buckets, grow bags, and woven baskets are excellent choices.
-
Equipped with drainage holes to prevent waterlogging, which can cause rot.
Grow bags are especially popular because they allow for good aeration and make harvesting easier, but any sturdy pot will work as long as it’s spacious.
Preparing the Soil Mix
Potatoes thrive in loose, well-draining soil that allows tubers to expand freely. A compact or heavy soil mix will hinder their growth and cause deformed potatoes. For best results, prepare a mix of:
-
High-quality potting soil as the main base.
-
Compost or aged manure to provide essential nutrients.
-
Sand, coco coir, or perlite to improve drainage and keep the soil light.
Aim for a slightly acidic soil with a pH between 5.5 and 6.5. This helps prevent diseases like scab and promotes healthy tuber development.
Choosing Seed Potatoes
While it may be tempting to plant store-bought potatoes, it’s best to use certified seed potatoes. These are disease-free and bred specifically for planting.
Cut larger seed potatoes into pieces, ensuring each piece has at least one or two eyes (buds). Let them dry for a day or two before planting to prevent rotting. Smaller seed potatoes can be planted whole.
Planting Potatoes in Containers
Once your container and soil are ready, planting is simple:
-
Fill the container one-third full with the soil mix.
-
Place seed potatoes on the soil surface, with the eyes facing upward. Space them about 6 inches apart.
-
Cover with 3–4 inches of soil.
-
Water gently to settle the soil.
As the plants grow, you will need to add more soil around the stems, a process known as “hilling.”
The Importance of Hilling
Hilling is essential in container potato gardening. When stems reach about 6–8 inches tall, add another 3–4 inches of soil, covering the lower stems and leaves. Continue this process every couple of weeks until the container is nearly full.
Hilling encourages more tubers to form along the buried stems, which increases yield. It also prevents sunlight from reaching the potatoes, which can turn them green and inedible.
Watering and Feeding
Potatoes grown in containers need consistent moisture but not waterlogging. Baskets and pots dry out faster than garden beds, so check soil frequently.
-
Water deeply 2–3 times a week, depending on weather.
-
Avoid overhead watering to reduce fungal problems.
-
Mulch the surface with straw or shredded leaves to retain moisture.
For feeding, apply a liquid fertilizer every two weeks. Choose one that is low in nitrogen but rich in phosphorus and potassium to support tuber development. Too much nitrogen will result in leafy growth instead of potatoes.
Sunlight Needs
Potatoes are sun-loving plants that require 6–8 hours of direct sunlight daily. Place your container in the sunniest spot on your balcony. If full sunlight is limited, choose early-maturing potato varieties, as they need less growing time.
Common Problems and Solutions
Growing potatoes in containers minimizes many pests and diseases, but a few issues can still arise:
-
Overwatering: Leads to root and tuber rot. Always ensure proper drainage.
-
Aphids and beetles: Inspect plants regularly and remove pests by hand or with insecticidal soap.
-
Yellowing leaves: May signal nutrient deficiency or natural aging of the plant. Feed with balanced fertilizer if occurring too early.
Harvesting Balcony Potatoes
One of the joys of potato gardening is harvest time. Depending on the variety, potatoes are ready in 70–120 days.
-
For new potatoes: Harvest when plants begin flowering. Gently dig near the soil surface and remove small, tender potatoes.
-
For mature potatoes: Wait until the foliage turns yellow and begins to die back. Dump the container or carefully dig through the soil to collect your harvest.
Freshly harvested potatoes should be dried for a few hours before storing. Keep them in a cool, dark, and well-ventilated place.
Continuous Harvesting
To enjoy potatoes year-round, stagger your plantings. Start with one container, then plant another a few weeks later. This ensures you always have a batch of potatoes at different growth stages, extending your harvest season.
Final Thoughts
Balcony potato gardening is both practical and rewarding. With the right container, soil mix, and care, even the smallest urban space can yield a generous supply of homegrown potatoes. Not only will you enjoy fresh produce, but you’ll also gain the satisfaction of cultivating your own food.
By following these easy care tips, you can transform your balcony into a productive potato patch and enjoy harvests season after season.


