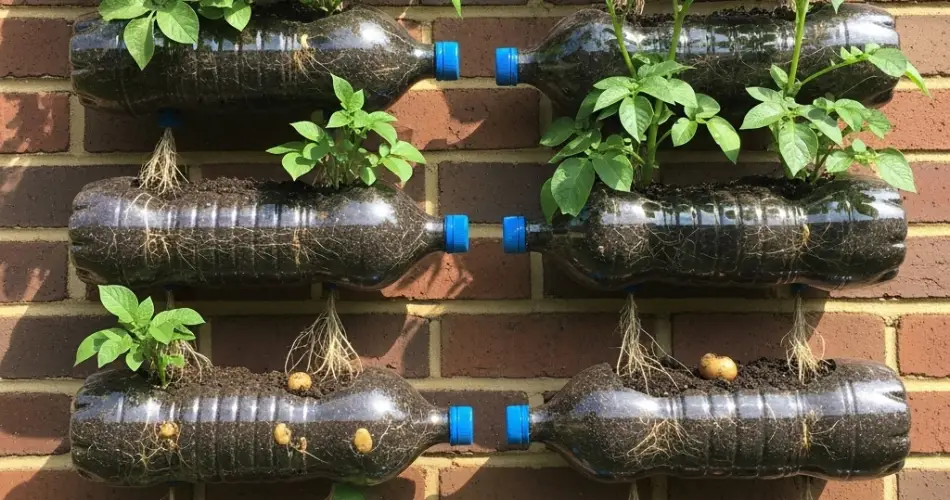
Potatoes are one of the most popular and versatile vegetables grown worldwide. Aside from planting whole tubers directly in soil, an effective and innovative method to propagate potato plants is through water propagation using bottles. This technique is simple, space-efficient, and ideal for gardeners looking to start potato plants indoors before transplanting them outdoors. Here’s a detailed guide on how to propagate potatoes in water using plastic bottles.
Why Propagate Potatoes in Water?
Water propagation offers several advantages. First, it allows you to observe the early root and shoot development of the potato, giving you more control over the growing conditions. Second, it saves space and uses recycled materials, making it eco-friendly. Finally, this method can speed up the process of growing healthy potato sprouts (also called “eyes”) ready for planting.
What You’ll Need
-
Clear plastic bottles (1 to 2 liters work well)
-
A sharp knife or scissors
-
Clean water
-
Healthy seed potatoes or potato pieces with eyes
-
Optional: toothpicks or small sticks
Step 1: Preparing the Bottle
Start by thoroughly cleaning the plastic bottle. Remove any labels so you can easily see inside. Next, cut the bottle horizontally about one-third from the bottom, creating two parts: the lower part will hold water, and the upper part can act as a cover or a mini-greenhouse if inverted.
Make several small holes around the bottle neck area to allow for airflow. If you want, you can insert toothpicks through the sides near the bottle’s neck to create a support ledge for the potato piece to rest on, preventing it from fully submerging.
Step 2: Preparing the Potato
Choose a healthy seed potato or a potato piece that has at least two or more “eyes” (small buds from which sprouts grow). If using a whole seed potato, no cutting is necessary. For larger potatoes, cut them into pieces ensuring each piece has an eye or two.
Allow the cut pieces to dry for a day or two to form a protective callus over the cut surfaces. This helps prevent rotting once placed in water.
Step 3: Positioning the Potato in the Bottle
Place the potato piece on the neck of the bottle, using toothpicks or the bottle rim to hold it partially submerged, with the bottom part of the potato touching the water. The eyes should face upward or sideways, as they will produce sprouts.
Fill the bottom section of the bottle with clean water, ensuring the water just touches the base of the potato without fully submerging it. Too much water can cause the potato to rot.
Step 4: Finding the Right Spot
Place the bottle in a warm, well-lit area but avoid direct sunlight, which may overheat the water and potato. A windowsill with indirect light is ideal. Maintain a room temperature between 18°C to 24°C (65°F to 75°F).
Step 5: Monitoring and Maintenance
Change the water every two to three days to prevent stagnation and bacterial growth. Observe the potato closely for signs of sprouting and root development. Within 1 to 2 weeks, you should see green shoots emerging from the eyes and roots growing into the water.
If the water level drops, refill as needed to keep the base of the potato moist.
Step 6: Transplanting
Once the sprouts have grown about 5 to 10 centimeters (2 to 4 inches) and roots are well developed, the potato plant is ready to be transplanted into soil. Gently remove the potato from the bottle and plant it in a container or garden bed with well-draining soil.
Cover the tuber with 2 to 3 inches of soil, leaving the sprouts above the surface. Water the soil thoroughly and continue to care for the plant as it grows, providing sunlight, water, and nutrients.
Benefits of Water Propagation for Potatoes
-
Early Growth Monitoring: Water propagation allows gardeners to see root and sprout development clearly before planting.
-
Reduced Disease Risk: Since the potato doesn’t stay in soil during initial sprouting, it lowers the chance of soil-borne diseases.
-
Space Efficiency: Using bottles is great for indoor or small-space gardening.
-
Recycling: Utilizing plastic bottles is an environmentally friendly way to propagate plants.
Tips for Success
-
Use organic or certified seed potatoes to reduce disease risks.
-
Avoid fully submerging the potato in water to prevent rot.
-
Keep the water fresh by changing it regularly.
-
Use clear bottles to monitor root growth but protect from direct sunlight to avoid overheating.
-
Once transplanted, gradually acclimate the plants to outdoor conditions to prevent shock.
Conclusion
Water propagation of potatoes in bottles is a practical and creative method for gardeners looking to start new potato plants indoors with minimal space and materials. It offers a clear view of early growth stages and can help ensure healthy plants before transplanting to soil. By following the simple steps of preparing bottles, positioning seed potatoes, maintaining water quality, and providing proper light and temperature, you can enjoy a successful potato growing experience from water propagation to harvest.


