Tips for Growing Peanuts on the Terrace: High-Yield Guide for Beginners
Peanuts are a delicious, protein-rich, and easy-to-grow crop that can thrive even in small spaces like a terrace. Many people assume peanuts require vast farmlands, but they can be successfully cultivated in pots, grow bags, or raised beds. By following the right techniques, beginners can achieve a high yield while enjoying the fun of home gardening.
This guide will walk you through the step-by-step process of growing peanuts on your terrace, from selecting seeds to harvesting a bountiful crop.
1. Why Grow Peanuts at Home?
Growing peanuts at home offers multiple benefits:
✅ High Yield in Small Spaces – Peanuts grow underground, allowing for efficient use of space. ✅ Easy to Grow – Requires minimal care compared to other crops. ✅ Drought-Tolerant – Can withstand dry conditions and requires less water. ✅ Nutritious & Versatile – High in protein, healthy fats, and vitamins. ✅ Fixes Nitrogen in Soil – Improves soil fertility, making it great for companion planting. ✅ Pesticide-Free – Homegrown peanuts ensure you get organic and chemical-free produce.
With proper care, you can harvest hundreds of peanuts from just a few plants!
2. Choosing the Right Peanut Variety
There are different types of peanuts to choose from, depending on your space and climate:
🌱 Runner Peanuts – High-yield variety, commonly used for peanut butter. 🌱 Virginia Peanuts – Large-sized peanuts, great for roasting. 🌱 Spanish Peanuts – Small nuts with a rich flavor, often used for snacks. 🌱 Valencia Peanuts – Sweet flavor, grows well in warmer climates.
For terrace gardening, Spanish or Valencia peanuts are ideal as they adapt well to container growth.
3. How to Grow Peanuts on the Terrace
Peanuts grow best in warm climates with at least 90–120 frost-free days. They need loose, well-drained soil to develop underground pods properly.
Step 1: Prepare the Soil and Container
🌿 Choose a large container (at least 12 inches deep) or a grow bag for better root expansion. 🌿 Use light, sandy, well-draining soil with a pH of 5.8–6.2. 🌿 Mix soil with organic compost and sand for aeration. 🌿 Ensure the pot has drainage holes to prevent waterlogging.
Step 2: Planting Peanut Seeds
🌱 Use raw, unprocessed peanuts (not roasted) or buy high-quality peanut seeds. 🌱 Remove peanuts from the shell but keep the skin intact. 🌱 Sow seeds 1–2 inches deep, spacing them 6 inches apart. 🌱 Water gently to moisten the soil.
Step 3: Germination and Early Growth
🌿 Seeds germinate within 5–10 days. 🌿 Keep soil moist but not soggy. 🌿 Once seedlings reach 4–6 inches tall, hill up soil around the base to encourage root expansion.
4. Caring for Peanut Plants
Watering
💧 Water moderately once or twice a week. 💧 Avoid overwatering, as peanuts are drought-tolerant. 💧 Reduce watering once flowers appear to encourage underground pod formation.
Fertilizing
🌿 Peanuts fix their own nitrogen, so they don’t require much fertilizer. 🌿 Apply a low-nitrogen, high-phosphorus fertilizer at flowering. 🌿 Use wood ash or compost tea to improve nutrient content.
Sunlight and Temperature
☀️ Peanuts need 6–8 hours of direct sunlight daily. ☀️ The ideal growing temperature is 70–85°F (21–29°C).
Mulching
🌱 Add a layer of straw or dried leaves to retain moisture and suppress weeds. 🌱 Mulching also prevents soil from hardening, making it easier for peanut pods to grow underground.
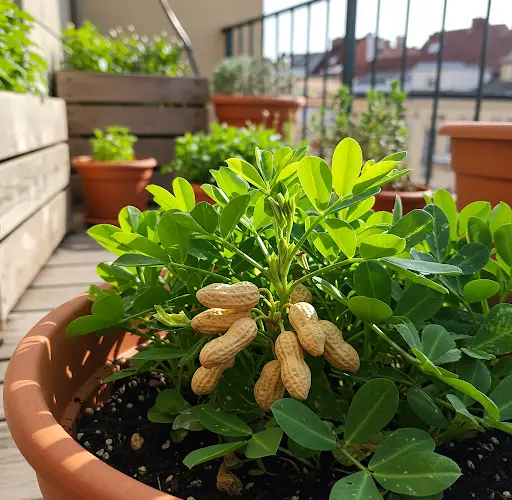
5. Flowering and Pegging: The Unique Peanut Growth Process
Peanuts have a unique growing process. After flowering, the plant develops “pegs”—stems that bend down and bury themselves in the soil, where peanuts form underground.
🔸 Ensure loose, soft soil for pegs to penetrate easily. 🔸 If growing in containers, add more soil or sand around the base to support pegging. 🔸 Reduce watering after pegging starts to prevent rot.
6. Harvesting Peanuts
Peanuts are ready to harvest in 90–120 days when the leaves start to yellow and dry out.
✔️ Gently loosen the soil with a hand fork. ✔️ Pull up the plant and shake off excess dirt. ✔️ Let peanuts air dry for 2–4 weeks in a shaded, dry place. ✔️ Shell and store in an airtight container or roast for snacking.
7. Common Problems and Solutions
Pests
🐛 Aphids – Spray with neem oil or use ladybugs as natural predators. 🐌 Slugs and Snails – Use eggshells or coffee grounds around the plants. 🐭 Rodents – Keep peanuts in raised containers to deter mice and squirrels.
Diseases
🍂 Leaf Spot & Fungal Issues – Avoid overhead watering, and apply copper-based fungicides. 🌱 Poor Pegging – Ensure soil is loose and well-draining.
8. Storing and Using Homegrown Peanuts
🥜 Store dried peanuts in sealed containers to prevent mold. 🥜 Roast for snacks, peanut butter, or cooking. 🥜 Use fresh peanuts for boiling or making peanut oil. 🥜 Leftover shells can be composted or used as mulch.
9. Conclusion: Start Growing Peanuts Today!
Growing peanuts on your terrace is fun, rewarding, and easy for beginners. With the right care, you can enjoy a high yield of fresh, organic peanuts without needing a large garden.
By following these simple steps, you can cultivate delicious, homegrown peanuts for snacking, cooking, or even making homemade peanut butter. So why not start today?
🌱🥜 Happy Peanut Gardening! 🥜🌱


