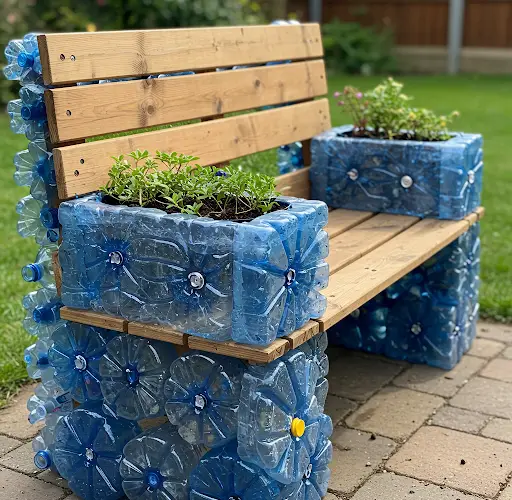
Recycling Plastic Bottles into a Garden Planter Bench: A Sustainable DIY Project
Recycling plastic bottles into a garden planter bench is an innovative, eco-friendly way to reduce waste while creating a functional and aesthetically pleasing piece for your outdoor space. This project not only helps the environment by repurposing plastic waste but also provides a sustainable gardening solution. Whether you have a small balcony or a spacious backyard, this DIY bench will add a unique touch to your garden while serving as both seating and a planter.
Why Choose a Plastic Bottle Garden Planter Bench?
- Eco-Friendly Solution: Plastic bottles are a major source of environmental pollution. By reusing them, you reduce landfill waste and contribute to sustainability.
- Cost-Effective: Instead of purchasing expensive outdoor furniture, this DIY project allows you to create a garden bench using materials you already have.
- Durable and Lightweight: When properly constructed, plastic bottles provide a strong yet lightweight structure that can support weight effectively.
- Customizable: You can personalize your bench with different designs, colors, and sizes to match your garden theme.
- Encourages Creativity: This project is a fun and engaging way to involve family members, especially children, in recycling and DIY craftsmanship.
Materials Needed
- Plastic bottles (at least 50-100, depending on bench size)
- Wooden planks or plywood (for the seating surface and base structure)
- Strong adhesive or cement
- Rope or plastic ties (for securing the bottles together)
- Paint and brushes (optional, for decoration)
- Drill and screws (for securing wooden components)
- Soil and plants (for the planter section)
- Waterproof fabric or plastic sheet (to prevent soil leakage)
Step-by-Step Guide to Creating Your Garden Planter Bench
Step 1: Collect and Prepare the Plastic Bottles
Gather plastic bottles of the same size and shape for consistency. Clean them thoroughly by rinsing them with water and removing any labels. Let them dry completely before use.
Step 2: Design and Structure Planning
Decide on the dimensions of your bench, keeping in mind the number of bottles required. Sketch a basic design outlining where the planter sections will be placed. The bench can be rectangular, L-shaped, or circular, depending on your preference.
Step 3: Assembling the Plastic Bottles
- Fill each plastic bottle with sand, soil, or air-tight crumpled plastic waste to make them sturdy and durable.
- Arrange the bottles in a row to form the base of the bench.
- Use strong adhesive, cement, or rope ties to secure them together in a solid structure.
- Stack multiple layers of bottles to achieve the desired height and stability.
Step 4: Securing the Wooden Seating Surface
- Cut wooden planks according to the bench size.
- Drill holes and use screws to attach the wooden seat to the top of the bottle structure.
- Ensure the seating surface is balanced and stable.
Step 5: Creating the Planter Section
- Identify the areas where you want to incorporate the planter.
- Use additional plastic bottles, cut in half, and attach them along the sides of the bench.
- Line the bottle planters with waterproof fabric or plastic sheets to prevent soil from spilling.
- Fill them with potting soil and plant flowers, herbs, or small shrubs.
Step 6: Decorating and Finishing Touches
- Paint the plastic bottles or wrap them in decorative fabric for an aesthetic look.
- Use waterproof paint to coat the wooden seat for weather resistance.
- Add cushions or padding for extra comfort.
- Surround the bench with additional plants or outdoor décor to enhance its visual appeal.
Maintenance Tips for a Long-Lasting Garden Planter Bench
- Check for Stability: Periodically inspect the structure to ensure that the bottles and wooden planks remain secure.
- Protect Against Weather Conditions: If placed outdoors, consider using a sealant on the wood to prevent weather damage.
- Water the Plants Regularly: Ensure the planter sections have proper drainage to avoid waterlogging.
- Replace Damaged Bottles: If any bottles show signs of wear or breakage, replace them promptly to maintain the bench’s integrity.
Additional Creative Ideas
- Modular Design: Create multiple small bench segments that can be rearranged as needed.
- Color Coordination: Use different colored bottles or paint them to match your garden theme.
- Integrated Lighting: Attach solar-powered LED lights around the bench for a charming nighttime ambiance.
- Hanging Planters: Add hooks to the sides to hang additional planters or decorative elements.
Conclusion
Recycling plastic bottles into a garden planter bench is a simple yet impactful way to contribute to environmental sustainability while enhancing your outdoor space. This DIY project is not only easy to make but also customizable, durable, and cost-effective. By repurposing plastic waste, you create a functional seating area that doubles as a beautiful planter, making your garden more eco-friendly and visually appealing. Get creative and start your own recycled bottle bench today!


