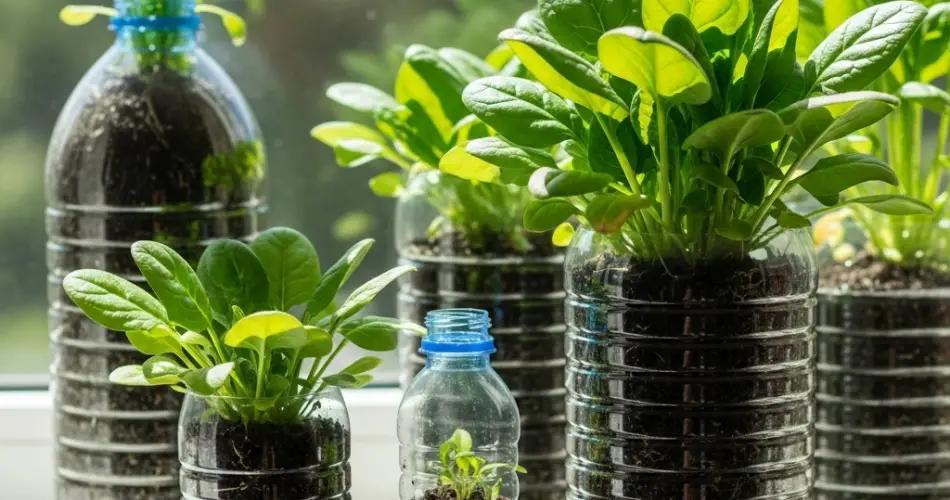
Don’t let limited space or lack of a garden stop you from growing your own leafy greens. With just a few plastic bottles and some spinach seeds, you can create a thriving mini-garden right at home. This low-cost, eco-friendly approach is perfect for beginners, apartment dwellers, or anyone looking to reuse plastic bottles in a meaningful way. Spinach, a fast-growing and nutrient-rich vegetable, is ideal for container gardening—especially in reused 2-liter bottles.
Here’s how to grow your own fresh spinach at home using nothing more than recycled plastic bottles and basic gardening tools.
Why Choose Plastic Bottles for Growing Spinach?
Plastic bottles are easy to find, lightweight, and perfectly sized for growing spinach, which has shallow roots. By reusing bottles instead of buying new pots or containers, you cut down on waste and reduce your environmental footprint.
Spinach is a great plant to grow in containers. It grows quickly, thrives in partial sun, and produces an abundance of healthy green leaves packed with iron, calcium, and vitamins. With the right setup, you can enjoy multiple harvests of fresh spinach even if you have very little space.
What You’ll Need:
-
Clean 2-liter plastic bottles
-
Sharp knife or cutter
-
Nail or screwdriver (for drainage holes)
-
Organic potting mix or compost-rich soil
-
Spinach seeds (baby leaf or compact varieties work best)
-
Watering can or spray bottle
Optional: Small stones or charcoal for drainage
Step 1: Cut and Prepare the Bottles
Thoroughly clean each plastic bottle and remove the labels. Then, use a cutter or sharp knife to cut a rectangular opening on the side of each bottle. This will be the planting area. Leave enough plastic around the edges to keep the structure stable.
Next, poke several drainage holes at the bottom of the bottle using a nail or heated screwdriver. These holes will allow excess water to drain and prevent root rot.
If you prefer, you can cut the top part of the bottle off and use the bottle upright, like a mini flowerpot.
Step 2: Add a Drainage Layer (Optional)
To improve drainage, place a few small stones or pieces of charcoal at the bottom of each bottle. This helps prevent the soil from becoming waterlogged and improves air circulation around the roots.
Step 3: Fill the Bottle with Soil
Fill the bottle with potting mix, leaving about 1 inch of space at the top to avoid soil overflow when watering. Use a well-draining, nutrient-rich soil that retains moisture but doesn’t become soggy. You can mix compost, garden soil, and a bit of coco peat or rice husks for better texture.
Step 4: Sow the Spinach Seeds
Sprinkle spinach seeds evenly over the surface of the soil. Cover them lightly with about 1/4 inch of soil and press gently to ensure good contact with the moist soil.
Water gently with a spray bottle or watering can. The soil should be damp but not waterlogged. Avoid overwatering, especially in the early stages.
Step 5: Place in the Right Location
Spinach thrives in cool, partially sunny areas. Place your bottle garden where it receives 4 to 6 hours of indirect sunlight daily. Avoid exposing the plants to intense afternoon sun, which can cause them to bolt (go to seed early).
Make sure the bottles are positioned upright and won’t tip over. You can place them on a windowsill, balcony ledge, or small table.
Step 6: Thin the Seedlings
Once the seedlings are a few inches tall and have 2–3 true leaves, it’s time to thin them out. Keep the strongest plants, spacing them about 2–3 inches apart. This gives each plant room to grow and access to enough nutrients, air, and light.
Use the thinned-out seedlings as microgreens in salads or sandwiches.
Step 7: Care and Maintenance
Water your spinach regularly to keep the soil evenly moist. Spinach doesn’t like dry soil but avoid letting water pool at the bottom. Check for drainage regularly.
Fertilizing is optional if you used compost-rich soil. But if your plants seem slow to grow, a light dose of organic liquid fertilizer every two weeks can help.
Remove yellowing leaves and check for pests such as aphids or caterpillars. Keeping the plants clean and well-maintained will result in a healthier harvest.
Step 8: Harvest Time
Spinach can be harvested in as little as 4 to 6 weeks after planting. For a continuous harvest, use the “cut-and-come-again” method: pick the outer leaves and let the center continue to grow.
If you prefer a full harvest, cut the plant at the base when the leaves are full-sized. You can replant new seeds in the same bottle after refreshing the soil with compost.
Bonus Tips
-
Stagger your plantings by sowing new seeds every 10–14 days for a non-stop harvest.
-
Move bottles to a cooler spot during hot months to prevent bolting.
-
Label your bottles with planting dates to keep track of growth cycles.
-
Reuse the same bottles for several growing cycles with occasional soil refreshment.
Conclusion
With a few simple steps and recycled materials, you can grow a lush supply of spinach right at home. Using plastic bottles not only saves space and money but also helps the environment by reducing waste. Whether you have a sunny balcony or just a kitchen window, this method makes it easy for anyone to enjoy fresh, homegrown spinach—anytime, anywhere.