Growing bean vines doesn’t have to require large garden beds or expensive equipment. With the help of recycled plastic bottles, you can propagate and nurture healthy bean plants even in the smallest spaces. This method is ideal for balconies, patios, or windowsills, and it makes use of materials that would otherwise end up as waste. It’s a simple, affordable, and eco-friendly way to produce fresh beans right at home.
Why Use Plastic Bottles for Bean Vine Propagation?
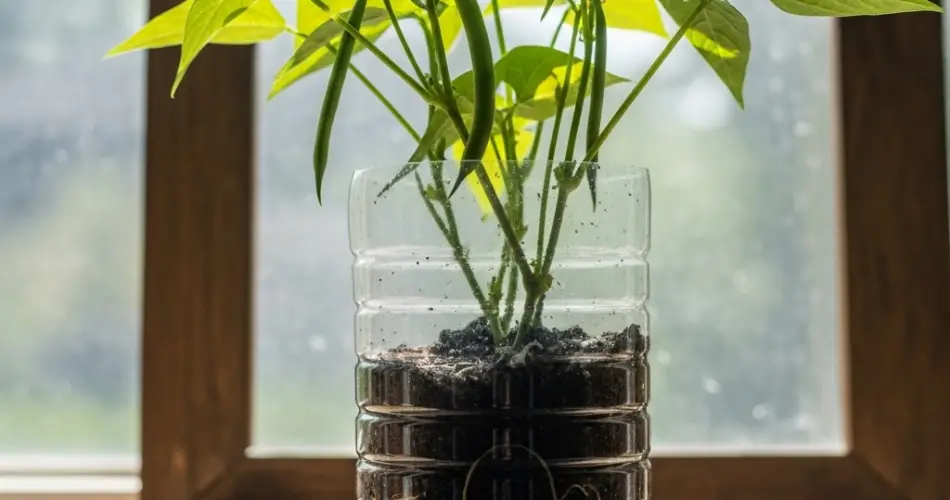
Plastic bottles serve as lightweight, portable containers that provide an excellent growing environment for young bean plants. They make it easy to control soil quality, monitor root growth, and manage water levels. Since beans are vigorous climbers, you can start them in bottles and later transfer them to larger pots, garden beds, or vertical trellises.
This method is also perfect for anyone who wants to garden without digging in the ground. Plus, it reduces plastic waste by repurposing bottles into productive plant containers.
Materials You’ll Need
-
1–2 liter plastic bottles
-
Bean seeds (choose pole beans or bush beans depending on your preference)
-
Potting soil rich in organic matter
-
A sharp knife or scissors
-
A small stake or stick (for initial vine support)
-
Optional: liquid organic fertilizer
Step-by-Step Bean Vine Bottle Propagation
1. Prepare the Bottles
Wash the bottles thoroughly to remove any residue. Cut them about one-third of the way from the top. You can either:
-
Keep the top as a removable cover to create a mini greenhouse effect during germination.
-
Or discard the top and use only the base as your planting pot.
Poke several small holes in the bottom for drainage. Without proper drainage, excess water can lead to root rot.
2. Choose and Prepare the Seeds
Select healthy bean seeds from a reliable source. You can speed up germination by soaking the seeds in room-temperature water for 4–6 hours before planting. This softens the seed coat and encourages quicker sprouting.
3. Fill the Bottles with Soil
Use high-quality potting soil mixed with compost or organic fertilizer. Beans grow best in loose, well-draining soil that retains enough moisture for their developing roots. Fill each bottle about three-quarters full, leaving space at the top for watering.
4. Plant the Seeds
Plant 2–3 seeds per bottle, spacing them slightly apart. Push each seed about 2–3 cm deep into the soil and gently cover it. Planting multiple seeds increases the chance of successful germination; you can thin out weaker seedlings later.
5. Water and Position
After planting, water the soil gently until it is evenly moist but not soggy. Place the bottles in a sunny spot—beans need at least 6–8 hours of sunlight per day for strong growth. A bright balcony, rooftop, or sunny windowsill works well.
Caring for Your Bean Seedlings
Maintain Moisture
Check the soil daily and water lightly whenever it begins to dry out. Avoid overwatering, as beans dislike waterlogged roots.
Provide Support
Once the seedlings are about 10–15 cm tall, insert a small stick or stake into the bottle. This gives the vines something to cling to as they grow. For pole beans, you can later transfer them to a larger container or garden space with a tall trellis.
Fertilize as Needed
Beans are light feeders, but a diluted liquid organic fertilizer every two weeks can encourage faster growth. Avoid excessive nitrogen, as it promotes leaf growth over bean production.
Thin the Seedlings
If all seeds germinate, choose the strongest plant and carefully snip the others at the base to prevent overcrowding.
Transplanting Bean Vines from Bottles
When the seedlings are strong and the weather is warm enough, you can transplant them to a larger container or directly into your garden. Here’s how:
-
Water the seedlings well to soften the soil.
-
Gently squeeze the sides of the bottle to loosen the root ball.
-
Carefully slide the plant out without breaking the roots.
-
Place it into a prepared planting hole and water thoroughly.
If you prefer, you can also keep them growing in large cut bottles for a compact garden setup—just be sure to provide ample climbing support.
Advantages of This Method
-
Space-saving: Ideal for small homes and urban areas.
-
Eco-friendly: Repurposes plastic waste into productive planters.
-
Controlled environment: Reduces the risk of pests and diseases early on.
-
Portable: Easy to move seedlings to optimal sunlight conditions.
Extra Tips for Success
-
Rotate the bottles every few days so the seedlings grow straight and evenly toward the light.
-
Keep bottles out of strong winds that can topple them over.
-
For a decorative touch, paint or wrap the bottles to make them more attractive while still leaving a window to see root development.
-
Start a few bottles every two weeks for a continuous harvest throughout the growing season.
By starting bean vines in plastic bottles, you not only give your plants the perfect head start but also contribute to reducing waste. This simple, cost-effective method makes it possible for anyone—regardless of space or resources—to enjoy fresh, homegrown beans. With just a few bottles, some seeds, and a little patience, you’ll have thriving vines that will reward you with bountiful harvests.


