Magical Salad Garden Straight from Recycled Plastic Bottles
With a little creativity and care, even the smallest space can be transformed into a lush garden. One of the most fun and eco-friendly ways to grow your own vegetables is by using recycled plastic bottles. This method doesn’t just reduce waste—it helps you grow your own salad greens at home, even if you don’t have a garden. Whether you’re living in an apartment or just want to use your vertical space more efficiently, a recycled plastic bottle garden is both magical and practical.
Why Use Plastic Bottles for Gardening?
Plastic bottles are readily available and easy to repurpose. Instead of throwing them away, they can become compact, water-efficient growing spaces that are ideal for shallow-rooted vegetables—like salad greens. Other benefits include:
-
Low cost: No need to buy fancy pots or containers.
-
Space-saving: Perfect for balconies, walls, windowsills, or hanging structures.
-
Customizable: Cut and arrange them in any shape or pattern.
-
Eco-friendly: A great way to reduce plastic waste and promote sustainability.
Ideal Salad Greens to Grow in Bottles
Many salad greens thrive in small containers. Here are a few that are perfect for bottle gardening:
-
Lettuce (romaine, butterhead, loose-leaf)
-
Arugula (rocket)
-
Spinach
-
Mustard greens
-
Pak choi
-
Kale (baby leaves)
-
Swiss chard
-
Watercress
You can even mix and match different varieties for a vibrant, flavorful, and nutritious harvest.
What You’ll Need
To set up your plastic bottle salad garden, gather the following items:
-
Empty plastic bottles (1.5–2 liters work best)
-
Scissors or a utility knife
-
Potting mix or vegetable-growing soil
-
Organic compost or natural fertilizer
-
Seeds or seedlings of your chosen greens
-
A sunny location (balcony, windowsill, or wall)
-
String, wire, or a rack for hanging (optional)
Step-by-Step Instructions
1. Prepare the Bottles
Wash the bottles thoroughly to remove any residue. Cut a rectangular window along the side of each bottle, leaving enough space to hold soil. Make 4–6 small drainage holes in the bottom of each bottle using a sharp tool or a heated nail.
If you plan to hang the bottles vertically, you can cut two holes near the top and thread string or wire through them for easy suspension.
2. Add Soil
Fill each bottle with potting mix mixed with organic compost. Avoid using garden soil alone—it may compact too much inside the bottle and restrict root growth.
Leave a 1–2 inch gap at the top to prevent water from overflowing during watering.
3. Plant Your Seeds or Seedlings
Sprinkle seeds across the surface and lightly press them into the soil. Cover with a thin layer of soil, depending on seed type. For seedlings, dig small holes and place them in gently.
Water lightly right after planting to settle the soil and activate germination.
4. Find the Right Location
Place your bottles where they’ll receive at least 4–6 hours of sunlight daily. South- or east-facing balconies, patios, or windows are perfect. If space is limited, try hanging the bottles vertically on a fence, trellis, or custom rack.
Caring for Your Salad Bottle Garden
Watering
Water daily or as needed, especially in hot weather. The soil in plastic bottles can dry out quickly, so check moisture levels often. If using small bottles, consider watering twice a day during dry seasons.
Feeding
Use organic liquid fertilizers like seaweed extract or compost tea every two weeks to boost growth and flavor.
Thinning
Once the seedlings sprout and grow a couple of inches, thin them out to give each plant space to grow. Use the thinned-out greens as microgreens in your first harvest.
Pest Control
Greens grown in containers tend to attract fewer pests. Still, check regularly for aphids or snails. If pests appear, spray gently with a homemade garlic or neem oil solution.
Harvesting Your Greens
Salad greens can be harvested in as little as 3–4 weeks, depending on the type. Use the “cut-and-come-again” method—snip the outer leaves while leaving the inner ones to grow. This allows continuous harvests for weeks.
If you plant in intervals every couple of weeks, you’ll have a steady supply of fresh greens throughout the season.
Creative Layout Ideas
-
Vertical towers: Stack bottles horizontally or vertically using ropes or frames.
-
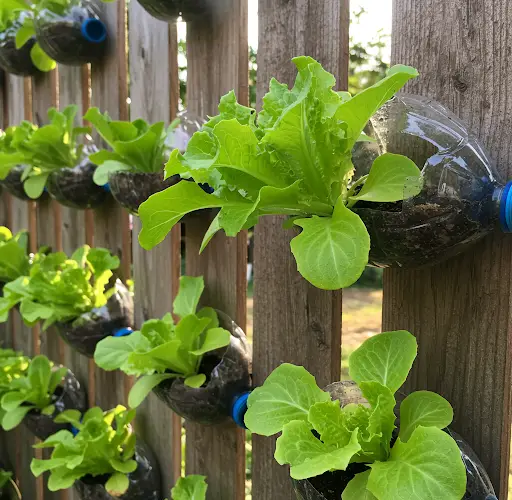
Wall garden: Attach bottles to a wooden pallet or wall in rows for a green backdrop.
-
Window garden: Hang bottles in a sunny window with string and suction cups.
-
Balcony railing: Tie or clamp bottles along the railing to maximize space.
These layouts are not only practical but visually appealing, bringing greenery into small urban spaces.
Conclusion
Growing a salad garden in recycled plastic bottles is a fantastic way to combine sustainability with healthy living. With just a few simple materials and a bit of sunlight, anyone can grow fresh, crisp greens at home—without needing a garden bed or much experience.
Whether you’re a beginner or a seasoned gardener, creating a magical bottle garden can be an inspiring, space-saving, and eco-conscious way to enjoy nature and fresh produce right where you live.


