Growing chili peppers on your balcony is not only a rewarding experience but also surprisingly easy and visually appealing. As someone who never imagined that a small space could be transformed into a thriving chili garden, I was amazed by how simple it was to grow chili peppers at home. The plants are not only productive but also offer a splash of color that brightens up any balcony, making it a unique and beautiful feature of your home.
If you’ve been considering growing your own chili peppers but don’t have a garden, your balcony is the perfect place to start. Here’s how I successfully grew chili peppers and enjoyed an abundant, colorful harvest.
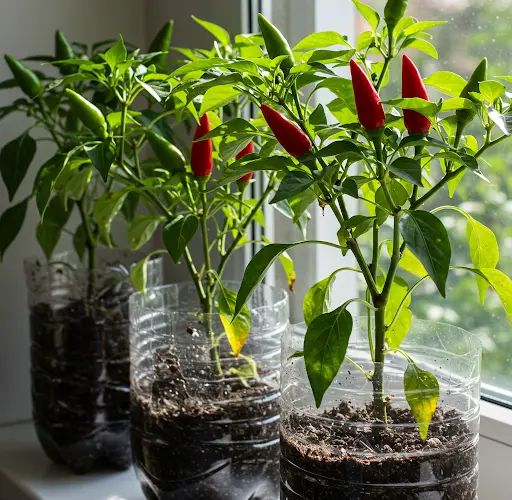
Step 1: Choose the Right Containers
One of the first steps in growing chili peppers on your balcony is choosing the right containers. Since chili plants have relatively shallow roots compared to other vegetables, they thrive in containers that are at least 12-14 inches deep and wide enough to accommodate their growth. You can use plastic pots, ceramic containers, or even recycled containers as long as they provide enough space for the roots to spread out.
To ensure proper drainage, make sure the containers have holes at the bottom. This prevents water from accumulating in the soil, which could lead to root rot. If your container doesn’t have drainage holes, simply drill a few small ones yourself.
Step 2: Select the Right Chili Pepper Varieties
When selecting chili pepper varieties, it’s important to consider the space you have available on your balcony. For smaller containers or limited space, opt for dwarf or compact chili varieties. Some great options for container gardening include:
-
Jalapeño: A medium-heat pepper that grows well in containers.
-
Cayenne: A long, thin variety that’s perfect for smaller spaces.
-
Thai Bird’s Eye: A small, super-hot variety that thrives in pots.
-
Habanero: A hot pepper variety that adds color and spice to any garden.
These varieties are well-suited for container gardening and produce plenty of peppers even in smaller spaces. Make sure to choose a variety based on your heat preference and the amount of sunlight available on your balcony.
Step 3: Planting Chili Seeds or Seedlings
You can start chili peppers either from seeds or seedlings, but starting from seeds is often the most cost-effective option. If you decide to start from seeds, sow them indoors about 8-10 weeks before the last frost date. Fill small seed trays or pots with a good-quality potting mix, and plant the seeds 1/4 inch deep. Keep the trays in a warm, sunny spot, or use a seedling heat mat to encourage germination.
Once the seedlings are large enough and the weather is warm, you can transplant them into larger containers on your balcony. Be sure to harden them off by gradually exposing them to outdoor conditions over a few days before planting them in their final location.
If you prefer to skip the germination process, you can buy chili seedlings from a local nursery and transplant them directly into your containers. This option saves time and gives you a head start on the growing season.
Step 4: Provide Plenty of Sunlight
Chili peppers are sun-loving plants that thrive in full sunlight. They need at least 6 hours of direct sunlight per day to grow properly and produce fruit. Place your containers in a spot on your balcony that gets plenty of sun, such as near the edge of the railing or against a wall that reflects heat.
If you live in a region with intense afternoon sun, consider providing some shade during the hottest part of the day to prevent the plants from drying out or becoming sunburned. You can use a sheer curtain or a shade cloth to protect the plants while still allowing them to get the sunlight they need.
Step 5: Watering and Fertilizing
Chili peppers require regular watering, but they don’t like to sit in waterlogged soil. Water the plants deeply, ensuring the soil is thoroughly moistened, but avoid overwatering. Allow the soil to dry out slightly between waterings, as chili peppers prefer to dry out between watering rather than staying constantly wet.
A good way to water your chili plants is to water at the base of the plant, directly onto the soil, rather than spraying the leaves. Wet leaves can encourage fungal diseases.
In addition to regular watering, chili peppers benefit from feeding. Use a balanced liquid fertilizer or an organic option like fish emulsion to provide essential nutrients. Feed the plants every 2-3 weeks during the growing season, but avoid over-fertilizing, as this can lead to lush foliage growth at the expense of fruit production.
Step 6: Supporting Plant Growth
As your chili plants grow, they may need a little extra support, especially if they’re producing a lot of fruit. Use plant stakes or cages to help support the plant and prevent it from tipping over. If you’re growing multiple plants in one container, be sure to provide enough space and airflow to avoid overcrowding.
Also, regularly prune your chili plants by removing dead or yellowing leaves. This helps promote healthy growth and allows the plant to focus its energy on producing peppers.
Step 7: Dealing with Pests and Diseases
Chili plants are generally resistant to pests, but they can still attract aphids, whiteflies, and spider mites, especially if they’re grown in containers. Regularly inspect your plants for signs of pests. If you notice any, you can wash the leaves with a mild soap solution or use organic insecticides like neem oil to get rid of them.
Chili plants are also susceptible to fungal diseases, particularly if the humidity is high. Make sure the plants are well-spaced to allow for good airflow, and avoid getting the leaves wet when watering.
Step 8: Harvesting Chili Peppers
Chili peppers are usually ready to harvest when they’ve reached their full size and color. Depending on the variety, this can take anywhere from 60 to 90 days. Most chili peppers start off green and change color as they ripen, turning red, orange, yellow, or purple.
To harvest, simply cut the peppers off the plant using a sharp pair of scissors or garden shears. Be careful not to damage the plant while harvesting. After harvesting, you can use the peppers immediately or store them in the fridge for a few days.
If you have a surplus of peppers, consider drying or freezing them for later use. Chili peppers can be dried by hanging them in a warm, dry spot, or you can freeze them whole for later use in cooking.
Final Thoughts
Growing chili peppers on your balcony has been a rewarding experience for me. Not only are the plants incredibly productive, but they also add a touch of beauty and color to my outdoor space. The small effort I put into growing them has paid off in a big way, with an abundant harvest of vibrant, flavorful peppers.
Whether you’re an experienced gardener or a beginner, growing chili peppers in containers on your balcony is a simple, low-maintenance way to enjoy homegrown produce. The right variety, proper care, and a little patience will result in a beautiful and fruitful chili garden that’s sure to impress.


