How to Make a Homemade Automatic Drip Irrigation System for Strawberries, Tomatoes, and Avocados
Growing strawberries, tomatoes, and avocados at home can be incredibly rewarding, but ensuring they receive consistent and adequate watering is critical for their healthy growth. One of the best ways to simplify garden maintenance is by setting up a homemade automatic drip irrigation system. This system saves water, reduces labor, and delivers moisture directly to the roots where plants need it most.
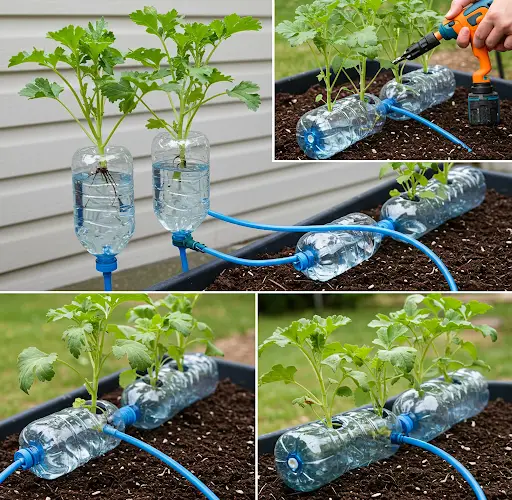
Here’s a step-by-step guide on how you can easily build an efficient drip irrigation system at home.
Materials You Will Need
-
1 large water container (around 100–200 liters capacity)
-
Mainline irrigation tubing (16mm or 20mm diameter)
-
Microtubing (4mm diameter) for branch lines
-
Drip emitters (adjustable, 1–4 liters/hour)
-
Hose connectors, tees, elbows, and end caps
-
Filter (optional but recommended)
-
Faucet or tap fitting for the container
-
Timer (optional for full automation)
-
Stakes or holders for tubing
-
Drill and drill bits
-
Waterproof tape or rubber grommets
-
Elevated stand for the container (at least 1 meter high)
All these materials can be found at garden supply stores, hardware shops, or online.
Step 1: Prepare the Water Container
Choose a sturdy container that can hold enough water for several days of irrigation. Clean it thoroughly before use.
Install a faucet near the bottom of the container. If the container doesn’t already have one, drill a hole using a spade bit and attach a faucet using waterproof tape or rubber gaskets to prevent leaks.
Place the container on a stable elevated stand to use gravity for water pressure. Ideally, the stand should be at least one meter tall to ensure a steady flow.
Step 2: Set Up the Main Water Line
Connect your mainline irrigation tubing to the faucet. This main tube will carry water across your garden area. Secure the tubing using clips or stakes to keep it in place.
Lay the tubing close to the plants you want to irrigate: strawberries, tomatoes, and avocados. Try to maintain a slight downward slope if possible, to assist water flow naturally.
Tip: Install a filter between the faucet and the tubing to trap debris and prevent clogging.
Step 3: Create Branch Lines to Each Plant
Use a punch tool to make small holes in the mainline tubing where needed. Insert 4mm microtubing into these holes. These small tubes will carry water directly to the base of each plant.
Extend the microtubing and secure it with stakes so the end of each tube is positioned at the root zone of every plant.
Step 4: Install the Drip Emitters
At the end of each microtube, attach a drip emitter. Adjustable drip emitters allow you to control the water output, which is especially useful since strawberries, tomatoes, and avocados have slightly different watering needs.
-
Strawberries prefer frequent, moderate watering.
-
Tomatoes need consistent deep watering to promote strong fruit development.
-
Avocados require good soaking but less frequent watering.
By adjusting each emitter, you can ensure every plant gets just the right amount of water.
Step 5: Test the System
Fill your water container and open the faucet slowly to allow water into the system. Check:
-
Water flows smoothly through the mainline and branch lines.
-
Each emitter drips water steadily.
-
There are no leaks at connections.
If necessary, adjust the emitters or reposition the tubing to improve water delivery.
If you’ve installed a timer, set it to open the valve automatically once or twice a day, depending on your plants’ needs and local weather conditions.
Step 6: Maintain Your System
To keep your drip irrigation system running smoothly:
-
Regularly check emitters for clogs.
-
Clean the filter if installed.
-
Flush the mainline occasionally to remove sediment buildup.
-
Refill the water container before it runs dry.
Maintenance is simple and requires only a few minutes each week.
Benefits of a Homemade Drip Irrigation System
-
Water Efficiency: Water is delivered directly to the plant roots, reducing evaporation and runoff.
-
Labor Savings: No more daily hand-watering — the system does the work for you.
-
Healthier Plants: Consistent watering prevents stress and promotes stronger growth and better yields.
-
Cost-Effective: Homemade systems are affordable compared to commercial setups.
-
Environmentally Friendly: You can even use collected rainwater in your container.
Final Tips
-
Position your container to catch rainwater if possible, saving even more water.
-
Group plants with similar water needs together to simplify setup.
-
Use high-quality tubing and emitters for better durability.
With just a few simple materials and a little effort, you can create a homemade automatic drip irrigation system that keeps your strawberries, tomatoes, and avocados thriving all season long.


