How to Make a Homemade Drip Irrigation System with Cheap Plastic Bottles — Easy and Fast
Keeping your garden properly watered doesn’t have to be complicated or expensive. One of the simplest, quickest, and most affordable ways to create a homemade drip irrigation system is by using cheap or recycled plastic bottles. This method is not only effective but also environmentally friendly, helping you reduce plastic waste while making sure your plants stay healthy and hydrated.
Here’s a complete, easy-to-follow guide to setting up your own drip irrigation system at home using plastic bottles.
Why Use Plastic Bottles for Drip Irrigation?
Plastic bottles are lightweight, easy to work with, and often readily available around the house. Instead of throwing them away, you can repurpose them into a practical watering solution for your garden. A drip irrigation system made from plastic bottles delivers water slowly and steadily right to the plant’s roots, promoting deep root growth and minimizing water waste.
This method is perfect for vegetable gardens, flower beds, potted plants, and even small trees.
Materials Needed
-
Plastic bottles (1 to 2-liter sizes are ideal)
-
A small nail, needle, or sharp pin
-
A lighter or candle (to heat the needle, if needed)
-
Scissors or a utility knife
-
String or garden wire (optional for hanging installations)
-
Water
Step-by-Step Instructions
1. Choose Your Bottles
Select plastic bottles depending on the size of the plants you wish to water. Standard 1-liter or 2-liter bottles are great for small to medium plants, while larger plants or trees may benefit from bigger containers, like 5-liter bottles.
2. Clean the Bottles
Rinse the bottles thoroughly to remove any residues. This step is important to ensure no harmful chemicals are introduced into the soil. Removing the label can also help you see the water level easily.
3. Make Small Holes
Use a sharp needle or nail to make one or two tiny holes in the bottle cap. Heating the needle slightly with a candle or lighter can make it easier to pierce the plastic.
Tip: Start with a very small hole to ensure a slow drip. You can always enlarge the hole later if needed.
If you prefer, you can create small holes on the sides or near the bottom of the bottle instead of the cap, depending on how you plan to position it.
4. Fill the Bottle with Water
Fill the prepared bottle with clean water. You can also add a diluted liquid fertilizer to the water for slow, continuous feeding if desired.
5. Install the Bottle
There are two simple installation options:
-
Upside-Down Method:
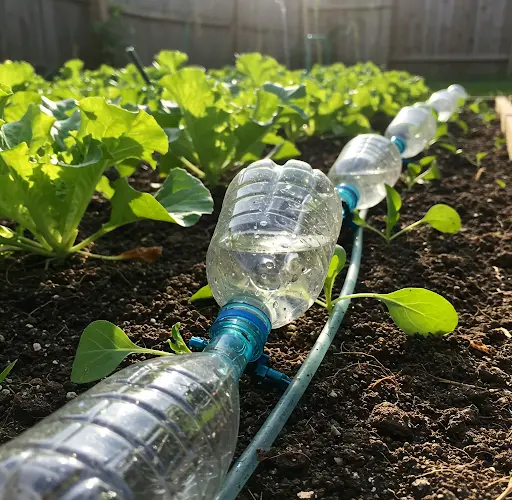
Turn the bottle upside down and bury the neck into the soil close to the plant’s roots. Make sure the cap with holes is positioned properly for a steady drip into the soil. -
Standing Bottle Method:
If you made holes in the body of the bottle, bury the bottom half into the soil with the cap side up, allowing you to refill the bottle easily without removing it.
For container plants or hanging baskets, you can suspend the bottle upside down using string or wire, allowing it to drip gently into the soil.
6. Test and Adjust
After setting up the bottle, observe the drip rate. Ideally, water should drip slowly — one drop every few seconds is usually perfect.
If the water drains too quickly, make a smaller hole or add a piece of cloth inside the cap to slow the flow.
If the water is too slow or doesn’t drip at all, make the hole slightly larger.
Helpful Tips for Success
-
Water Before Installation:
Thoroughly water the soil before inserting the bottle to reduce the plant’s immediate water needs and extend the drip system’s lifespan. -
Use Mulch:
Applying mulch around the base of the plant helps retain moisture and enhances the efficiency of the drip system. -
Secure the Bottles:
If your bottle tends to tip over, use a small stake or pile some soil or stones around it to keep it upright and stable. -
Adjust for Plant Needs:
Some plants require more water than others. Adjust the number of bottles or the size of the holes depending on the needs of each plant. -
Use Larger Bottles for Bigger Plants:
Big trees or large vegetable plants like squash and tomatoes may benefit from 5-liter bottles to ensure adequate hydration.
Benefits of a Homemade Bottle Drip Irrigation System
-
Low Cost:
Made from easily available materials, costing almost nothing. -
Eco-Friendly:
Reduces plastic waste and conserves water. -
Time-Saving:
Reduces the need for daily watering, especially useful during hot weather or vacations. -
Easy to Build:
No special skills or tools required. -
Customizable:
Suitable for gardens, pots, balconies, and even greenhouses.
Final Thoughts
Making a homemade drip irrigation system using cheap plastic bottles is an excellent solution for anyone looking for a fast, simple, and sustainable way to water their plants. With minimal effort and no major expense, you can provide your garden with consistent hydration, promote healthier plant growth, and do your part to reduce plastic waste. It’s an easy project that makes a big impact, whether you have a small herb garden or a larger backyard plot.
Give it a try and see how this simple method can transform your gardening routine!


