Radishes are among the easiest and fastest vegetables to grow, making them a favorite for beginner and experienced gardeners alike. Their crisp texture, peppery flavor, and vibrant colors add a refreshing touch to salads and meals. The best part is that you don’t need a large garden to grow them. Radishes thrive in rustic wooden containers, which not only provide a functional growing space but also add charm to patios, balconies, and small backyards. With the right soil, light, and care, you can enjoy fresh radishes in as little as three to four weeks.
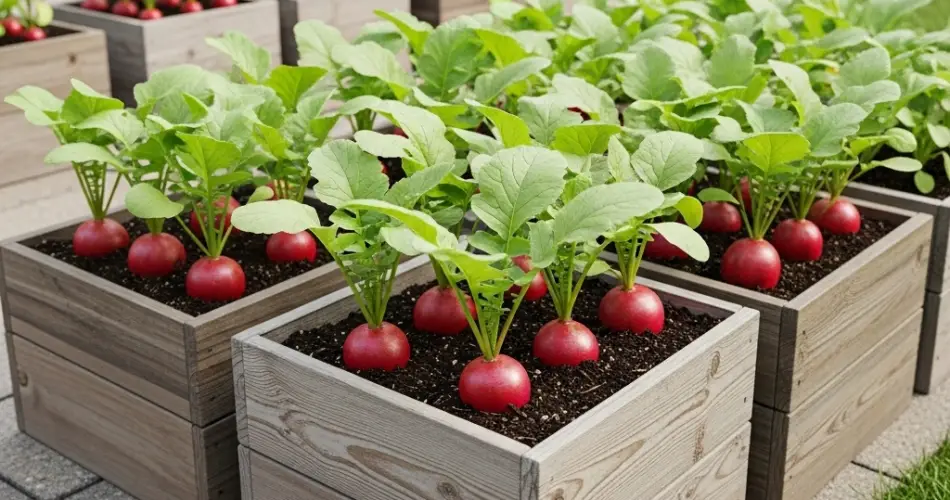
Why Choose Wooden Containers for Radishes?
Wooden containers are excellent for radishes because they offer controlled growing conditions and rustic appeal. Unlike heavy ceramic pots or plastic planters, wooden boxes help regulate soil temperature, preventing it from overheating in the sun. Their natural appearance also blends beautifully with outdoor or rustic-style home gardens.
Additionally, using wooden containers helps reduce weed problems and soil-borne pests, since you’re working with fresh soil mixes instead of existing ground soil. The portability of these boxes allows you to move them to sunnier spots or sheltered areas when needed, making them ideal for small-space gardening.
Choosing the Right Wooden Container
Radishes don’t need deep soil, but they do require enough space for their roots to develop. A rustic wooden box about 8–10 inches deep is usually sufficient. The width and length can vary depending on how many radishes you’d like to plant at once. For continuous harvests, consider several small planters rather than one large one.
Make sure the container has drainage holes at the bottom. Excess water can cause radishes to split or rot. Cedar, pine, and oak are great wood choices for containers, as they naturally resist decay. Avoid treated wood, since chemicals can seep into the soil and affect your crops.
Preparing the Soil
Radishes grow best in loose, well-draining soil that allows their roots to expand without resistance. Fill your wooden container with a mix of potting soil, compost, and sand or perlite to keep the soil light and crumbly. Avoid compacted or clay-heavy soil, which can deform the roots.
The ideal pH for radishes is between 6.0 and 7.0. Adding compost not only provides nutrients but also helps maintain balanced soil structure. Before planting, level the soil surface and water lightly so that it settles evenly in the container.
Planting Radish Seeds
Radishes are grown directly from seed, as they do not transplant well. Sow the seeds about half an inch deep and one inch apart in rows. Cover them lightly with soil and water gently. Within three to five days, you should see sprouts emerging.
For continuous harvests, practice succession planting. This means sowing a new batch of seeds every 10–14 days. This method ensures you’ll have a steady supply of radishes throughout the season rather than one large harvest all at once.
Sunlight and Watering
Radishes thrive in full sunlight, needing at least 6 hours of direct sun daily. Place your rustic wooden container in a bright spot, such as a balcony ledge, patio corner, or sunny backyard nook. While radishes tolerate some shade, too little sunlight can lead to excessive leafy tops with small or underdeveloped roots.
Consistent moisture is key. Water radishes regularly to keep the soil evenly moist but not soggy. Dry soil may cause radishes to become woody or split, while overwatering can lead to rot. The porous nature of wooden boxes helps with water regulation, but check the soil often, especially during warm weather.
Thinning for Healthy Growth
One of the most important steps in growing radishes is thinning the seedlings. Once the sprouts are about two inches tall, thin them so that plants are spaced at least 2 inches apart. Crowded radishes struggle to form proper roots, resulting in small or misshapen vegetables. Gently remove the extra seedlings and, if you like, use the thinned greens in salads—they are edible and nutritious.
Fertilizing and Maintenance
Radishes grow quickly and don’t require heavy feeding. Too much fertilizer, especially nitrogen-rich types, will encourage leafy growth at the expense of root development. Instead, enrich the soil with compost before planting, and if needed, apply a balanced organic fertilizer halfway through the growing cycle.
Mulching with straw, shredded leaves, or grass clippings can help retain soil moisture and regulate temperature, especially if you’re growing radishes in warm climates.
Harvesting Radishes
Radishes are ready for harvest within three to four weeks, depending on the variety. Check them by gently brushing away the soil around the top of the root. If the shoulders of the radish are about one inch in diameter, they are ready to pick. Pull them gently from the soil and rinse them immediately.
Harvest radishes promptly once mature, as leaving them too long in the soil can make them pithy, woody, or overly spicy.
Extending the Growing Season
Radishes are cool-season crops and grow best in spring and fall. However, by using rustic wooden containers, you can extend the growing season by moving them to slightly sheltered areas or using row covers to protect against extreme weather. Some small, fast-growing varieties are particularly suited for container gardening and can be grown almost year-round in mild climates.
Final Thoughts
Growing radishes in rustic wooden containers is both practical and rewarding. These adaptable vegetables require minimal effort, making them perfect for beginner gardeners or those with limited space. Wooden boxes create the ideal growing environment, keep plants tidy, and enhance the charm of your garden setting.
With just a little care—loose soil, consistent watering, sunlight, and timely harvesting—you can enjoy crisp, flavorful radishes in only a few weeks. Not only will you have fresh produce at your fingertips, but you’ll also experience the satisfaction of cultivating your own food in a stylish and space-saving way.


