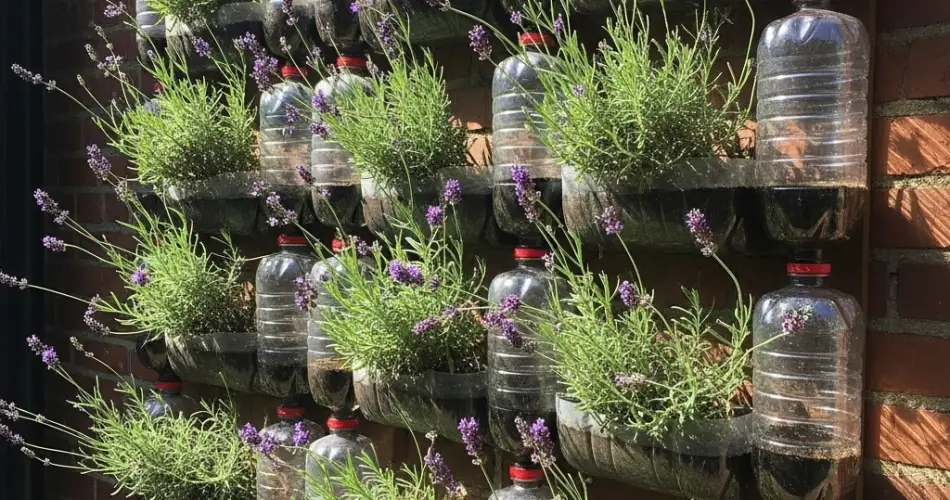
Lavender is a fragrant, beautiful, and low-maintenance herb that adds charm and practicality to any garden. If you lack horizontal space, you can still enjoy this versatile plant by growing it vertically using recycled plastic bottles. This method is not only eco-friendly but also a great way to transform unused walls or fences into productive and aromatic green spaces.
Vertical gardening with plastic bottles makes it possible to grow lavender even in small apartments, balconies, or tight backyard corners. With the right setup and care, you’ll enjoy fresh lavender blooms and scent throughout the season.
Why Lavender?
Lavender is known for its soothing scent, beautiful purple flowers, and ability to attract pollinators. It also has culinary, medicinal, and ornamental uses. Drought-tolerant and sun-loving, lavender thrives in containers, making it an excellent candidate for vertical bottle gardening. Once established, it requires little water and resists most pests.
What You’ll Need
To get started with your vertical lavender garden, gather the following materials:
-
Clean 1.5- to 2-liter plastic bottles
-
Sharp scissors or a utility knife
-
A drill or nail (for making drainage holes)
-
Well-draining potting soil (preferably sandy or gritty mix)
-
Lavender seeds or young lavender plants
-
String, wire, or zip ties
-
A vertical support structure: wooden panel, wall, fence, or frame
-
Optional: gravel or small pebbles for drainage
Step 1: Prepare the Plastic Bottles
Start by washing the bottles thoroughly and removing any labels. Cut a wide opening on one side of each bottle, leaving enough plastic around the edges to hold soil securely. This will be the planting area.
Next, use a drill or nail to make several small drainage holes in the bottom of each bottle. Lavender is highly sensitive to overwatering, so proper drainage is crucial.
Step 2: Create Your Vertical Setup
There are several ways to build your wall-mounted garden using the prepared bottles:
-
Hanging Design: String bottles with wire or twine and hang them in rows from a strong frame or hooks.
-
Mounted Design: Secure the bottles to a wooden board or directly to a wall using screws, clips, or brackets.
-
Staggered Stack: Arrange the bottles vertically in a staggered formation so water from upper levels can drip into lower ones, conserving moisture.
Ensure the setup is stable and that each bottle is tilted slightly upward to keep soil in place and prevent spillage.
Step 3: Add Soil and Plant Lavender
Lavender prefers slightly alkaline, sandy, and well-drained soil. Use a cactus or Mediterranean herb mix, or create your own by combining regular potting mix with sand, perlite, or crushed pumice. To further support drainage, add a thin layer of gravel or small stones at the bottom of each bottle before filling them with soil.
If using seeds, sprinkle them lightly on top and cover them with a very thin layer of soil. Lavender seeds take time to germinate—sometimes up to a month—so be patient and keep the soil barely moist.
If using seedlings or small lavender plants, gently transplant them into the bottles, being careful not to disturb the roots too much.
Step 4: Choose the Right Location
Lavender needs at least 6 to 8 hours of direct sunlight per day. Select a wall or fence that receives ample sunlight—ideally south- or west-facing. Indoors, position your vertical garden near a sunny window or under a grow light.
Make sure your support structure is strong enough to hold the combined weight of soil, water, and plants.
Step 5: Watering and Maintenance
Lavender thrives in dry conditions and is very sensitive to overwatering. After planting, water lightly and allow the soil to dry out between waterings. Mature lavender prefers being underwatered rather than overwatered.
-
Watering: Let the top inch or two of soil dry before watering again. Water deeply but infrequently.
-
Feeding: Lavender doesn’t need much fertilizer. A light application of organic compost or a low-nitrogen fertilizer once during the growing season is sufficient.
-
Pruning: Trim back faded flower spikes and woody growth to encourage fuller growth and more blooms.
-
Pests: Lavender rarely suffers from pests, but keep an eye out for aphids or fungal issues in overly damp conditions.
Step 6: Harvesting and Using Lavender
Once your lavender begins to flower, you can start harvesting. Use scissors or pruning shears to cut stems just above the leaves. The best time to harvest is in the morning after the dew has dried but before the sun becomes too intense, which preserves the aromatic oils.
Hang the harvested stems upside down in a dry, dark, and well-ventilated space to dry them. Dried lavender can be used in sachets, teas, baked goods, or even homemade skincare products.
Step 7: Seasonal Care
Lavender is a perennial, so it will return year after year with proper care. In cooler climates, protect your plants during winter by bringing the vertical setup indoors or covering it with a frost cloth. Trim the plants back in late summer or fall to maintain their shape and health.
A vertical lavender garden made from recycled plastic bottles is a great way to blend sustainability, beauty, and practicality. This project not only reduces plastic waste but also brings soothing scents and delicate color into your living space. With just a few simple materials and a sunny wall, you can enjoy the many benefits of homegrown lavender all season long.


