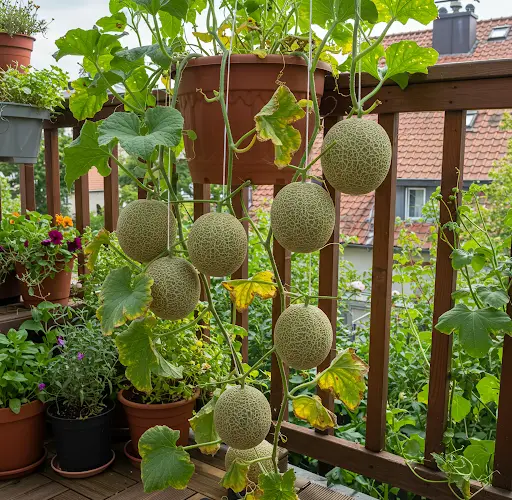
Growing your own melons at home may seem like a task for experienced gardeners, but with the right technique, even beginners can enjoy the satisfaction of harvesting sweet, juicy melons. One of the most space-efficient and productive methods is to grow hanging melons, a technique perfect for patios, balconies, terraces, and small gardens.
This guide will show you a simple step-by-step method for cultivating hanging melons at home. Whether you’re growing cantaloupe, honeydew, or small watermelons, this approach ensures healthy vines, manageable space, and delicious fruit.
Why Grow Melons Vertically?
Hanging or vertical gardening isn’t just a trendy option—it’s incredibly effective for melons. Here’s why:
-
Saves space: Ideal for small gardens or container setups.
-
Improves airflow: Reduces risk of fungal diseases and pests.
-
Cleaner fruit: Melons don’t touch the ground, so there’s less rot and blemishing.
-
Easy harvesting: Fruits hang at waist level or higher, making picking simple.
-
Looks beautiful: Hanging melon plants double as ornamental vines.
Materials You’ll Need
To get started with your home hanging melon garden, you’ll need:
-
Melon seeds (choose compact or small-fruit varieties)
-
Large pots or grow bags (minimum 20–30 liters)
-
High-quality potting mix
-
Organic compost or manure
-
Trellis or strong support frame
-
Slings or netting (to support hanging fruits)
-
Watering can or hose
-
Mulch (optional but helpful)
Step-by-Step Guide to Growing Hanging Melons
1. Choose the Right Variety
For hanging melon cultivation, opt for smaller or hybrid varieties that are more manageable on a trellis. Some beginner-friendly types include:
-
Cantaloupe
-
Honeydew
-
Sugar Baby Watermelon
-
Mini Tiger Melon
These types are lighter, mature quickly (70–90 days), and thrive in container setups.
2. Prepare Your Containers and Soil
Melons need deep, nutrient-rich soil with good drainage. Use large containers with holes at the bottom, and fill them with a mix of:
-
50% potting soil
-
30% compost or aged manure
-
20% sand or cocopeat
Add a handful of bone meal or wood ash to boost phosphorus for root and fruit development.
Place the containers where they get 6–8 hours of direct sunlight daily.
3. Sowing and Germination
Sow 2–3 seeds per container about 1 inch deep. Keep the soil moist but not waterlogged.
Seeds typically germinate within 7–10 days. Once the seedlings have 2–3 true leaves, thin them out and leave the strongest plant in each pot.
4. Installing the Trellis or Hanging Frame
Install a sturdy vertical trellis, bamboo frame, or wire mesh to support the vines as they grow. You can also train the vines to climb along a wall or fence.
Ensure the structure is strong enough to bear the weight of the plant and the fruits. As the melons develop, they can get heavy, so extra support is critical.
5. Care and Maintenance
-
Watering: Keep the soil consistently moist, especially during flowering and fruit development. Avoid overhead watering; direct the water to the base.
-
Fertilizing: Feed the plant every 2 weeks with a diluted mix of organic compost tea, banana peel fertilizer (rich in potassium), or seaweed extract.
-
Pruning: Pinch off excess side shoots and trim old leaves to promote better air circulation and fruiting.
6. Support the Fruits
As melons begin to form, support them with slings made from old cloth, mesh, or netting. Tie them securely to the trellis to reduce pressure on the vine.
This prevents fruit from dropping prematurely and helps it develop evenly while hanging.
7. Flowering and Pollination
Melons produce both male and female flowers. Pollination is essential for fruit development.
Encourage pollinators by planting nearby flowers, or hand-pollinate by transferring pollen from male to female flowers using a soft brush or cotton swab.
Female flowers have a small swollen bulb at the base, which becomes the fruit after pollination.
8. Mulching and Sun Protection
Add a layer of mulch around the plant base to:
-
Retain moisture
-
Regulate soil temperature
-
Suppress weeds
In very hot climates, consider shading the plants during peak afternoon hours to prevent heat stress.
Harvesting Your Melons
Melons are generally ready to harvest 70–90 days after planting. Signs of ripeness include:
-
A strong, sweet aroma from the fruit
-
The skin color changes and becomes dull or yellowish
-
The stem begins to crack or dry near the fruit
-
A gentle press at the blossom end feels slightly soft
Use a clean knife or shears to cut the melon from the vine. Avoid pulling it off by hand to prevent damaging the plant.
Final Tips for Sweet, Juicy Fruits
-
Don’t overwater once fruits start forming—too much moisture can reduce sweetness.
-
Apply potassium-rich feed (like banana peel tea) during fruiting.
-
Remove excess fruits to allow the plant to focus energy on fewer but better-quality melons.
-
Keep checking the slings to ensure they’re supporting the growing melons well.
Conclusion
Growing hanging melons at home is not only practical but also incredibly rewarding. With the right setup and a little care, even beginners can enjoy a sweet, abundant harvest. Whether on a rooftop, balcony, or backyard, this vertical method makes melon gardening possible in any space.
If you’re looking to start a fun, fruitful gardening project, try this simple hanging method—you’ll be surprised at how easy and productive it can be!


