How to Grow Bean Sprouts in Plastic Bottles | Grow Bean Sprouts at Home
Growing bean sprouts at home is a simple, cost-effective, and rewarding process. Using plastic bottles as containers makes it even more convenient, as it saves space and ensures a clean, controlled environment for sprouting. Whether you want to enjoy fresh, crunchy bean sprouts for salads, stir-fries, or sandwiches, this method will help you achieve a successful harvest in just a few days. Follow this step-by-step guide to grow fresh and nutritious bean sprouts at home using plastic bottles.
Why Grow Bean Sprouts in Plastic Bottles?
Using plastic bottles for sprouting beans offers several advantages:
- Space-Saving – Ideal for small kitchens, apartments, or urban homes.
- Eco-Friendly – Repurposes used plastic bottles instead of discarding them.
- Cost-Effective – No need for expensive sprouting trays or specialized equipment.
- Hygienic and Controlled Environment – Ensures clean sprouts free from contaminants.
- Easy to Maintain – Requires minimal effort and no soil or fertilizers.
With just a few simple steps, you can enjoy a continuous supply of fresh, homegrown bean sprouts.
Choosing the Right Beans for Sprouting
Not all beans are suitable for sprouting. Some of the best options include:
- Mung Beans – Most commonly used for sprouting, with a crisp texture and mild taste.
- Lentils – Fast-growing and nutrient-dense.
- Chickpeas (Garbanzo Beans) – Have a nutty flavor and are excellent for salads.
- Alfalfa Seeds – Produce delicate, flavorful sprouts.
- Soybeans – High in protein but require longer sprouting time.
Always choose organic, untreated beans to ensure a successful sprouting process. Non-organic beans may be chemically treated to prevent germination.
Materials Needed for Growing Bean Sprouts in Plastic Bottles
To get started, you will need:
- A clean plastic bottle (1 to 2 liters in size)
- Dried beans (mung beans, lentils, etc.)
- Clean water
- A fine-mesh cloth or a piece of breathable fabric
- Rubber band or string
- A knife or scissors to cut drainage holes
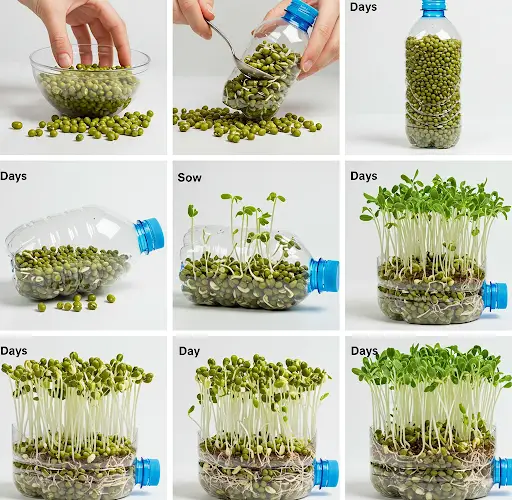
Step-by-Step Guide to Growing Bean Sprouts in a Plastic Bottle
Step 1: Prepare the Plastic Bottle
- Take a clean, empty plastic bottle and remove any labels.
- Using a knife or scissors, cut off the top portion of the bottle to create a wide opening for easy access.
- Poke several small drainage holes near the bottom to allow excess water to escape.
Step 2: Soaking the Beans
- Measure ¼ to ½ cup of dried beans (depending on the bottle size).
- Rinse the beans thoroughly under running water to remove dirt and debris.
- Place the beans in a bowl and soak them in water for 8-12 hours (or overnight).
- After soaking, the beans will swell in size and begin to soften.
Step 3: Adding Beans to the Bottle
- Drain the soaked beans and transfer them into the plastic bottle.
- Cover the bottle’s opening with a fine-mesh cloth or breathable fabric, then secure it with a rubber band or string.
- Place the bottle in a dark, warm place (such as a cupboard or pantry) to encourage sprouting.
Step 4: Rinsing and Draining
- Twice a day (morning and evening), rinse the beans with clean water to keep them moist.
- Fill the bottle with water, swish it around gently, then drain it completely through the holes.
- Ensure the beans are never sitting in stagnant water to prevent mold growth.
- Repeat this rinsing and draining process every 12 hours for the next few days.
Step 5: Watching the Sprouts Grow
- After 2-3 days, tiny white sprouts will begin to emerge from the beans.
- Continue the rinsing process for up to 5-7 days, depending on the desired length of sprouts.
- If you prefer longer sprouts, allow them to grow for a few extra days.
Step 6: Harvesting the Sprouts
- Once the sprouts reach 2-3 inches in length, they are ready to be harvested.
- Give them a final rinse and drain well.
- If you want to remove the bean skins, soak the sprouts in a bowl of water and gently agitate them – the skins will float to the top for easy removal.
- Store the sprouts in an airtight container in the refrigerator for up to a week.
Tips for the Best Bean Sprouts
- Use Fresh Beans – Older beans may have a lower germination rate.
- Maintain Proper Drainage – Ensure that excess water drains out completely to prevent mold.
- Keep the Bottle in the Dark – Sprouts grow best in a dark environment; exposure to light may turn them green and bitter.
- Avoid Overcrowding – Too many beans in one bottle can cause uneven growth and poor air circulation.
- Consume Fresh – For the best taste and texture, eat your sprouts within a few days of harvesting.
Health Benefits of Homegrown Bean Sprouts
Growing your own bean sprouts at home ensures you get the freshest, most nutritious produce. Bean sprouts are:
- Rich in Protein – Great for vegetarians and vegans.
- Packed with Vitamins – High in vitamins C, K, and B-complex.
- Full of Antioxidants – Help fight free radicals and improve immunity.
- Good for Digestion – Contain fiber and digestive enzymes.
- Low in Calories – A perfect addition to a healthy diet.
How to Use Bean Sprouts in Your Meals
Homegrown bean sprouts are incredibly versatile and can be used in a variety of dishes, including:
- Salads – Add crunch and freshness to any salad.
- Stir-Fries – Toss them into noodles or vegetable stir-fries.
- Sandwiches and Wraps – Use them as a filling for extra texture.
- Soups – Enhance the flavor and nutrition of broths and noodle soups.
- Smoothies – Blend with other ingredients for a nutrient boost.
Conclusion
Growing bean sprouts in plastic bottles is an easy, eco-friendly way to enjoy fresh, homegrown sprouts year-round. With minimal effort, you can produce a continuous supply of nutritious sprouts right in your kitchen. Whether you’re looking for a simple gardening project or a cost-effective way to enhance your diet, this method is perfect for beginners and seasoned gardeners alike. Start growing your own bean sprouts today and enjoy their fresh, crunchy goodness in your favorite dishes!


