Growing Squash in Plastic Containers: A Step-by-Step Guide
Squash is a versatile and nutritious vegetable that can be grown in a variety of settings, from traditional garden beds to more compact spaces like balconies and terraces. Growing squash in plastic containers offers the perfect solution for those with limited space or anyone looking to grow this hearty plant in a manageable way. This guide will walk you through the process of successfully growing squash in plastic containers, ensuring a healthy and bountiful harvest.
Why Grow Squash in Plastic Containers?
Growing squash in containers offers several advantages:
-
Space-saving: Ideal for small spaces, such as patios, balconies, or urban gardens.
-
Control over soil quality: Containers allow you to create an ideal growing medium.
-
Easy mobility: Containers can be moved to optimize sun exposure or protect plants from extreme weather.
-
Reduced pests: Growing squash in containers can reduce some common soil-borne pests and diseases.
With the right container, soil, and care, you can grow both summer and winter squash varieties successfully in plastic pots or containers.
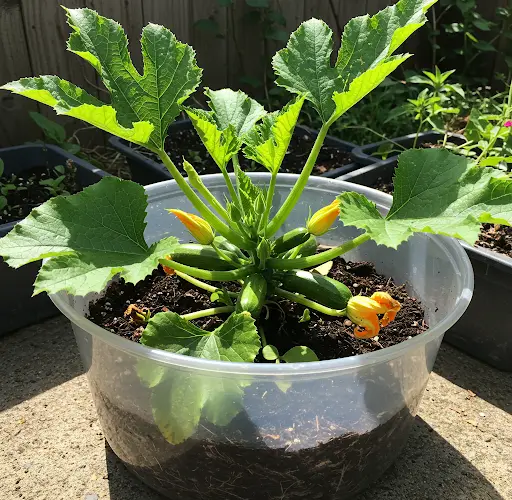
Choosing the Right Container
The first step in growing squash in plastic containers is selecting the right size and type of container. Squash plants have sprawling vines, and the roots can spread quite wide. Choose a container that provides enough space for the plant to thrive:
-
Size: Select a container that is at least 18–24 inches in diameter and 12–18 inches deep. This will provide enough room for both the roots and the plant’s sprawling vines.
-
Drainage: Ensure the container has sufficient drainage holes at the bottom to prevent waterlogging. Too much moisture can cause root rot.
-
Material: While plastic containers are lightweight and easy to move, make sure they are UV-resistant to prevent cracking and fading from the sun.
Preparing the Soil
Squash plants require nutrient-rich, well-draining soil for healthy growth. Start with a high-quality potting mix, and enhance it with organic matter to provide the necessary nutrients:
-
Compost: Add compost or well-rotted manure to the potting mix to improve fertility and soil structure.
-
pH levels: Squash prefers slightly acidic to neutral soil (pH 6.0 to 7.0). Check the soil’s pH using a simple test kit, and amend it if needed.
-
Drainage: Make sure the potting mix is loose and drains well. You can mix perlite or coarse sand to improve drainage.
Fill the container with soil, leaving a couple of inches from the top for watering. This will prevent water from spilling over when you irrigate the plants.
Planting the Squash
Squash can be grown from seeds or seedlings. Both methods are effective, but growing from seeds is often more economical and provides a wider variety of squash to choose from.
Planting from seeds:
-
Fill the container with soil, leaving enough space for the seed.
-
Make a small hole about 1 inch deep.
-
Plant 2–3 seeds in each hole and cover them lightly with soil.
-
Water gently to moisten the soil, but avoid soaking it.
Planting from seedlings:
-
If you’re transplanting seedlings, make sure they are acclimatized to outdoor conditions if started indoors.
-
Dig a hole large enough to fit the root ball of the seedling.
-
Place the seedling in the hole and cover it with soil, pressing gently around the base to secure it.
Squash plants need full sunlight, so place the container in a location that receives at least 6–8 hours of direct sunlight per day.
Watering and Fertilizing
Squash needs consistent moisture, especially during its early growth stages and while the fruit is developing. However, it’s important to avoid over-watering, which can lead to root rot.
-
Watering: Water deeply when the top inch of soil feels dry. Ensure the water reaches the root zone, but allow excess water to drain out of the bottom of the container.
-
Fertilizing: Squash is a heavy feeder, so regular feeding is essential. Use a balanced liquid fertilizer or compost tea every 2–3 weeks. When flowers begin to form, switch to a fertilizer higher in potassium and phosphorus to support fruit development.
Supporting the Squash Vines
Squash vines can spread wide, taking up a lot of space in a container garden. To manage the plant’s growth and keep the fruit off the ground, you can provide vertical support:
-
Trellis: Install a small trellis or plant cage inside the container. As the vines grow, gently train them to climb the trellis, securing them with soft ties.
-
Staking: If a trellis is not an option, you can allow the vines to sprawl over the edges of the container or along the ground. Just ensure the vines are not overcrowded and can grow freely.
Supporting the vines also helps prevent diseases like powdery mildew by improving air circulation around the plant.
Harvesting the Squash
The time it takes to harvest squash will depend on the variety and growing conditions, but typically, summer squash is ready to harvest within 50–60 days, while winter squash takes about 80–100 days.
-
Summer squash: Harvest when the fruit is still tender and the skin is smooth. Cut the fruit from the vine using a sharp knife.
-
Winter squash: Wait until the skin hardens and the color deepens. The vine will also begin to die back when the squash is ready for harvesting. Cut the squash from the vine, leaving about 2 inches of stem.
Final Thoughts
Growing squash in plastic containers is a simple and rewarding way to enjoy fresh, homegrown vegetables. With the right container, soil, and care, you can easily grow squash in small spaces while reaping a bountiful harvest. Whether you prefer summer squash or winter squash, this method offers a convenient solution for gardeners of all experience levels.
By following the steps outlined in this guide, you can grow healthy, flavorful squash right on your patio, balcony, or even in a small backyard. Enjoy the satisfaction of harvesting your own squash, and experiment with different varieties to find the ones that best suit your tastes and growing environment.


