How to Grow Healthy Pumpkins from Kitchen Waste and Recycled Plastic Bins
Growing pumpkins at home can be a fun and rewarding experience, and it’s easier than you might think. One of the best ways to do it is by using kitchen waste and recycled plastic bins, a sustainable approach that reduces waste while promoting healthy plant growth. By combining composting with container gardening, you can grow pumpkins in small spaces like balconies, patios, or even on your windowsill. In this article, we will guide you through the process of growing healthy pumpkins using kitchen scraps and recycled plastic bins, so you can enjoy homegrown pumpkins without needing a large garden.
Why Grow Pumpkins from Kitchen Waste and Recycled Plastic Bins?
The benefits of using kitchen waste and recycled plastic bins for pumpkin growing are numerous:
-
Sustainability: You’re reducing food waste and reusing plastic materials, making your gardening practice more eco-friendly.
-
Space-saving: Plastic bins are perfect for small spaces, allowing you to grow pumpkins in limited areas like balconies or patios.
-
Low-cost: You don’t need to buy expensive materials; kitchen scraps and old plastic bins can be repurposed for gardening.
-
Fertile Soil: Kitchen waste, when composted, provides rich, nutrient-dense soil that pumpkins love, leading to healthier plants and larger fruits.
Materials Needed
To start growing pumpkins using kitchen waste and recycled plastic bins, you will need the following materials:
-
Plastic bins (large, 10-20 gallon bins work best)
-
Kitchen scraps (vegetable peels, coffee grounds, eggshells, fruit waste, etc.)
-
Good-quality compost or potting soil (to provide additional nutrients)
-
Pumpkin seeds or seedlings
-
Watering can or hose
-
Drill or knife (for creating drainage holes in the bins)
-
Fertilizer (optional, for additional nutrients)
Step-by-Step Guide to Growing Pumpkins from Kitchen Waste and Recycled Plastic Bins
1. Choose the Right Plastic Bin
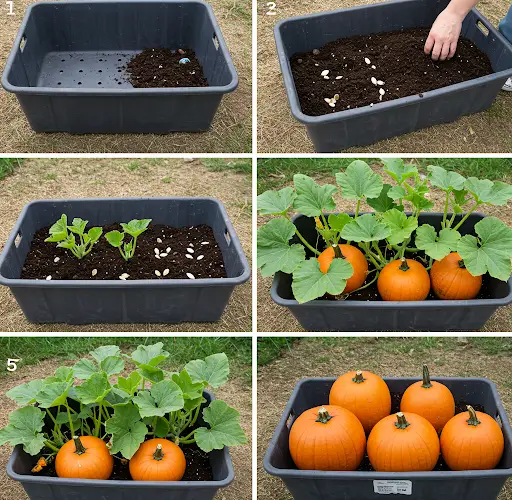
The first step in growing pumpkins in recycled plastic bins is selecting the right bin. Pumpkins are large plants with extensive root systems, so you’ll need a bin that is at least 10-20 gallons in size. This will give the plants enough room to grow and spread. Choose a plastic bin with a lid, or one that can be easily covered, to help retain moisture and warmth, especially in cooler climates.
Ensure the bin has drainage holes to allow excess water to escape. You can use a drill or a knife to make several small holes at the bottom of the bin. Good drainage is essential to prevent root rot and ensure healthy growth.
2. Prepare the Kitchen Waste for Composting
Start by collecting kitchen scraps. Common items that make great compost for pumpkins include:
-
Fruit and vegetable peels (potatoes, carrots, squash, etc.)
-
Coffee grounds
-
Eggshells
-
Tea bags (without staples)
-
Used paper towels or napkins
-
Fruit cores (apple, pear, etc.)
Avoid adding meat, dairy, or oily foods to the compost as they can attract pests and slow down decomposition.
Layer the kitchen scraps at the bottom of the plastic bin. These will act as the initial composting material, providing nutrients for the pumpkins. Once the bin is filled with waste, cover it with a layer of soil or compost to help start the decomposition process. This compost will turn into rich, fertile soil as it breaks down, creating an excellent environment for your pumpkins to thrive.
3. Fill the Bin with Potting Soil
After the kitchen scraps are layered, fill the bin with high-quality potting soil or compost. This will give the pumpkin plants the soil structure and nutrients they need for strong growth. If you’re using store-bought compost or potting mix, ensure it’s designed for vegetable gardening to provide the right balance of nutrients.
Leave some room at the top of the bin for watering and maintenance. Once the bin is filled, gently pat the soil to remove air pockets and make sure it’s evenly distributed.
4. Plant the Pumpkin Seeds
Once the bin is prepared, it’s time to plant the pumpkin seeds. You can either plant them directly into the composted bin or start with seedlings. If using seeds, plant 2-3 seeds about 1-2 inches deep in the soil. Make sure the seeds are spaced at least 6-8 inches apart to give each plant plenty of room to grow. If you’re using seedlings, plant one seedling in the center of the bin and ensure the roots are covered with soil.
Water the seeds or seedlings gently but thoroughly to help them settle into the soil. Keep the bin in a warm, sunny spot, as pumpkins require plenty of sunlight to grow. A spot that gets at least 6-8 hours of direct sunlight a day is ideal.
5. Care for the Plants
Pumpkin plants require consistent moisture to grow well. Water the plants regularly, but be careful not to overwater. The soil should remain moist, but not soggy, to avoid root rot. Make sure the drainage holes are functioning correctly to prevent water from accumulating at the bottom of the bin.
As the plants begin to grow, you may need to provide additional nutrients. You can do this by adding a slow-release fertilizer or compost once a month. Be sure to choose a fertilizer that is balanced and suitable for vegetables, as pumpkins are heavy feeders and benefit from extra nutrients.
6. Support the Growing Pumpkin Vines
As the pumpkin vines grow, they may start to spread and trail over the edges of the bin. If your bin is large enough, you can allow the vines to spill out naturally. However, if you’re working with limited space, you may want to prune the vines back occasionally to keep them from spreading too far. If you want to grow pumpkins vertically, you can install a trellis to support the vines and encourage upward growth.
7. Harvesting the Pumpkins
Pumpkins typically take 80 to 100 days to grow, depending on the variety. You will know they’re ready to harvest when the skin becomes firm and the color changes, such as turning orange for traditional pumpkins. The stem should also be dry and brown. Use a sharp knife or garden shears to cut the pumpkin off the vine, leaving about 2-3 inches of stem attached.
8. Maintain the Bin for Future Crops
After harvesting your pumpkins, you can reuse the plastic bin for future gardening projects. Simply add more compost or potting soil and start a new batch of kitchen scraps. The bin can be used season after season, providing a sustainable and space-efficient method for growing vegetables.
Benefits of Growing Pumpkins from Kitchen Waste and Recycled Plastic Bins
-
Eco-friendly: Reduces food waste and repurposes plastic containers.
-
Space-efficient: Perfect for growing pumpkins in small spaces.
-
Cost-effective: You don’t need to buy expensive materials for the garden.
-
Rich, fertile soil: The compost made from kitchen scraps provides nutrients for healthy pumpkin growth.
Conclusion
Growing pumpkins from kitchen waste and recycled plastic bins is an easy, sustainable, and space-efficient method that offers numerous benefits. By composting kitchen scraps and using recycled materials, you can grow healthy pumpkins while reducing waste and promoting eco-friendly practices. Whether you’re an experienced gardener or a beginner, this method will help you enjoy fresh, homegrown pumpkins and make the most of limited space.


