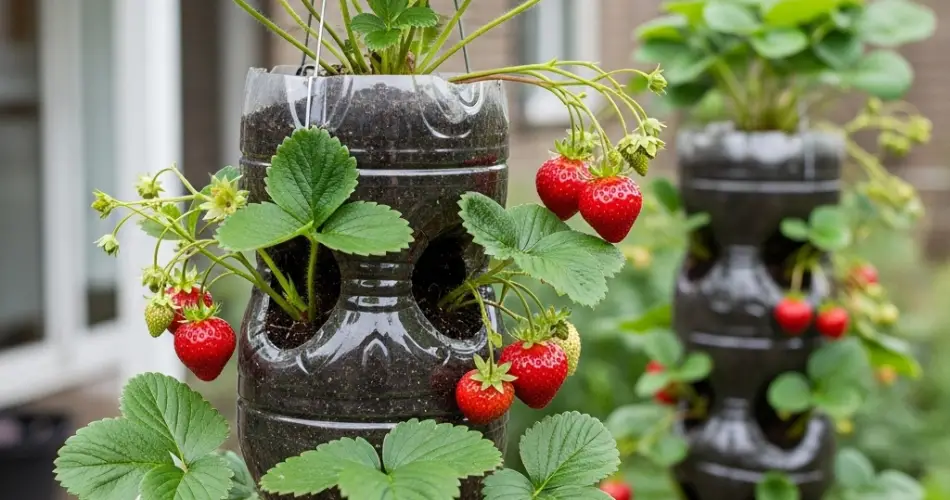
Strawberries are among the most loved fruits for home gardeners. Sweet, juicy, and packed with nutrients, they’re a delight to grow and harvest. But if you’re short on space, there’s no need to miss out. You can grow strawberries vertically using hanging plastic bottles, making it possible to enjoy homegrown berries even if all you have is a small balcony or patio.
This vertical gardening method not only saves space but also recycles plastic waste into productive planters. It’s an eco-friendly and efficient way to enjoy strawberries right at your fingertips.
Why Use Hanging Plastic Bottles?
Using plastic bottles to grow strawberries offers a number of benefits:
-
Maximizes vertical space – Ideal for apartments, small patios, or fences
-
Reduces waste – Recycles plastic bottles into functional garden tools
-
Improves airflow – Minimizes fungal issues and keeps fruit clean
-
Simplifies care – Easier to water, fertilize, and harvest at eye level
-
Customizable – You can adjust height, number of bottles, and placement easily
This method is especially helpful for those looking to grow food sustainably in tight urban spaces.
Choosing the Right Strawberry Variety
When selecting strawberries for vertical bottle gardening, choose varieties that are compact and produce fruit over a longer period. The best types include:
-
Ever-bearing – Produce two main harvests per year, ideal for consistent yields (e.g., ‘Ozark Beauty’, ‘Seascape’)
-
Day-neutral – Produce fruit steadily throughout the growing season, especially good for small spaces (e.g., ‘Albion’, ‘Tristar’)
-
Alpine strawberries – Smaller fruits but perfect for containers and hanging setups
Avoid June-bearing varieties in this setup, as they produce a large, single harvest and tend to spread more.
Materials You’ll Need
To set up your vertical strawberry garden using bottles, gather the following:
-
1.5 or 2-liter plastic bottles (with caps)
-
Sharp knife or utility scissors
-
Potting mix rich in compost and perlite
-
Strawberry seedlings or bare-root plants
-
Hanging wire, string, or chain
-
Small stones or gravel for drainage (optional)
-
Fertilizer (organic liquid or slow-release)
Step 1: Prepare the Bottles
-
Clean the bottles thoroughly and remove labels.
-
Cut planting holes – On one side of the bottle, cut out 2–3 horizontal slits, each about 2–3 inches wide. Space them vertically for multiple plant positions.
-
Create drainage holes – Poke 4–6 small holes at the bottom and near the sides of the cap to ensure good drainage.
-
Add hanging holes – Puncture two small holes near the top of the bottle (opposite each other) to attach a wire or string for hanging.
Optionally, add a few stones or gravel at the bottom before filling with soil to improve drainage.
Step 2: Fill and Plant
Fill the bottle with potting mix up to each planting hole as you go. The mix should be lightweight and moisture-retentive, such as a blend of peat moss, compost, and perlite.
Gently insert one strawberry plant per hole, ensuring the crown (where roots meet the stem) stays above the soil line. Top off the bottle with soil, then plant another seedling at the top opening for maximum use of space.
Water gently to settle the soil around the roots.
Step 3: Hang the Bottles
Use wire, rope, or chain to hang your strawberry bottle garden from a fence, balcony rail, or wall-mounted hook. Make sure the area receives at least 6–8 hours of sunlight daily.
Keep bottles spaced far enough apart so plants get enough light and airflow. This also makes watering and harvesting easier.
Step 4: Watering and Feeding
Strawberries grown in bottles need consistent moisture, but avoid waterlogging. Because bottles dry out quickly, check the soil daily, especially during warm weather. Water slowly until it begins to drain from the bottom.
Feed your plants every 2–3 weeks with a diluted organic liquid fertilizer or a balanced slow-release type. This ensures they get the nutrients needed for continuous flowering and fruiting.
Mulch around the crown inside each opening if possible to retain moisture and protect roots from temperature fluctuations.
Step 5: Maintenance and Harvest
Regularly remove yellowing leaves and watch for pests like aphids or spider mites. Since fruit hangs outside the bottle, it’s less likely to rot or be attacked by slugs.
Harvest strawberries when they are fully red and firm. Pick them regularly to encourage more fruit production. Day-neutral and ever-bearing varieties will continue to produce into the late season with proper care.
After the growing season, trim back foliage and overwinter the bottles in a sheltered spot or replant fresh starts next season.
Final Thoughts
Growing strawberries in hanging plastic bottles is a simple, sustainable, and rewarding way to cultivate fresh fruit at home. This vertical method not only saves ground space but also turns common waste into a productive system that’s perfect for any size home.
With a bit of sunlight, regular care, and the right setup, you’ll be enjoying sweet, juicy strawberries from your very own vertical garden—no backyard required.


