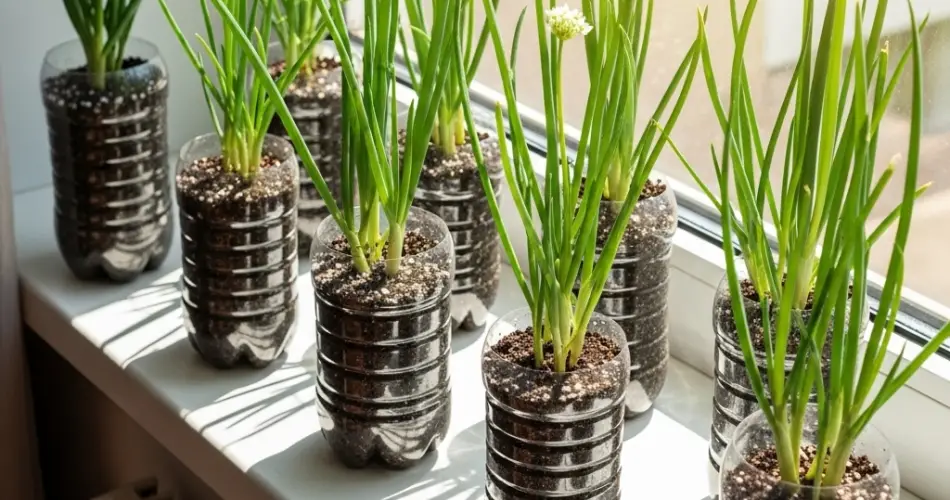
Scallions, also known as green onions or spring onions, are among the easiest vegetables to grow at home, especially indoors. Their compact size and fast-growing nature make them ideal for indoor container gardening—even better, they can thrive in recycled plastic bottles. Whether you live in an apartment with no garden or simply want to grow some fresh greens in your kitchen, this method is budget-friendly, sustainable, and highly rewarding.
Here’s a step-by-step guide to growing scallions indoors using recycled plastic bottles—perfect for anyone who wants to enjoy fresh, homegrown flavor all year long.
Why Grow Scallions Indoors?
Scallions require minimal care, grow quickly, and don’t need deep soil, making them ideal for indoor gardening. When grown indoors, they’re protected from pests and weather fluctuations, and they add a vibrant green touch to your kitchen space. Growing them in recycled bottles also helps reduce plastic waste and makes use of materials you likely already have at home.
What You’ll Need
Before getting started, gather these materials:
-
Clear plastic bottles (1.5-liter or 2-liter soda bottles work best)
-
Sharp scissors or a craft knife
-
A nail or screwdriver for making drainage holes
-
Potting mix (preferably light and well-draining)
-
Kitchen scraps (scallion roots with the white bulb intact) or scallion seeds
-
Water spray bottle or a small watering can
-
A windowsill or indoor spot with good natural light
Preparing the Plastic Bottles
-
Clean the Bottles
Rinse the bottles thoroughly to remove any residue. Allow them to dry before cutting. -
Create Openings
Using scissors or a utility knife, cut rectangular openings along the side of each bottle, wide enough to plant and access the scallions. Leave some space between openings if you plan to grow multiple plants in a single bottle. -
Add Drainage Holes
Use a heated nail or screwdriver to make 4–6 small holes in the bottom of the bottle for proper drainage. This step is crucial to prevent waterlogging, which can lead to root rot. -
Optional Hanging Option
If you’d like to hang your bottles, punch two holes near the top and thread a strong string or wire through them.
Filling and Planting
-
Add Potting Mix
Fill the bottle with potting mix up to the base of your planting openings. If you’re using a bottle cut in half horizontally, fill the bottom half with soil and insert the top portion upside-down to serve as a watering funnel. -
Planting Scallion Scraps
If you’re using scallion scraps, trim off the green tops and leave about 1.5–2 inches of the white root portion. Press the root ends gently into the soil with the tips slightly exposed.If using seeds, sprinkle a few into each planting hole, cover lightly with soil, and mist gently with water.
-
Water Gently
Use a spray bottle or watering can to moisten the soil. Keep the soil lightly damp but never soggy.
Light and Placement
Place the bottle garden in a bright indoor spot such as a kitchen windowsill, balcony ledge, or near a glass door. Scallions need about 4–6 hours of indirect sunlight daily. If natural light is limited, use a grow light to supplement.
Turn the bottles occasionally so all sides of the plants receive light evenly. This helps prevent bending or uneven growth.
Care and Maintenance
-
Watering: Check soil moisture every few days. Water when the top inch of soil feels dry. Avoid overwatering.
-
Fertilizing: If your potting mix lacks nutrients, use a diluted liquid organic fertilizer every two weeks to support healthy growth.
-
Air Circulation: Good airflow helps prevent mold growth. Open windows occasionally or use a small fan nearby.
Harvesting Your Indoor Scallions
Scallions grow quickly and are usually ready to harvest within two to three weeks after planting. Use clean scissors to snip the green tops once they reach 6–8 inches tall. Always leave at least 1 inch of the white base in the soil so the plant can regrow.
You can continue harvesting the same plant multiple times. With regular care and cutting, scallions will keep producing for weeks.
Common Problems and Fixes
-
Mold or mildew: Caused by excess moisture or poor ventilation. Allow the soil to dry slightly between watering and improve air circulation.
-
Yellowing leaves: May indicate overwatering or lack of nutrients. Check drainage and consider adding a mild fertilizer.
-
Slow growth: Scallions need sufficient light. Move the container to a sunnier spot or supplement with grow lights.
Final Thoughts
Growing scallions indoors using recycled plastic bottles is a smart, eco-friendly way to produce your own fresh greens even in limited space. It’s simple enough for beginners and satisfying for seasoned gardeners alike. Plus, it turns waste into something useful and delicious.
With just a few kitchen scraps and some creativity, you can build a low-cost indoor garden that supplies you with scallions year-round—perfect for garnishing dishes, adding flavor to meals, or simply enjoying the fresh taste of homegrown success.


