Scallions, also known as green onions or spring onions, are flavorful, fast-growing, and perfect for home gardening—even in the smallest of spaces. One of the most convenient and sustainable ways to grow them is by regrowing kitchen scraps in hanging plastic bottles. This method transforms simple waste—both plastic and vegetable trimmings—into a productive, space-saving herb garden.
Whether you live in a high-rise apartment or a house with no garden, this guide will help you regrow scallions effortlessly using vertical bottle planters.
Why Regrow Scallions?
Scallions are one of the easiest vegetables to regrow. The white base of the plant, which is often discarded during food prep, contains the root system that allows it to regenerate. When planted properly and given light, water, and air circulation, these bases quickly sprout new green shoots.
Advantages of regrowing scallions:
-
Reuses vegetable scraps and reduces food waste
-
Provides a constant supply of fresh greens
-
Suitable for kitchens, balconies, or windowsills
-
Easy for beginners and kids to grow
-
Ideal for vertical gardening in small homes
Why Use Hanging Bottles?
Plastic bottles are lightweight, abundant, and easy to repurpose. Hanging them vertically frees up counter or floor space, making them perfect for narrow balconies or sunny indoor corners. Plus, hanging systems offer better air circulation and drainage, which scallions thrive on.
Benefits of hanging bottle planters:
-
Saves horizontal space
-
Improves drainage and air flow
-
Upcycles plastic waste
-
Looks attractive and organized
-
Easy to access for harvesting and maintenance
What You’ll Need
To get started, gather the following materials:
-
Empty 1.5–2-liter plastic bottles (one for each bunch of scallions)
-
Sharp scissors or a utility knife
-
A nail or screwdriver (for creating holes)
-
Twine, string, or wire (for hanging)
-
Potting soil mixed with compost or coconut coir
-
Scallion scraps (the white base with roots intact)
-
A sunny location (4–6 hours of light daily)
-
Watering can or spray bottle
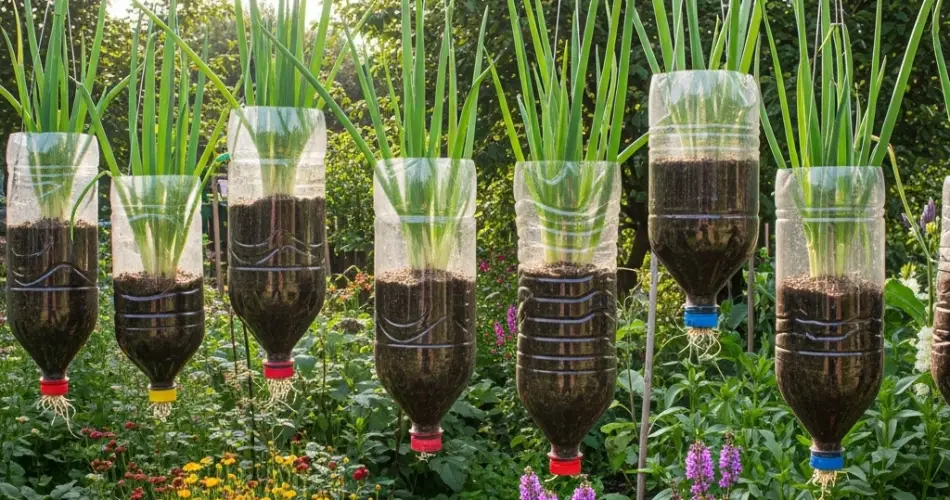
How to Prepare Your Hanging Bottles
Step 1: Clean the Bottles
Wash bottles thoroughly and remove labels. Let them dry.
Step 2: Cut the Planting Window
Lay the bottle on its side and cut a rectangular opening (about 4–6 inches) along one side. This will be where you plant the scallions.
Step 3: Add Drainage Holes
Poke 4–6 small holes in the bottom of the bottle to allow excess water to drain out and prevent root rot.
Step 4: Create Hanging Points
Make two holes near the bottle’s neck and two near the base. Thread string or wire through each side to make a secure hanging harness. Tie both ends to form a loop you can hang from hooks or a rod.
Planting Scallions
-
Fill the Bottle with Soil
Add potting soil about ¾ of the way full. Use a mix that is light, well-draining, and nutrient-rich to encourage healthy growth. -
Prepare the Scallions
Use kitchen scraps with the white base and roots intact (about 1–2 inches of white part left). If roots are dry, soak them in water for a few hours before planting. -
Plant the Bases
Push each scallion base about 1 inch into the soil, spacing them slightly apart within the bottle. Make sure the tops are visible above the soil surface. -
Water Gently
Use a spray bottle or watering can to moisten the soil. Be careful not to flood the bottle. -
Hang the Bottle
Place your planter in a sunny spot where it receives at least 4–6 hours of light daily. A bright windowsill, kitchen wall, or balcony railing works well.
Daily Care and Maintenance
-
Watering: Keep the soil moist, not soggy. Check daily, especially if the planter is exposed to heat or wind.
-
Sunlight: Scallions grow best in bright, indirect sunlight. Rotate the bottle every few days if indoors, so all sides receive light.
-
Fertilizing: Apply a diluted organic liquid fertilizer every two weeks to keep the plants growing strong.
-
Air Circulation: Make sure bottles are not crowded. Good airflow helps prevent mold or mildew.
Harvesting Your Scallions
Scallions are typically ready for harvest 10–14 days after planting, depending on the growing conditions.
-
Use scissors to snip off the green shoots once they are about 6–8 inches tall.
-
Leave at least 1 inch of the plant above the soil to allow it to regrow.
-
Scallions can be harvested multiple times before needing to be replaced.
Over time, regrowth may slow. Simply remove the old base and plant a new one using fresh scraps.
Tips for Success
-
Group multiple hanging bottles to create a vertical scallion wall.
-
Add labels to track planting dates for a continuous harvest cycle.
-
Catch excess water with a tray underneath if growing indoors.
-
Try mixing in garlic greens or chives for variety.
Final Thoughts
Regrowing scallions in hanging bottles is a sustainable, space-saving way to enjoy fresh, homegrown greens right where you live. With minimal supplies and effort, you can transform kitchen scraps and recycled bottles into a productive and attractive vertical herb garden. It’s an ideal project for small spaces, beginner gardeners, and anyone looking to reduce waste while growing their own food.
Give your scallion ends a second life—and enjoy the fresh flavor straight from your own DIY hanging garden.


