Grow Lettuce in Recycled Plastic Bottles: A Simple and Sustainable Gardening Method
Lettuce is one of the easiest and fastest-growing leafy vegetables, making it a perfect choice for home gardeners, even those with limited space. With just a few recycled plastic bottles and basic gardening supplies, you can grow fresh, crisp lettuce right on your balcony, windowsill, or backyard.
This eco-friendly method is not only cost-effective but also promotes sustainability by repurposing plastic waste. Whether you’re looking to create a vertical garden or simply want to grow your own food in small spaces, using plastic bottles to grow lettuce is a rewarding and practical solution.
Why Use Plastic Bottles for Growing Lettuce?
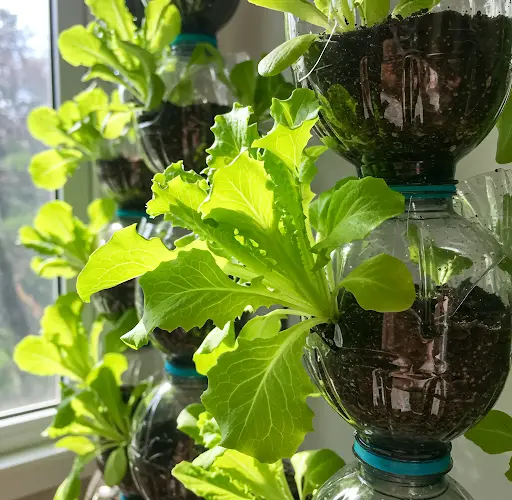
Plastic bottles are widely available and often discarded as waste. By reusing them in your garden, you reduce landfill pollution while creating compact, portable containers that are ideal for leafy greens like lettuce. These containers retain moisture well, offer great drainage when modified, and are easy to manage in small spaces.
Lettuce doesn’t require deep soil, which makes it an ideal candidate for container gardening. With a bit of creativity, you can set up a productive lettuce garden using only recycled materials.
What You’ll Need
-
1.5 to 2-liter plastic bottles (transparent or semi-transparent)
-
Potting soil or a mix of garden soil, compost, and sand
-
Lettuce seeds or seedlings
-
A sharp knife or cutter
-
A nail or screwdriver for making drainage holes
-
A watering can or spray bottle
-
Optional: string or wire for vertical hanging
Step 1: Prepare the Plastic Bottles
Start by cleaning the plastic bottles thoroughly. Remove any labels and rinse out any residue.
There are two common ways to modify bottles for growing lettuce:
-
Horizontal Method: Lay the bottle on its side and cut out a rectangular window along one side. This creates a trough-like planter.
-
Vertical Method: Cut off the top of the bottle to create an open-top planter. Poke a few drainage holes in the bottom.
For both methods, poke several small holes at the bottom of the bottle using a hot nail or screwdriver. These will allow excess water to drain out and prevent root rot.
If you’re creating a hanging garden, punch two holes near the top of the bottle on opposite sides and thread string or wire through them to hang vertically on a wall or railing.
Step 2: Add Soil and Compost
Lettuce thrives in well-drained, nutrient-rich soil. Mix the following for best results:
-
50% potting soil or garden soil
-
30% compost or well-rotted manure
-
20% sand or cocopeat (for aeration and drainage)
Fill your prepared bottles with this mixture, leaving about an inch from the top for watering space. Gently pat down the soil without compacting it too much.
If you’re using organic kitchen waste like chopped banana peels or crushed eggshells, mix them into the bottom layer of the soil to provide slow-release nutrients.
Step 3: Planting the Lettuce
Lettuce can be grown from seeds or seedlings. If using seeds, sprinkle them lightly across the soil surface and gently press them in. Lettuce seeds need light to germinate, so avoid burying them deeply—just a thin layer of soil is enough.
Water gently using a spray bottle or watering can with a fine nozzle to avoid displacing seeds. Keep the bottles in a bright area with indirect sunlight until seeds germinate (typically 5–10 days).
If transplanting seedlings, create small holes in the soil and place each seedling carefully, firming the soil around the base.
Step 4: Caring for Your Lettuce Plants
Lettuce prefers cool, moist conditions and partial sunlight. Here’s how to care for your plants:
-
Water regularly, keeping the soil consistently moist but not soggy.
-
Avoid direct midday sun, which can cause wilting or bitterness. Morning or late afternoon sun is ideal.
-
Fertilize every 10–14 days with a diluted organic liquid fertilizer, such as compost tea or banana peel water.
-
Thin out overcrowded seedlings once they’ve grown a few inches tall. This ensures better airflow and healthier growth.
To prevent pests, spray the leaves with diluted neem oil or a homemade garlic-chili spray once a week.
Step 5: Harvesting
Lettuce can be harvested in two ways:
-
Cut-and-come-again: Snip the outer leaves when they reach about 4–6 inches long, leaving the inner leaves to grow. This method allows for multiple harvests.
-
Full harvest: When the plant matures (usually in 30–45 days), cut the entire plant at the base.
Harvest in the morning for the crispest leaves. Rinse with cool water and store in the refrigerator for up to a week.
Step 6: Replanting for Continuous Supply
Lettuce grows quickly, and you can stagger your planting every 1–2 weeks to ensure a continuous harvest. Simply replant new seeds in fresh soil within the same bottles, or rotate bottles while older plants are still growing.
Conclusion
Growing lettuce in recycled plastic bottles is a simple, sustainable, and rewarding gardening project for beginners and experienced growers alike. Whether you live in a small apartment or have limited garden space, this method lets you enjoy homegrown greens year-round while reducing waste and embracing eco-conscious habits.
Give it a try, and you’ll be surprised at how much you can harvest from such a small and resourceful setup.


