The ZZ plant (Zamioculcas zamiifolia) is one of the most stylish and low-maintenance houseplants, known for its glossy green leaves, upright stems, and ability to thrive in almost any indoor setting. If you’re looking for an eco-friendly and budget-conscious way to grow this plant, consider using recycled plastic bottles as planters. Not only does this reduce waste, but it also gives your home or workspace a unique green touch with a creative twist.
In this guide, you’ll learn how to grow ZZ plants in plastic bottles, turning common household waste into chic indoor plant decor. Whether you’re a beginner or a plant enthusiast, this DIY gardening method is simple, sustainable, and rewarding.
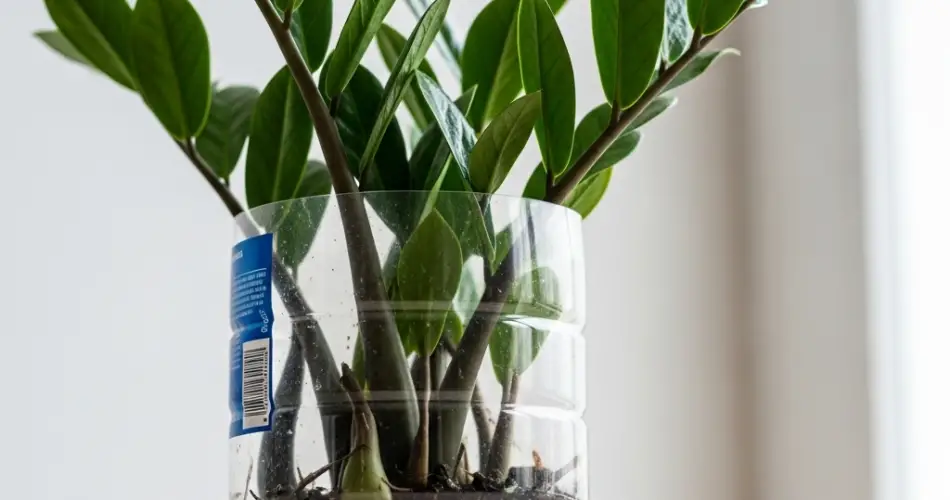
Why Choose ZZ Plants for Bottle Gardening?
The ZZ plant is ideal for busy people or those new to houseplants. It’s drought-tolerant, handles low light conditions, and rarely suffers from pests or diseases. It also grows relatively slowly, making it a perfect candidate for compact spaces like plastic bottle containers. With minimal watering needs and a striking look, the ZZ plant complements any interior style—from modern minimalism to boho chic.
Pairing this hardy plant with upcycled containers is a great way to start eco-conscious gardening at home.
Materials You’ll Need
-
A clean plastic bottle (1.5L or 2L recommended)
-
Sharp scissors or a craft knife
-
ZZ plant (either a small plant or stem/rhizome division)
-
Cactus or succulent potting mix
-
Small stones or gravel
-
Activated charcoal (optional)
-
A spoon or scoop
-
Natural twine, paint, or fabric (for decoration, optional)
-
Needle or nail (for drainage holes)
How to Make a Bottle Planter for Your ZZ Plant
1. Clean and Cut the Bottle
Wash the bottle thoroughly and remove any labels. Cut the bottle horizontally about one-third of the way from the top. The bottom portion will serve as your planter. If you’re aiming for a self-watering design, you can invert the top portion and place it inside the bottom half with the cap removed.
Punch 3–5 small holes at the base of the bottle for drainage. You can use a heated needle or small nail to do this safely.
2. Add a Drainage Layer
ZZ plants are sensitive to overwatering. To avoid root rot, start by placing a layer of gravel or small stones at the bottom of the container. This helps excess water drain away from the roots. For additional odor and moisture control, add a thin layer of activated charcoal above the stones.
3. Fill with Well-Draining Soil
Use a potting mix made for succulents or cacti, as ZZ plants prefer loose, well-aerated soil. These blends usually include perlite, sand, and peat moss or coco coir, which help prevent waterlogging. Fill the bottle about three-quarters full with soil.
4. Plant the ZZ
If you’re using a small ZZ plant from a nursery, gently remove it from its original container and loosen the roots. Place it in the center of the bottle and backfill with soil until the base is secure. Press down lightly to remove air pockets.
If you’re using a division or rhizome, make sure it has at least one healthy stem or shoot. Plant it just deep enough to cover the rhizome, leaving any growing tips exposed above the soil line.
After planting, wait a day or two before watering to let the roots adjust and avoid the risk of rot.
Care Tips for Your Bottle-Grown ZZ Plant
-
Light: ZZ plants thrive in indirect light but can tolerate low-light spaces like offices or shaded rooms. Avoid placing them in direct sun, which can scorch the leaves.
-
Water: Only water when the top 2–3 inches of soil feel completely dry. In a plastic bottle, moisture retention is higher, so always check before watering. Too much water is the most common cause of failure with ZZ plants.
-
Humidity: ZZ plants tolerate standard indoor humidity levels. No need for misting or humidifiers.
-
Feeding: Fertilize once every 1–2 months during the growing season (spring and summer) with a diluted houseplant fertilizer. Avoid feeding in winter when growth slows.
-
Cleaning: Dust the leaves occasionally with a soft, damp cloth to keep them shiny and help the plant photosynthesize more efficiently.
Styling Your Bottle Planter
Plastic doesn’t have to look cheap or basic. Add a personal touch by decorating the bottle with:
-
Twine wrapped around the outside for a rustic look
-
Painted designs using acrylic paint
-
Fabric scraps or washi tape for a colorful finish
-
A woven basket or ceramic sleeve to cover the bottle base
Group several bottle planters together for a visually striking, eco-conscious indoor display.
When to Repot
Although ZZ plants grow slowly, they will eventually outgrow the bottle container. Signs it’s time to upgrade include roots circling inside the bottle or pushing up from the soil. When this happens, transfer your plant to a larger upcycled container or standard pot, and consider reusing the original bottle for a new propagation project.
Final Thoughts
Eco gardening doesn’t have to be expensive or complicated. By growing ZZ plants in recycled plastic bottles, you reduce waste, save money, and enjoy the satisfaction of creating something beautiful and sustainable. With just a few materials and a bit of care, you can turn everyday trash into a long-lasting, stylish addition to your home.
This creative approach to indoor planting proves that small choices—like reusing a plastic bottle—can make a big difference for both your space and the environment.


