Chives are a versatile and aromatic herb that adds a mild onion flavor to a variety of dishes. From salads and soups to baked potatoes and omelets, fresh chives elevate many recipes with their vibrant green color and subtle zest. For gardeners with limited space or those interested in sustainable practices, growing chives in recycled plastic bottle planters is an excellent solution.
This method not only makes gardening accessible and eco-friendly but also offers a convenient way to harvest fresh chives year-round. Here’s a comprehensive guide to creating easy bottle planters for endless chives.
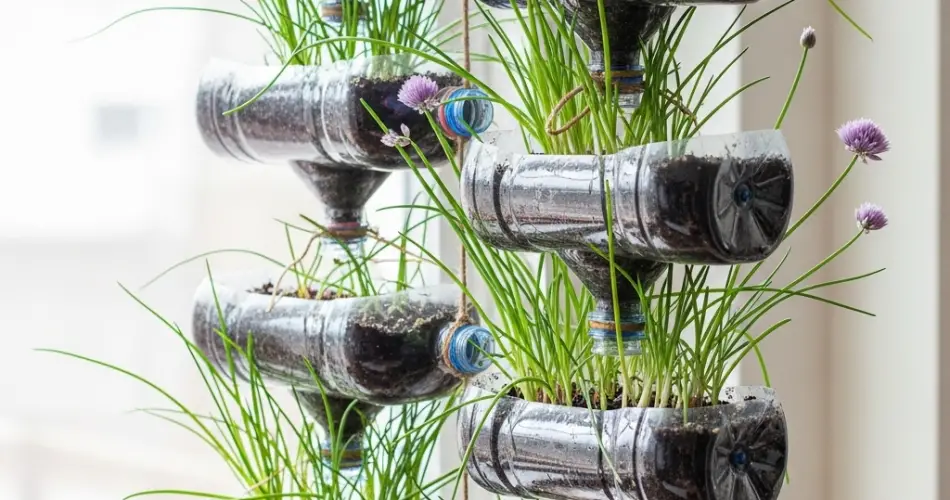
Why Grow Chives in Bottle Planters?
Using plastic bottles as planters for chives offers several advantages:
-
Sustainability: Reuses plastic waste, helping reduce environmental pollution.
-
Compactness: Perfect for small spaces like balconies, kitchen counters, or windowsills.
-
Cost-Effective: No need to buy expensive pots or containers.
-
Controlled Environment: Bottles retain moisture, supporting healthy root development.
-
Visibility: Clear plastic allows easy monitoring of soil moisture and root growth.
Materials Needed
-
Clean, empty plastic bottles (1 or 2 liters)
-
Sharp scissors or a craft knife
-
Potting soil or seed-starting mix
-
Chive seeds or small chive plants
-
Water
-
Spray bottle for misting
-
String or hooks (optional, for hanging)
-
Labels or markers
Step 1: Preparing the Plastic Bottle Planters
Begin by thoroughly washing the plastic bottles to remove any dirt or labels.
Using scissors or a craft knife, carefully cut the bottle horizontally about one-third from the top. The bottom part will serve as the planter, and the top can be inverted to create a humidity dome or used for watering.
Make several drainage holes in the base of the bottom section to ensure excess water can drain away, preventing root rot.
Step 2: Filling and Planting
Fill the bottom portion of the bottle with moist potting soil or seed-starting mix, leaving about an inch of space at the top.
If using seeds, sprinkle them evenly over the soil surface and cover lightly with about 0.5 cm (¼ inch) of soil.
If planting small chive plants, create a hole in the soil and gently transplant the plant, firming the soil around the roots.
Water gently to moisten the soil without oversaturating it.
Step 3: Positioning Your Bottle Planters
Place the bottle planters in a location that receives at least 4 to 6 hours of sunlight daily. Chives thrive in bright light but can tolerate some shade.
Rotate the planters occasionally to ensure even light exposure and prevent uneven growth.
Step 4: Caring for Your Chives
Keep the soil consistently moist but avoid waterlogging. Use a spray bottle to mist the soil surface and leaves, especially in dry conditions.
Remove the humidity dome once seedlings emerge to improve airflow and reduce the risk of mold.
Fertilize lightly every few weeks with an organic, balanced fertilizer to support healthy growth.
Step 5: Harvesting Chives
Chives are ready to harvest once they reach about 15 to 20 centimeters (6 to 8 inches) tall.
Use scissors to snip the leaves near the base, leaving at least 5 centimeters (2 inches) of growth to encourage continual regrowth.
Regular harvesting promotes bushier, healthier plants and prevents the chives from flowering prematurely.
Tips for Success
-
Use fresh seeds or healthy starter plants to ensure vigorous growth.
-
Maintain consistent moisture and good drainage to prevent root diseases.
-
Provide adequate light to avoid leggy or weak plants.
-
Thin seedlings if overcrowded to give each plant enough space.
-
Label your planters to keep track of varieties or planting dates.
Benefits of Growing Chives in Bottle Planters
-
Year-Round Freshness: Grow chives indoors for a continual supply.
-
Eco-Friendly: Repurposes plastic bottles and reduces waste.
-
Space-Saving: Ideal for urban dwellers and small gardening spaces.
-
Educational: Great project for beginners and children interested in gardening.
-
Cost Savings: Avoid buying fresh herbs frequently by growing your own.
Troubleshooting Common Issues
-
Yellowing Leaves: Often caused by overwatering or poor drainage. Check soil moisture and adjust watering.
-
Mold or Mildew: Remove humidity dome promptly and improve ventilation.
-
Leggy Growth: Increase light exposure to ensure strong, compact plants.
-
Pests: Watch for aphids or mites and treat naturally with insecticidal soap or neem oil if needed.
Conclusion
Growing chives in easy DIY bottle planters is a rewarding and sustainable way to enjoy fresh herbs at home. This approach is perfect for gardeners with limited space or those seeking an eco-conscious gardening method.
By following these simple steps—preparing bottle planters, planting seeds or seedlings, providing proper care, and harvesting regularly—you can maintain a flourishing supply of chives year-round.
Embracing this method not only enhances your cooking but also contributes to reducing plastic waste, making your gardening practice both practical and environmentally responsible.


