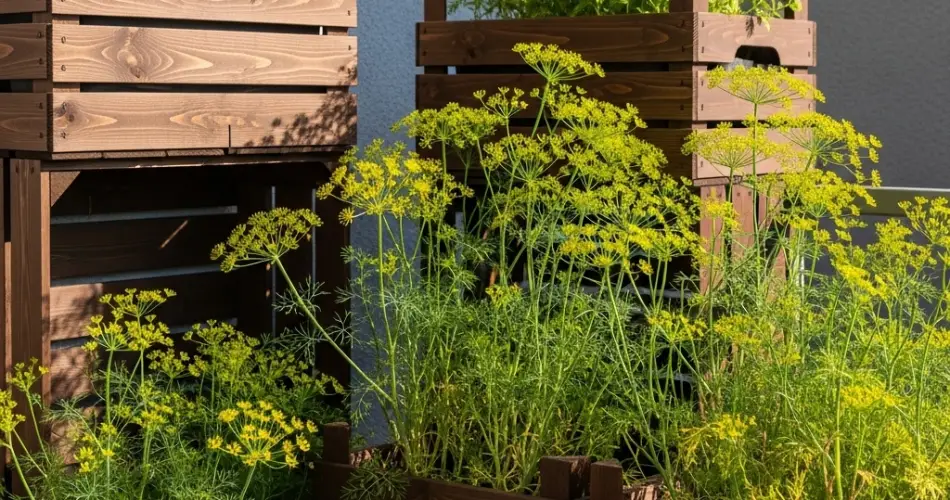
Fresh herbs are a simple pleasure for anyone who loves to cook or garden, and dill is no exception. With its feathery green foliage and bright, tangy flavor, dill brings a burst of freshness to salads, fish dishes, and homemade pickles. Even if you live in a compact apartment with limited space, you can successfully grow dill right on your balcony using a wooden crate. This DIY dill crate garden is an easy, attractive, and functional way to enjoy this aromatic herb in an urban setting.
Why Grow Dill in a Crate?
Crates are ideal for small-space gardening. They’re lightweight, portable, and can be placed anywhere with adequate sunlight. Wooden crates offer a rustic, decorative look that blends naturally with greenery while providing enough space for shallow-rooted herbs like dill. Because dill grows quickly and doesn’t require deep containers, a crate makes the perfect planter—just make sure it’s at least 20 cm deep for optimal root development.
Using crates also allows for excellent drainage, which is crucial for dill. When lined properly and filled with the right soil, a crate planter provides the environment dill needs to thrive on a sunny balcony.
Materials You’ll Need
To start your own DIY dill crate garden, you’ll need:
-
A wooden crate (preferably untreated or food-safe)
-
Landscape fabric or coconut coir liner
-
Gravel or small stones
-
Well-draining potting soil
-
Organic compost
-
Dill seeds or seedlings
-
A hand trowel
-
Watering can or spray bottle
Optional: Hooks or stands if you want to elevate or hang the crate
Preparing the Crate
Begin by lining the inside of your crate with landscape fabric or a coconut coir liner. This helps contain the soil while allowing water to drain freely. Make sure there are drainage holes or small gaps at the base of the crate—this is important to prevent root rot and soggy soil.
Add a layer of gravel or small stones to the bottom of the crate to further improve drainage. Then, fill the crate with a mix of potting soil and compost. A light, well-draining soil mix is best for dill, which prefers slightly acidic to neutral pH levels and loose soil that doesn’t retain too much moisture.
Sowing Dill
Dill can be grown from seed or seedlings, but starting from seed is easy and often more successful for this herb. Sow the seeds directly into the soil about 1 cm deep and space them 5 to 10 cm apart. Water gently to avoid displacing the seeds. Germination usually occurs within 7 to 14 days.
If you’re using seedlings, plant them about 15 cm apart to allow room for the delicate foliage to spread. Be gentle when transplanting, as dill has a taproot that doesn’t like to be disturbed.
Ideal Growing Conditions
Dill thrives in full sunlight—at least 6 hours a day—so place your crate in the sunniest part of your balcony. A south- or west-facing spot works best. While dill will tolerate partial shade, less sun can result in leggier plants and weaker flavor.
Keep the soil consistently moist, especially during germination and early growth stages. Once established, dill becomes more drought-tolerant but still needs regular watering in hot weather. Always water at the base to keep the foliage dry and prevent mildew.
Fertilizing and Maintenance
Dill doesn’t require heavy feeding. If you’ve added compost to your soil, that’s often enough to support its growth. However, if you want to give it a boost, apply a diluted organic liquid fertilizer once a month during the growing season.
Regular maintenance is minimal. Thin out overcrowded seedlings early on to encourage healthy, bushier plants. Pinch off any flower heads if your goal is to continue harvesting the leaves, as flowering can reduce leaf production and signal the plant to complete its lifecycle.
Harvesting Your Dill
You can start harvesting dill leaves once the plant reaches about 20 cm in height. Use clean scissors to snip the outer leaves, leaving the central stems intact to encourage regrowth. Fresh leaves are most flavorful when picked in the morning.
If your dill begins to flower, you can also collect the seeds once they mature. Dill seeds are used in pickling and cooking, and can be stored in a cool, dry place for future use or for replanting.
Pest and Disease Tips
Dill is relatively pest-resistant but may attract aphids or caterpillars. Check the foliage regularly, especially the undersides of leaves. Remove pests by hand or use a gentle spray of soapy water. Ensure good airflow around the crate and avoid overwatering to prevent fungal diseases.
End of Season and Regrowth
Dill is an annual herb and will typically complete its lifecycle in one season. However, it self-seeds easily. If you allow some of the seeds to fall into the crate, you may see new plants sprouting the next season without any effort.
Conclusion
A DIY dill crate garden is an easy and rewarding way to enjoy fresh herbs right from your urban balcony. With just a few basic materials and a sunny spot, you can grow flavorful dill in a stylish, space-saving planter. Whether you use it for cooking, pickling, or simply enjoying its feathery greenery, dill in a crate brings both beauty and practicality to your home garden.


