Cucumbers are a favorite summer vegetable, loved for their crisp texture and refreshing taste. Starting cucumbers from seed indoors gives gardeners a head start on the growing season, especially in regions with shorter warm periods. One simple, sustainable, and space-saving method for cucumber propagation is using recycled plastic bottles. These bottles serve as mini-greenhouses that help maintain the warmth and humidity essential for fast germination and healthy seedling growth. This article will guide you through simplifying cucumber propagation with plastic bottles, making the process accessible for gardeners of all levels.
Why Propagate Cucumbers Using Plastic Bottles?
Cucumber seeds require consistent warmth, moisture, and protection during germination. Using plastic bottles as propagation containers offers several key benefits:
-
Microclimate Control: Bottles create a humid, warm environment that accelerates germination.
-
Protection: Seedlings are shielded from temperature fluctuations, drafts, and pests.
-
Sustainability: Reusing plastic bottles reduces waste and promotes eco-friendly gardening practices.
-
Space Efficiency: Bottles are compact and ideal for gardeners with limited indoor space.
-
Easy Monitoring: Clear bottles allow you to check seedling progress and soil moisture without disturbance.
Materials Needed for Bottle Propagation
-
Clear plastic bottles (1 to 2 liters)
-
Sharp scissors or a utility knife
-
Seed-starting mix or light potting soil
-
Cucumber seeds
-
Spray bottle for gentle watering
Preparing the Bottle Propagation Containers
-
Clean the Bottles: Wash the bottles thoroughly to remove residues and ensure a clean environment for seedlings.
-
Cut the Bottles: Cut the bottle horizontally about two-thirds from the bottom. The bottom section will hold soil and seeds, and the top will serve as a dome to trap humidity.
-
Drainage Holes: Poke small holes in the bottom of the planter section to allow excess water to drain and prevent soggy soil.
-
Ventilation: Keep the bottle cap off or puncture small holes in it to permit airflow, reducing the risk of mold.
Preparing the Soil and Sowing Seeds
Cucumbers thrive in light, well-draining soil. Use seed-starting mix or fine potting soil to give your seeds the best chance.
-
Moisten the soil lightly before filling the bottle planter—it should be damp but not soaking wet.
-
Fill the planter portion to about two inches below the rim to leave room for watering and airflow.
-
Plant cucumber seeds about ½ inch deep, sowing one or two seeds per bottle to avoid overcrowding.
-
Mist the soil gently with a spray bottle to settle the seeds without disturbing them.
-
Cover the planter with the bottle top, creating a mini-greenhouse effect that locks in warmth and moisture.
Creating Optimal Conditions for Germination
Cucumber seeds usually germinate in 3 to 10 days when conditions are right. To maximize success:
-
Temperature: Maintain warmth between 75°F and 85°F (24°C to 29°C). Using a heat mat can ensure steady soil warmth.
-
Light: Seeds do not need light to germinate, but seedlings require 12 to 16 hours of bright, indirect light daily to avoid leggy growth. Place the bottles near a sunny window or under grow lights.
-
Humidity: The bottle dome helps retain moisture. Open the lid briefly once a day to allow fresh air circulation and prevent fungal growth.
-
Moisture: Keep the soil consistently moist but not waterlogged. Mist as needed.
Caring for Seedlings After Germination
Once seedlings emerge:
-
Gradually increase ventilation by propping the bottle lid open or removing it for longer periods to help seedlings acclimate to normal humidity levels.
-
Water carefully to maintain moist soil without overwatering.
-
Thin seedlings if more than one germinates per bottle, leaving the strongest to develop.
Transplanting Seedlings Outdoors or in Containers
When seedlings have grown two to three sets of true leaves and are sturdy (usually after 4 to 6 weeks), they are ready to move outdoors or into larger containers.
-
Hardening Off: Gradually expose seedlings to outdoor conditions by placing them outside for a few hours daily over 5 to 7 days.
-
Planting Site: Cucumbers prefer warm, sunny locations with well-draining, fertile soil.
-
Transplanting: Plant seedlings at the same depth as in the bottle planter.
-
Watering: Water thoroughly after transplanting and maintain consistent moisture for healthy establishment.
Troubleshooting Common Issues
-
Damping-Off Disease: A fungal problem causing seedlings to collapse. Prevent it by ensuring good ventilation, using sterilized soil, and avoiding overwatering.
-
Leggy Seedlings: Occur due to insufficient light. Provide adequate bright light or supplemental grow lights.
-
Slow Germination: Can result from cold temperatures or old seeds. Use fresh seeds and maintain a warm environment.
Advantages of Bottle Propagation for Cucumbers
-
Eco-friendly and budget-friendly seed-starting method.
-
Creates a nurturing environment that speeds up germination.
-
Protects seedlings in a compact, manageable space.
-
Enables easy monitoring of moisture and growth progress.
Final Thoughts
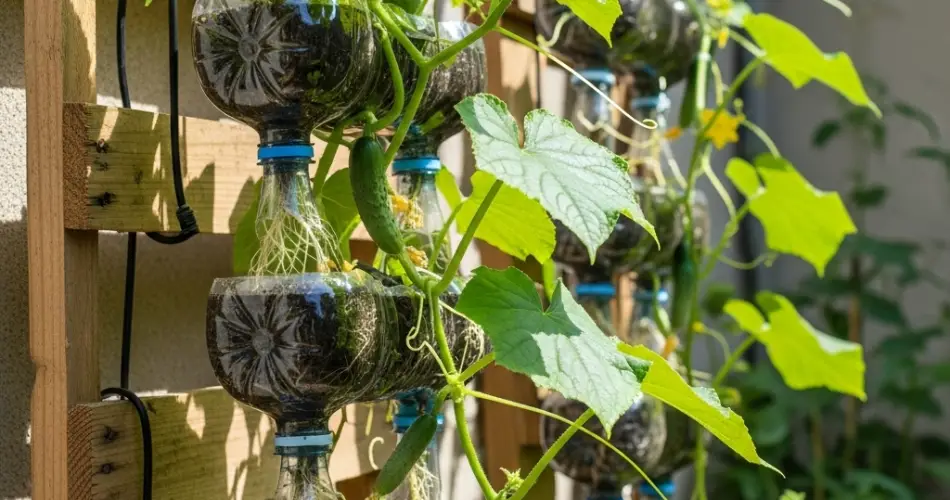
Propagating cucumbers with recycled plastic bottles is a simple and sustainable way to give your seedlings a fast start. The mini-greenhouse effect of the bottle dome provides the ideal humidity and warmth cucumbers need to germinate quickly and grow into strong seedlings. Whether gardening indoors in a limited space or aiming to reduce plastic waste, this method is accessible and effective. With careful attention to moisture, temperature, and light, you’ll enjoy a healthy cucumber crop starting from these easy bottle propagations, leading to a bountiful harvest later in the season.


