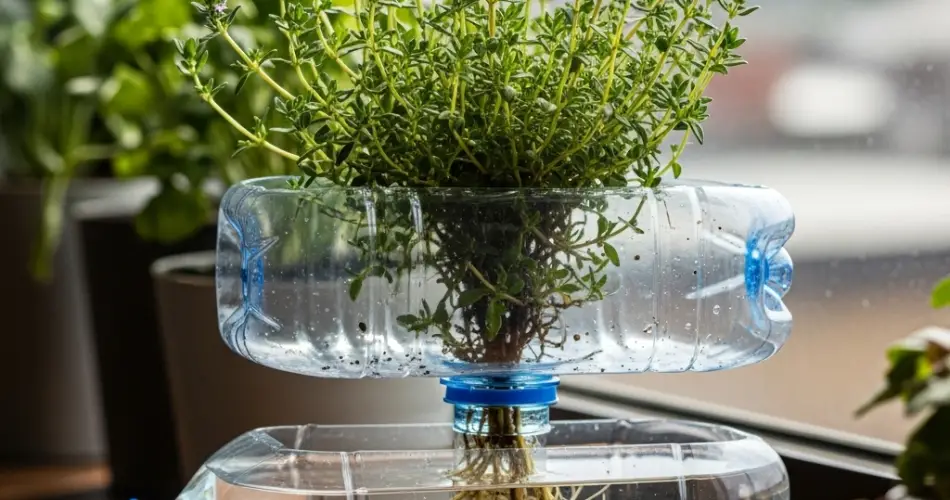
Thyme is a versatile herb prized for its fragrant leaves, culinary uses, and natural health benefits. Its aromatic foliage complements a variety of dishes, from roasted meats to sauces and stews. One of the easiest ways to expand your thyme collection is by cloning it from cuttings. Using a simple plastic bottle setup, you can propagate thyme efficiently, sustainably, and with minimal space requirements.
This method is perfect for gardeners who want to multiply their plants quickly without relying on seeds or buying additional nursery plants. With a few recycled bottles and a healthy mother plant, you can create a steady supply of thyme for your kitchen and garden.
Why Clone Thyme from Cuttings?
While thyme can be grown from seeds, cloning through cuttings offers several advantages:
-
Faster growth: Cuttings develop roots more quickly than seeds germinate.
-
Consistent flavor: New plants are exact clones of the parent, ensuring the same aroma and taste.
-
Low cost: No need to buy seeds or new plants—just reuse existing material.
-
Eco-friendly: Recycled plastic bottles reduce waste while supporting sustainable gardening.
Selecting Thyme Stems
Choose a healthy, mature thyme plant free of pests and disease. The best stems for cuttings are semi-woody, flexible, and about 8–12 cm long. Avoid overly woody or flowering stems, as these take longer to root and may produce weaker plants.
Take cuttings from the top or middle portions of the plant where growth is strong but tender. Remove any flowers or buds to encourage root development rather than energy being diverted to blooms.
Preparing Your Plastic Bottle
A clear plastic bottle, such as a 1- or 1.5-liter water or soda bottle, works perfectly for this propagation method. The transparency allows you to monitor root development.
Steps to prepare the bottle:
-
Remove the label and wash the bottle thoroughly.
-
Cut the bottle approximately one-third from the top.
-
Use the bottom portion as a simple water container for rooting.
-
For a self-watering setup, invert the top part into the base and insert a cotton wick through the cap to draw water from the bottom.
This design provides consistent moisture to the cuttings while preventing water from touching the leaves, which reduces the risk of rot.
Preparing Thyme Cuttings
-
Cut just below a leaf node, where roots are most likely to form.
-
Trim the cutting to about 8–12 cm in length, leaving two or three sets of leaves intact at the top.
-
Remove the lower leaves to minimize water loss and reduce the risk of bacterial growth.
-
Optionally, dip the cut end in rooting hormone to encourage faster root development, though thyme generally roots well without it.
Rooting Thyme in Bottles
Fill the prepared bottle with clean water, submerging only the leaf nodes. The leaves themselves should stay above the water to avoid rotting. Place the bottle in a warm location with bright, indirect sunlight. Thyme prefers temperatures around 20–25°C for optimal rooting.
Change the water every two to three days to keep it fresh and oxygenated. Within 10–14 days, small white roots should begin emerging from the nodes. Once roots reach 5–7 cm in length, the cuttings are ready for transplanting into soil.
Transplanting Rooted Thyme Cuttings
Prepare a small pot or garden bed with well-draining soil. Thyme prefers slightly sandy soil with good aeration.
Steps:
-
Make a small hole in the soil to accommodate the roots without bending them.
-
Place the rooted cutting in the hole and gently cover with soil.
-
Water thoroughly to help settle the soil.
-
Keep the plant in partial shade for the first few days, gradually moving it to full sun as it acclimates.
Regular watering is important initially, but once established, thyme is drought-tolerant and thrives with minimal care.
Caring for Thyme Plants
-
Sunlight: Full sun encourages strong, flavorful leaves.
-
Watering: Allow the soil to dry slightly between waterings; thyme is sensitive to overwatering.
-
Pruning: Trim regularly to maintain a bushy shape and encourage new growth.
-
Fertilizing: Thyme grows well with minimal fertilizer; light compost or diluted liquid fertilizer every 4–6 weeks is sufficient.
Harvesting regularly not only provides fresh leaves for cooking but also keeps the plant compact and productive.
Continuous Propagation
Once your first cuttings are established, you can continue cloning thyme indefinitely. This ensures a continuous supply of healthy plants for your garden or kitchen. Reusing plastic bottles in this way promotes sustainable gardening while keeping costs low.
Benefits of the Plastic Bottle Setup
-
Affordable: Uses readily available materials.
-
Sustainable: Repurposes plastic, reducing waste.
-
Space-efficient: Ideal for indoor windowsills or small outdoor areas.
-
Easy monitoring: Clear bottles allow you to watch root growth without disturbing the plant.
Final Thoughts
Cloning thyme in a simple plastic bottle setup is an effective, low-cost, and environmentally friendly way to expand your herb collection. By following these steps, you can transform a single thyme stem into a flourishing plant ready for your garden or kitchen.
This method is beginner-friendly, requires minimal materials, and produces consistent results. With a few cuttings and recycled bottles, you can enjoy a constant supply of fresh, aromatic thyme while practicing sustainable gardening.


