Cucumbers are a refreshing and versatile crop that many gardeners enjoy growing. While most people start cucumbers from seed, another practical method is cloning vines through cuttings. This approach allows you to multiply healthy cucumber plants without buying more seeds, while also ensuring that new plants inherit the exact traits of the parent. By using upcycled plastic bottles as mini-propagation chambers, you can create a simple, low-cost, and eco-friendly system for rooting cucumber cuttings indoors.
This technique works well for gardeners who want to extend their cucumber harvest, replace aging vines, or grow more plants from a favorite variety. With the right setup, bottle propagation is both efficient and surprisingly easy.
Why Clone Cucumbers Instead of Growing from Seed?
Growing from seed is common, but cuttings offer distinct advantages:
-
Faster maturity: Cuttings establish roots quicker and grow faster than seeds.
-
Consistency: Each clone retains the qualities of the parent, such as taste, disease resistance, or productivity.
-
Cost savings: No need to purchase additional seed packets if you already have a healthy vine.
-
Continuous harvest: Replacing older vines with rooted cuttings ensures a steady supply of cucumbers throughout the season.
For gardeners who want reliability and speed, cloning is a valuable method to try.
Materials You’ll Need
-
A clean, clear plastic bottle (1–2 liters)
-
Scissors or a sharp knife
-
A healthy cucumber vine for cuttings
-
Potting mix or seed-starting soil
-
A spray bottle with water
-
Optional: rooting hormone (for faster root development)
-
A sunny windowsill or grow light setup
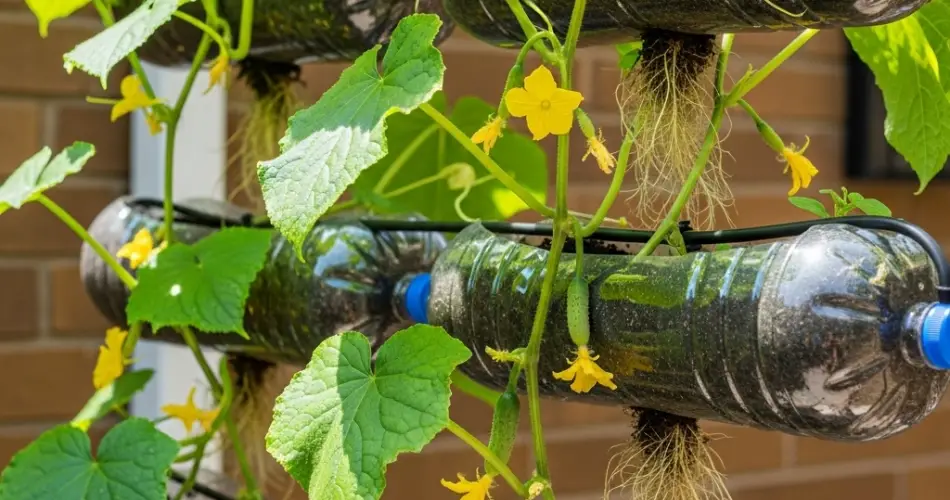
Preparing the Bottle
-
Clean thoroughly: Wash the plastic bottle with warm water and soap to remove any residues.
-
Cut the bottle: Slice the bottle about one-third from the top. The bottom section becomes the planter, while the top acts as a humidity dome.
-
Add drainage holes: Poke small holes at the base for proper water flow.
-
Assemble the mini-greenhouse: Keep both parts of the bottle, so you can fit the top back on once the cutting is planted.
This bottle system creates a warm and humid environment, perfect for rooting cucumber vines.
Taking and Preparing Cucumber Cuttings
-
Choose a healthy vine: Select a section of the plant that is disease-free and vigorous. Look for non-flowering stems about 4–6 inches long.
-
Cut carefully: Using sharp scissors or a knife, snip just below a leaf node (the small bump where leaves emerge). Nodes are the best rooting points.
-
Remove lower leaves: Strip off the leaves from the bottom half of the cutting to reduce water loss. Keep only two or three leaves at the top.
-
Optional rooting aid: Dip the cut end into rooting hormone if available. While not required, this helps speed up root growth.
Planting the Cuttings in Bottles
-
Fill the bottom section of the bottle with damp potting mix.
-
Insert the cutting into the soil, burying the node where roots will form. Firm the soil gently around it.
-
Mist the cutting lightly with water to maintain moisture.
-
Place the top of the bottle back on, creating a dome that traps humidity. Loosen or remove the cap to allow some airflow.
This enclosed system acts like a mini greenhouse, reducing stress on the cutting while encouraging root development.
Caring for the Cuttings
-
Light: Place the bottle near a bright window where it receives indirect sunlight. Avoid harsh direct light in the early days, as this can stress the cutting.
-
Moisture: Keep the soil consistently moist but not soggy. Mist if needed to maintain humidity inside the dome.
-
Air circulation: Lift the bottle top daily to let in fresh air. This prevents mold and fungal problems.
-
Temperature: Cucumbers prefer warmth. Maintain indoor temperatures around 70–80°F (21–27°C).
Roots should begin forming within 10–14 days, and you can check progress by looking through the clear bottle sides.
Transplanting Rooted Cuttings
Once the cutting develops a healthy root system, usually after two to three weeks, it’s ready for transplanting. At this stage:
-
Gradually open the bottle more often to acclimate the plant to normal air conditions.
-
Gently remove the cutting from the bottle planter.
-
Transplant into a larger pot or directly into the garden, depending on the season and weather conditions.
-
Water thoroughly and continue to provide good sunlight and care.
Benefits of Bottle Propagation for Cucumbers
-
Low-cost setup: Uses common household items instead of expensive propagation trays.
-
Eco-friendly gardening: Gives plastic bottles a second life while reducing waste.
-
High success rate: The mini-greenhouse effect creates the perfect conditions for rooting.
-
Observation: Clear sides allow you to monitor root growth and soil moisture without disturbing the cutting.
Troubleshooting Common Issues
-
Wilting cuttings: This may happen if humidity is too low. Keep the dome on longer or mist more often.
-
Mold in soil: Reduce watering and increase air circulation by loosening the bottle cap.
-
Slow root growth: Warmer temperatures and rooting hormone can help speed things up.
Final Thoughts
Cloning cucumber vines in bottles is a simple, effective, and sustainable gardening technique. With just a plastic bottle, some soil, and healthy vine cuttings, you can multiply your cucumber plants quickly and enjoy consistent harvests.
This method not only ensures reliable plant quality but also reduces waste and costs. For home gardeners, bottle propagation is a practical way to keep cucumber production thriving all season long.


