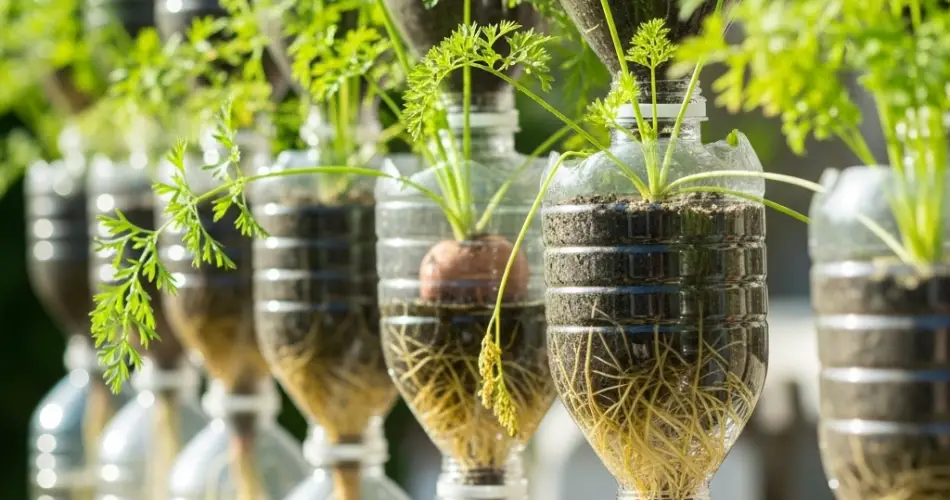
Carrots are a versatile root vegetable that can be grown almost anywhere, even without a traditional garden bed. One simple and affordable method for starting carrots is using clear plastic bottles as mini greenhouses. This technique is perfect for gardeners with limited space, allowing them to create a controlled environment for seed germination while reusing materials that would otherwise be discarded.
Why Use Clear Bottles for Carrot Propagation
Clear bottles offer a controlled, protective space that helps carrot seeds germinate more successfully. The transparency allows sunlight to pass through, warming the soil and maintaining a consistent temperature. The enclosed space also reduces water evaporation, meaning the seeds stay moist for longer—an essential factor for carrot germination, which can be slow compared to other vegetables. Additionally, the compact size of bottles makes them ideal for balconies, patios, or even indoor windowsills.
Materials Needed
To start carrots in clear bottles, you’ll need:
-
Empty, clean, clear plastic bottles (1.5–2 liters work best)
-
A sharp utility knife or scissors for cutting
-
Potting mix or fine garden soil with good drainage
-
Carrot seeds (choose a variety suited for container growing)
-
A small watering can or spray bottle
Preparing the Bottles
Begin by rinsing your bottles thoroughly to remove any residue. Using a sharp knife or scissors, cut the bottle horizontally in half. The bottom half will serve as the planting container, while the top half acts as a removable lid to create a greenhouse effect. Make several small drainage holes in the bottom to prevent waterlogging, which can cause root rot.
Filling and Sowing
Fill the bottom section with loose, fine-textured soil or potting mix. Carrots prefer sandy or loamy soil with no large clumps or stones, as these can cause roots to fork or grow misshapen. Moisten the soil lightly before sowing. Scatter carrot seeds thinly across the surface and cover them with a thin layer of soil—about 0.5 cm deep. Press the soil gently to ensure good seed-to-soil contact.
Creating the Greenhouse Effect
Place the top half of the bottle back over the bottom, with the cap removed to allow ventilation. This setup traps heat and moisture, speeding up germination while protecting seeds from sudden temperature changes. Keep the bottle in a sunny location, such as a windowsill, balcony shelf, or outdoor spot that receives at least 6 hours of light per day.
Watering and Care
Carrot seeds need consistently moist soil to germinate, which can take 10–21 days. Check the moisture level daily and use a spray bottle to water gently so as not to disturb the seeds. The bottle greenhouse helps retain humidity, but on warm days, you may need to lift the lid slightly to prevent overheating.
Once the seedlings are about 3–4 cm tall, thin them out to prevent overcrowding. Carrots need space for their roots to develop properly, so leave about 2–3 cm between plants in a bottle setup.
Transitioning to Larger Containers or Beds
When seedlings are strong enough—usually when they have at least 4 true leaves—you can either leave them to mature in the bottle if the variety is small, or transplant them to a deeper container or raised bed. Handle them carefully to avoid damaging the roots.
If keeping them in the bottle until harvest, remember that depth is important. Carrots need at least 15–20 cm of loose soil to develop straight roots. Some gardeners stack bottle bases or use tall bottle designs to provide extra depth.
Benefits Beyond Germination
Using bottles is not only a space-saving method but also an eco-friendly one. This practice repurposes plastic waste while giving you a steady supply of fresh carrots. It also allows you to start carrots earlier in the season since the mini greenhouse effect protects seedlings from cooler weather.
Harvesting
Carrots grown in bottle setups are usually ready to harvest in 60–80 days, depending on the variety. You’ll know they’re ready when the tops of the roots are about 1–2 cm in diameter and have a bright orange color. To harvest, loosen the soil gently and pull the carrots out by their green tops.
Final Tips
-
Choose short or round carrot varieties for small containers, such as ‘Paris Market’ or ‘Thumbelina’.
-
Avoid over-fertilizing, as too much nitrogen will encourage leafy tops instead of large roots.
-
Rotate your crop if reusing soil to prevent pest buildup.
Clear bottle propagation is a practical, sustainable, and fun way to grow carrots in even the smallest spaces. With minimal effort, you can enjoy crisp, sweet carrots straight from your own container garden.


