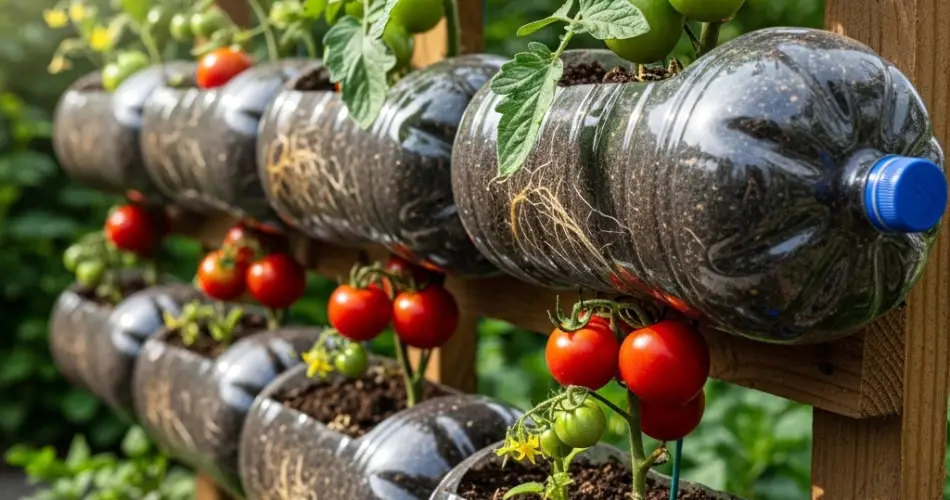
Tomatoes are one of the most rewarding crops for home gardeners, offering a bounty of sweet, tangy fruits that can be used fresh, cooked, or preserved. While growing tomatoes from seed is a tried-and-true method, there is a clever and sustainable alternative that can help you raise strong seedlings with minimal fuss: bottle propagation. By repurposing clear plastic bottles, you can create mini-greenhouses that nurture young tomato plants, giving them the warmth, moisture, and protection they need to thrive.
Why Choose Bottle Propagation?
Bottle propagation is more than just a creative way to reuse plastic—it provides real advantages for growing tomatoes.
-
Microclimate control: The enclosed bottle creates a humid, warm environment that accelerates seed germination and encourages strong seedling development.
-
Visibility: Clear plastic allows you to easily monitor moisture levels, seedling growth, and root formation.
-
Protection: Seedlings are shielded from sudden changes in temperature, pests, and wind, giving them a stronger start.
-
Sustainability: By upcycling bottles, you reduce waste while saving money on traditional seedling trays or cloches.
This method is especially helpful for small-space gardeners or those starting seeds indoors before the outdoor growing season begins.
Materials You’ll Need
-
Tomato seeds of your preferred variety
-
A clean, clear plastic bottle (1–2 liters works well)
-
Sharp scissors or a utility knife
-
Potting mix or seed-starting soil
-
Spray bottle for watering
-
A sunny windowsill or indoor grow light
Optional: a tray or saucer to catch excess water.
Preparing the Bottle
-
Clean the bottle thoroughly to remove any labels, glue, or residue.
-
Cut the bottle about one-third from the top. The bottom portion becomes your planting container, while the top can serve as a removable dome.
-
Make drainage holes in the base to prevent waterlogging. A heated needle or sharp blade can help with this step.
-
Optional upgrade: If you want a hinged version, cut almost all the way around the middle of the bottle but leave a small section intact to act as a hinge.
You now have a simple, functional mini-greenhouse.
Planting Tomato Seeds
-
Fill the bottom of the bottle with moist potting mix, leaving about an inch of space at the top.
-
Plant tomato seeds about ¼ inch deep. Place two to three seeds per bottle section to ensure successful germination.
-
Gently cover the seeds with soil and lightly mist with water.
-
Place the top of the bottle back on, leaving the cap slightly loosened or removed to allow air circulation.
This setup keeps humidity high while preventing excess moisture buildup.
Caring for the Seedlings
-
Light: Tomato seedlings need plenty of light. Place the bottles in a sunny windowsill where they can get 6–8 hours of sun daily. If natural light is limited, supplement with grow lights.
-
Watering: Use a spray bottle to keep the soil consistently moist but not soggy. The enclosed bottle will recycle much of the moisture, reducing the need for frequent watering.
-
Temperature: Keep the bottles in a warm spot. Tomatoes germinate best between 21–27°C (70–80°F).
-
Ventilation: Open the bottle cap or lift the dome occasionally to allow fresh air circulation. This reduces the risk of fungal growth.
Within 7–10 days, tomato seedlings should emerge and begin developing their first leaves.
Thinning and Transplanting
Once seedlings have grown their first true leaves, thin them to one strong plant per bottle. This ensures that each seedling has enough nutrients and space to grow without competition.
As seedlings grow taller, you may need to adjust the dome or remove it entirely. Keep the bottle base as the growing container until the seedlings are ready for transplanting.
When seedlings are about 4–6 inches tall and have developed several sets of leaves, they are ready to be transplanted into larger pots or directly into the garden. Before moving them outdoors, harden them off by gradually exposing them to outdoor conditions—starting with a few hours each day and increasing the time over a week.
Advantages of Bottle Propagation for Tomatoes
-
Stronger roots: Bottles encourage vertical root growth since the clear sides let you monitor development and ensure seedlings aren’t rootbound.
-
Cost-effective: No need for expensive trays or greenhouses.
-
Portable: Bottles can be easily moved to sunnier windows, warmer rooms, or protected areas.
-
Eco-friendly: Repurposing bottles reduces plastic waste and gives new life to disposable items.
Troubleshooting Common Problems
-
Mold or fungus: This usually means there is too much moisture. Remove the dome for longer periods to improve airflow.
-
Leggy seedlings: If seedlings stretch and appear weak, they are not receiving enough light. Move them to a sunnier location or use grow lights.
-
Yellowing leaves: This can be a sign of nutrient deficiency. Use a diluted liquid fertilizer once seedlings have their second set of true leaves.
Conclusion
Bottle propagation is a practical, eco-friendly way to start strong tomato seedlings at home. With minimal materials and a bit of care, you can create a controlled environment that encourages healthy root systems, sturdy stems, and vigorous early growth. This method not only reduces plastic waste but also saves money while giving your tomatoes the best possible start.
Whether you’re gardening on a balcony, a windowsill, or preparing for a full outdoor plot, bottle propagation ensures your tomato seedlings are resilient, healthy, and ready to produce a bountiful harvest.


