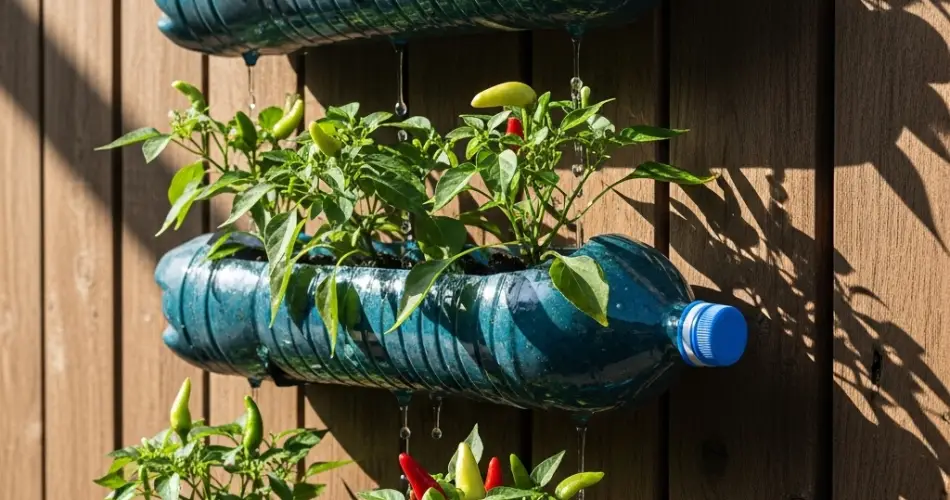
Chili peppers are a favorite among home gardeners, prized for their vibrant colors, spicy kick, and culinary versatility. While many assume you need garden beds or pots to grow them, there’s an innovative method that allows you to cultivate thriving chili plants even in the smallest spaces: wall-mounted bottle gardens. This approach uses recycled plastic bottles as planters, turning vertical surfaces into productive mini-farms that save space, reduce waste, and produce a fiery harvest right outside your window.
Why Grow Chilies on a Wall?
Wall-mounted bottle gardens offer several benefits:
-
Space Efficiency: Perfect for balconies, patios, and narrow outdoor walls.
-
Eco-Friendly: Reuses discarded bottles that would otherwise end up as waste.
-
Improved Airflow: Elevated plants are less prone to ground-dwelling pests and diseases.
-
Aesthetic Appeal: Creates a colorful, living wall of greenery and ripening chilies.
This method is especially ideal for urban gardeners or those with no traditional garden space.
Choosing the Right Bottle
For chili plants, use sturdy 1.5 to 2-liter plastic bottles. They provide enough space for root development while remaining lightweight enough to hang securely. If possible, choose bottles made of thick plastic to better support the soil’s weight and resist sun damage.
Opaque or painted bottles can help prevent algae growth and keep root temperatures stable.
Preparing the Bottle Planters
-
Cut the Planting Opening:
Lay the bottle horizontally and cut a wide rectangular window along the side to create the planting area. -
Add Drainage Holes:
Pierce several small holes along the bottom side for water drainage. This is crucial to prevent waterlogging. -
Install Hanging Supports:
Attach strong wire, rope, or wall-mounted hooks. Ensure they can bear the weight of the soil and a mature chili plant.
The Perfect Soil Mix for Chilies
Chilies thrive in loose, well-draining soil rich in organic matter. A good mix is:
-
1 part garden soil for structure
-
1 part compost for nutrients
-
1 part coarse sand or perlite for drainage and aeration
Before planting, you can incorporate a slow-release organic fertilizer to give your chili seedlings a strong start.
Planting Your Chilies
You can start from seeds or seedlings:
-
From Seeds: Sow 2–3 seeds directly into each bottle. Cover lightly with soil and water gently. Once seedlings emerge, thin them to leave the strongest plant.
-
From Seedlings: Transplant young plants that are 8–10 cm tall. Place them in a prepared hole in the bottle’s soil, then press the soil gently around the roots. Water immediately after planting.
Watering and Maintenance
Chilies in bottles require consistent but moderate watering. Overwatering can cause root rot, so let the top 2–3 cm of soil dry slightly before the next watering. In hot weather, check daily, as bottle planters tend to dry out faster.
Mulching with straw, shredded leaves, or coco coir will help retain moisture and stabilize the soil temperature.
Sunlight Needs
Chili plants love sunlight. Position your wall-mounted bottles where they’ll receive at least 6 hours of direct sun daily. If your climate is extremely hot, light afternoon shade can help prevent leaf scorch.
Feeding for Fiery Harvests
Once flowers appear, switch to a fertilizer higher in potassium and phosphorus to encourage flowering and fruiting. Liquid seaweed extract, compost tea, or a natural vegetable fertilizer can be applied every two weeks during the fruiting period.
Pest and Disease Prevention
Wall-grown chili plants are less likely to face soil-borne pests, but you should still watch for aphids, whiteflies, and spider mites. Inspect leaves regularly and use organic pest control solutions, such as neem oil spray or garlic-chili extract, to keep infestations under control.
Ensure good airflow between bottles to reduce the risk of fungal diseases. Avoid splashing water directly onto the leaves during watering.
Harvesting Your Chilies
Chilies can be harvested green for a milder flavor or left to ripen to full color for maximum heat and sweetness. Use scissors or pruning shears to cut the fruit from the plant, avoiding damage to the stems.
Regular harvesting encourages the plant to produce more fruit, so pick often once the peppers mature.
Advantages of Bottle Wall Chili Gardens
-
Urban-Friendly: Turns any sunny wall into a productive farm.
-
Low Cost: Requires only recycled bottles, basic tools, and soil.
-
Sustainable: Reduces plastic waste and promotes local food growing.
-
Decorative: Produces a colorful vertical display when peppers ripen in shades of green, yellow, orange, and red.
Final Tips
Choose chili varieties suited to your climate, such as Thai chilies for hot areas or mild capsicum for cooler zones. Keep up with watering, feeding, and pest checks, and your wall-mounted bottle garden will reward you with an abundant harvest of homegrown heat.
With this simple and sustainable setup, you can turn unused wall space into a vertical chili farm that brings both spice and style to your home.


