How to Build a Simple and Effective Drip Irrigation System Using Recycled Bottles
Watering your garden effectively is one of the most important steps to keeping plants healthy and productive. Many gardeners find that drip irrigation is one of the best methods to deliver water directly to a plant’s roots, and with good reason. This method allows water to seep slowly into the soil, giving plants the time they need to absorb moisture without flooding or wastage. It’s especially useful for shallow-rooted plants like cucumbers, but it works well for a wide variety of vegetables, herbs, and flowers.
Fortunately, you don’t need an expensive setup to enjoy the benefits of drip irrigation. With just a few basic materials—many of which you may already have at home—you can create a simple, efficient, and eco-friendly watering system.
Why Use Drip Irrigation?
Unlike overhead watering, which can waste water through evaporation or runoff, drip irrigation delivers water slowly and directly to the root zone of the plant. This encourages strong root development, conserves water, and reduces the risk of fungal diseases caused by wet foliage. For plants that require consistent moisture—like cucumbers, tomatoes, or flowering ornamentals—this method is ideal.
Additionally, drip irrigation helps gardeners save time. Once in place, the system handles watering consistently, even during busy weeks or hot, dry days.
Materials You’ll Need
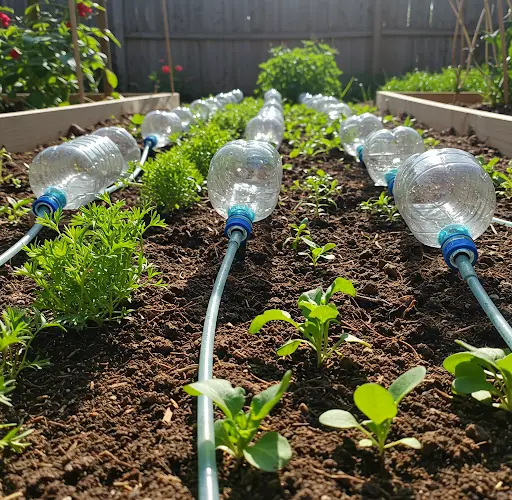
To build your own low-cost drip irrigation system, you’ll need:
-
A clean 1-liter plastic bottle
-
A small bamboo stick or garden stake
-
A twist tie or string
-
A pin or needle
-
A small piece of an ear cleaning stick (or similar object to control water flow)
Step-by-Step Instructions
-
Prepare the Bottle
Begin by cutting off the bottom portion of the plastic bottle. This open end will allow you to easily pour water into the container once the system is set up. Be sure to keep the cut edge smooth and free of sharp points. -
Make Attachment Holes
Near the edge of the cut opening, use a knife or hole punch to create two small holes on opposite sides. These will be used to tie the bottle to the bamboo stick or garden stake for support. -
Create the Drip Outlet
Using a pin or small nail, poke a tiny hole in the center of the bottle cap. This will serve as the outlet for your slow-dripping water. For better control of the flow rate, insert a small piece of an ear cleaning stick into the hole. The cotton and plastic will slow down the release of water, allowing it to drip gradually into the soil. -
Mount the Bottle to the Stick
Thread a twist tie or piece of string through the side holes you made at the top of the bottle. Then secure the bottle to your bamboo stick or garden stake. It’s important to ensure that the bottle is tightly attached so it doesn’t tip over or shift once in the soil. -
Position in the Garden
Choose a plant that needs regular watering and gently insert the bamboo stick into the soil next to it. The cap end of the bottle should be positioned just above the soil, with the hole pointing downward so water drips directly near the plant’s roots. Adjust the angle as needed to ensure stability and direct watering. -
Fill and Observe
Pour water into the open end of the bottle. After a few seconds, you should see water begin to drip slowly from the cap. If the water flows too quickly, adjust or replace the ear stick filter to reduce the flow. If the dripping is too slow, you can widen the hole slightly or use a thinner piece of filter material.
Enhancing the System with Nutrients
One of the great advantages of this DIY drip system is that it can also be used to deliver nutrient-rich solutions such as compost tea or diluted liquid fertilizers. Simply replace plain water with your chosen nutrient solution, and your plants will receive both hydration and nutrition right at their roots.
This dual-use makes the drip system a smart solution for feeding and watering plants at the same time. Compost tea, for instance, provides beneficial microbes and essential minerals, further improving plant health and soil vitality.
A Low-Cost, High-Impact Gardening Hack
This homemade drip irrigation setup is not only inexpensive but also environmentally friendly. It gives a second life to plastic bottles and promotes water conservation while keeping your plants consistently hydrated. You can build as many of these systems as needed to match the size of your garden, and once they’re in place, maintenance is minimal.
Whether you’re tending to a few potted plants or a full vegetable patch, this easy method can help improve plant health, save water, and reduce your workload.
Give it a try and watch your garden thrive with a simple, steady supply of moisture delivered exactly where it’s needed most.


