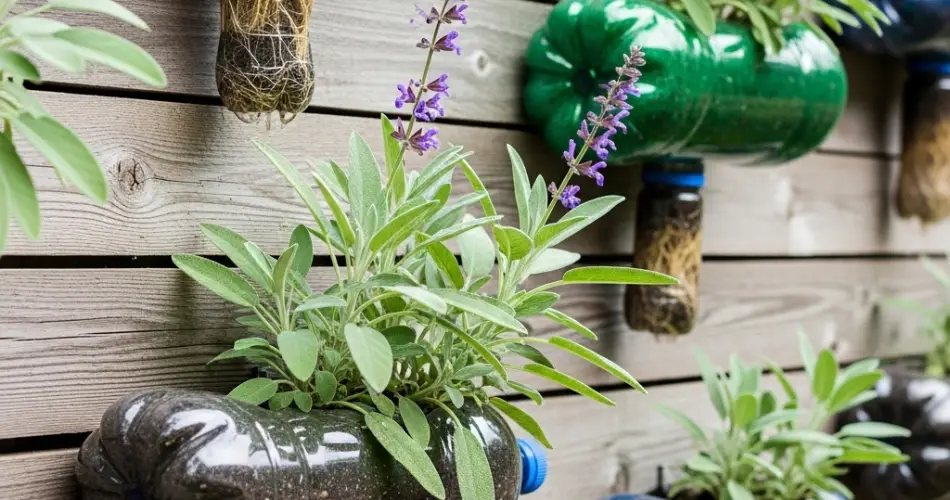
Sage is a fragrant and versatile herb, treasured for its culinary and medicinal properties. Its aromatic leaves enhance a wide range of dishes, from roasted vegetables and meats to sauces and teas. For gardeners with limited space, growing sage in a wall-mounted bottle garden provides a practical and visually appealing solution. This method maximizes vertical space, repurposes plastic bottles, and allows for easy harvesting of fresh sage throughout the year. Here’s a step-by-step guide to creating a thriving wall-mounted bottle garden for aromatic sage.
Selecting Bottles for Your Garden
Plastic bottles are ideal for vertical gardening due to their light weight, durability, and ease of modification. For sage, bottles of at least 1.5 liters are recommended to provide sufficient room for roots. Wash the bottles thoroughly to remove labels and residue. Cut each bottle horizontally to create an open-top planter. Adding small holes in the bottom or sides ensures proper drainage, preventing waterlogging and root rot. Using bottles of uniform size helps create a tidy, organized wall garden, while mixing bottle sizes can add visual interest.
Choosing the Wall Location
Sage thrives in full sun, requiring at least four to six hours of sunlight per day. Outdoor walls are ideal, but indoor walls near bright, south-facing windows can also work well. Ensure the supporting structure—such as a wooden frame, wire mesh, or hanging grid—is sturdy enough to hold multiple bottles filled with soil. Position the bottles with openings facing upward, making planting, watering, and harvesting simple and convenient. Adequate sunlight and a stable structure are key to healthy, productive sage plants.
Constructing the Wall-Mounted Garden
Secure the bottles to your chosen wall using hooks, wire, or string. Arrange them in rows or staggered patterns depending on your space and aesthetic preferences. Staggering the bottles slightly improves airflow and ensures all plants receive sufficient light. Make sure each bottle is firmly anchored to prevent tipping or falling, particularly in outdoor locations where wind may be a factor.
Soil Preparation and Planting Sage
Sage prefers well-draining soil rich in organic matter. A light potting mix blended with sand or perlite works best in bottles to prevent waterlogging. Fill each bottle with soil, leaving about two centimeters of space at the top. For seeds, sprinkle them evenly on the surface and lightly cover them with soil. For seedlings or transplants, gently loosen the roots before placing them in the bottle and fill in around the roots with soil, pressing lightly to stabilize. Proper planting ensures that sage establishes quickly and grows healthily in a vertical setup.
Watering and Care
Sage is drought-tolerant but requires regular watering during establishment. Water the plants moderately, allowing the soil to dry slightly between watering sessions. Overwatering can lead to root rot, particularly in bottles with limited drainage. A thin layer of gravel or small stones at the bottom of each bottle enhances drainage. Indoor gardens benefit from occasional misting and indirect sunlight to maintain plant health. Proper watering and care are essential for robust, aromatic leaves.
Fertilization and Growth Tips
Sage requires minimal fertilization. A balanced liquid fertilizer applied every four to six weeks is sufficient to encourage steady growth. Prune the top stems regularly to promote bushier growth and maintain the plant’s upright shape. Frequent harvesting stimulates new shoots and ensures a continual supply of fresh leaves for culinary use. Maintaining spacing between bottles improves airflow and reduces competition, keeping the plants healthy.
Pest and Disease Management
Sage is generally hardy, but occasional pests such as aphids or spider mites may appear. A gentle spray of water or organic insecticidal soap usually resolves these issues. Adequate airflow and spacing reduce the risk of fungal problems. Healthy, well-maintained plants are less susceptible to pest and disease issues, making vertical bottle gardening a low-maintenance solution.
Harvesting Sage
Begin harvesting sage once plants reach a height of 10–15 centimeters. Snip the outer leaves or top portions of stems using scissors, taking care not to remove more than one-third of the plant at a time. Fresh sage can be used immediately in cooking, or the leaves can be dried or frozen for later use. Regular harvesting encourages continuous growth and ensures that your wall-mounted bottle garden remains productive.
Decorative and Practical Benefits
A wall-mounted sage garden offers both practical and aesthetic advantages. The silvery-green foliage softens walls, adds texture, and brings a natural, fragrant element to indoor or outdoor spaces. Repurposing plastic bottles reduces waste while creating a functional, eco-friendly herb-growing system. Having fresh sage readily available enhances your cooking and brings the pleasure of homegrown herbs to your daily life.
Expanding Your Vertical Herb Collection
Once your sage wall garden is thriving, consider adding other Mediterranean herbs such as rosemary, thyme, oregano, or basil. These herbs grow well in similar conditions and create a diverse, aromatic vertical garden. Combining multiple herbs adds color, texture, and culinary variety, making your wall both visually appealing and highly functional. Vertical gardening maximizes limited space, making it ideal for balconies, patios, or indoor herb enthusiasts.
Creating a wall-mounted bottle garden for aromatic sage is a practical, sustainable, and rewarding project. With proper sunlight, soil, and care, your sage will thrive, providing fresh, flavorful leaves while transforming any wall into a vibrant, green space. This DIY approach merges beauty, functionality, and eco-consciousness, making it perfect for small-space gardeners and herb lovers.


