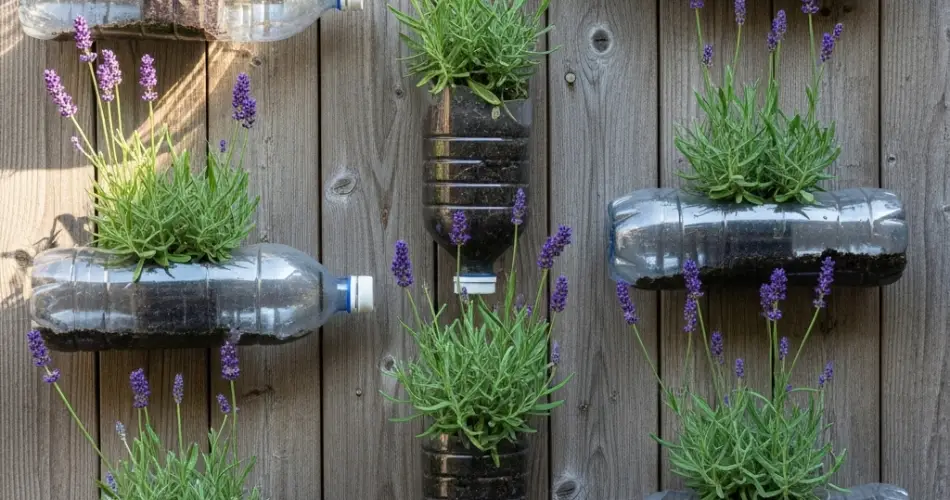
Lavender is cherished for its soothing fragrance, vibrant purple flowers, and versatility in both culinary and decorative uses. Whether you’re infusing baked goods, crafting sachets, or simply enjoying its calming aroma, fresh lavender is a delightful addition to any home. If ground space is limited, you can still grow this fragrant herb by creating a lavender wall garden from old plastic bottles. This eco-friendly vertical garden saves space, reduces waste, and adds a charming, aromatic feature to your balcony, patio, or garden wall.
Why Choose a Lavender Wall Garden?
Growing lavender in a vertical bottle garden has several unique benefits:
-
Space efficiency – Perfect for small living areas where traditional garden beds aren’t possible.
-
Sustainability – Reuses discarded bottles, keeping plastic out of landfills.
-
Easy access – Herbs are at arm’s reach for pruning, harvesting, and care.
-
Aesthetic appeal – Creates a living wall of greenery and flowers.
-
Aromatic benefits – Lavender releases a gentle fragrance with each breeze.
Choosing the Right Lavender Variety
Lavender thrives in sunny, well-drained conditions. Compact varieties like English lavender (Lavandula angustifolia) or dwarf cultivars such as ‘Hidcote’ and ‘Munstead’ are ideal for bottle gardens. They remain small enough to grow comfortably in limited soil while still producing plenty of blooms.
Materials You’ll Need
-
6–10 clean plastic bottles (1.5 or 2 liters)
-
Sharp scissors or a utility knife
-
Drill or heated nail for drainage holes
-
Quality potting soil mixed with sand or perlite
-
Lavender seeds or seedlings
-
Rope, cable ties, or hooks for mounting
-
Wooden frame or wall space for support
-
Optional: Non-toxic paint for decorating bottles
Step 1: Prepare the Bottles
-
Clean and remove labels – Wash bottles thoroughly and peel off labels for a neat appearance.
-
Cut planting openings – Cut a rectangular window along one side for side-mounted gardens, or remove the top third for upright planting.
-
Add drainage holes – Drill several holes at the bottom to allow excess water to escape.
-
Decorate if desired – Paint or wrap the bottles for UV protection and a more attractive look.
Step 2: Create the Wall Garden Structure
There are two main ways to arrange your lavender bottles:
Vertical hanging method:
-
Attach bottles to a sturdy wall or fence using hooks, cable ties, or rope.
-
Stagger them so that water from the upper bottles does not oversaturate those below.
Frame-mounted method:
-
Build or repurpose a wooden frame.
-
Secure bottles in rows using screws or strong wire, keeping planting openings accessible.
Ensure your wall garden is positioned in a sunny location with at least 6–8 hours of direct sunlight per day.
Step 3: Prepare the Soil
Lavender prefers well-drained soil to prevent root rot. A good blend is:
-
2 parts potting soil
-
1 part coarse sand or perlite
-
A small handful of compost for nutrients
Avoid heavy, moisture-retentive mixes, as lavender thrives in slightly dry conditions.
Step 4: Planting Lavender
From seeds:
-
Fill each bottle with prepared soil, leaving a few centimeters at the top.
-
Sow seeds on the surface, then lightly cover with a thin layer of soil.
-
Water gently to keep the soil slightly moist until germination.
From seedlings:
-
Create a hole large enough for the root ball.
-
Place the seedling and fill in with soil, pressing gently around the roots.
-
Water lightly to help the plant settle in.
Step 5: Watering and Light Care
Lavender thrives on minimal watering. Allow the top layer of soil to dry between waterings, especially in bottle planters where drainage is limited. Overwatering can quickly lead to root issues.
Place your wall garden where it will receive full sun for most of the day. If indoors, supplement with a grow light to maintain healthy growth and blooming.
Step 6: Maintenance and Pruning
-
Fertilizing – Feed with a balanced liquid fertilizer every 6–8 weeks during the growing season.
-
Pruning – Trim spent flowers and shape the plant after blooming to encourage fresh growth and maintain a compact form.
-
Pest management – Lavender’s fragrance naturally repels many insects, but keep an eye out for aphids and remove them promptly.
Step 7: Harvesting Lavender
Lavender is best harvested when about half of the flower buds have opened. Cut stems early in the day after the dew has dried for the strongest aroma.
You can use fresh lavender immediately in recipes or crafts, or hang bunches upside down in a dry, well-ventilated space to preserve them.
Benefits Beyond Beauty
This bottle wall garden does more than provide fresh lavender—it also helps the environment by repurposing waste materials. Its vertical design brings greenery and color to otherwise unused spaces, while the plant’s natural scent creates a relaxing atmosphere.
Whether you enjoy lavender for cooking, decoration, or simply its calming fragrance, this DIY project offers a sustainable and visually appealing way to grow it at home.
Final Thoughts
Transforming old bottles into a lavender wall garden is a creative and eco-conscious project that delivers beauty, fragrance, and functionality. With minimal space and a little care, you can enjoy the charm of blooming lavender right outside your window or on your balcony wall. This sustainable gardening method proves that even in small urban spaces, it’s possible to cultivate a thriving, aromatic haven.


