Anthuriums, with their vibrant spathes and glossy foliage, are among the most striking houseplants you can grow indoors. While many plant lovers focus on caring for mature anthuriums, propagating them is equally rewarding—and easier than you might think. One surprisingly effective and eco-friendly method involves using recycled plastic bottles to root anthurium divisions or stem cuttings. This simple propagation hack allows you to multiply your collection while giving plastic waste a second life.
Using plastic bottles as propagation containers is cost-effective, space-saving, and perfect for watching roots develop in real time. With a few basic tools and a healthy parent plant, you can successfully propagate anthuriums at home and grow lush, thriving plants from simple cuttings.
Why Use Plastic Bottles for Propagation?
Plastic bottles are ideal for propagation setups because they’re:
-
Transparent – You can easily monitor water levels and root growth.
-
Customizable – Bottles can be cut to size, shaped for airflow, or converted into self-watering containers.
-
Sustainable – Reusing bottles reduces plastic waste and promotes greener gardening.
-
Compact – Perfect for windowsills, indoor shelves, or makeshift greenhouses.
For anthuriums, which prefer loose, moist conditions and good humidity, plastic bottles help maintain an ideal rooting environment while showcasing the process.
Best Propagation Methods for Anthuriums
There are two main ways to propagate anthuriums using bottles:
-
Division – Ideal for mature plants with multiple stems or offshoots.
-
Stem cuttings – Useful when the plant has a tall central stem that can be cut and rooted.
Both methods can thrive in a plastic bottle setup, either in water or with a lightweight soil mix.
Materials You’ll Need
-
A mature anthurium plant (for division or stem cutting)
-
Clean plastic bottle (1–1.5 liters)
-
Sharp knife or scissors
-
Lightweight potting mix (or sphagnum moss)
-
Optional: rooting hormone, activated charcoal, cotton wick
-
Water (filtered or dechlorinated)
-
Decorative wrap (twine, fabric, or paint)
Preparing the Plastic Bottle
Choose a bottle with a wide enough opening to accommodate your cutting or root mass.
-
Cut the bottle about one-third from the top. The bottom will serve as the planting chamber.
-
If you’re using water for rooting, leave the top intact and insert the cutting through the opening.
-
If using soil or moss, poke a few drainage holes in the bottom.
-
Wrap the outside of the bottle with fabric or paper to reduce light exposure on developing roots while keeping the rest of the setup tidy.
Optional: For a self-watering version, thread a cotton wick through the cap and nest the top half of the bottle upside down into the bottom half filled with water.
Method 1: Propagating by Division
If your anthurium has multiple offshoots or basal clumps, you can divide the plant at the root level.
Steps:
-
Carefully remove the plant from its container.
-
Gently tease apart the root ball into smaller sections, each with at least one stem and healthy roots.
-
Place each division into a plastic bottle filled with moist, chunky soil or moss mix.
-
Water lightly and place in bright, indirect light.
This method produces the fastest results and ensures genetic consistency with the parent plant.
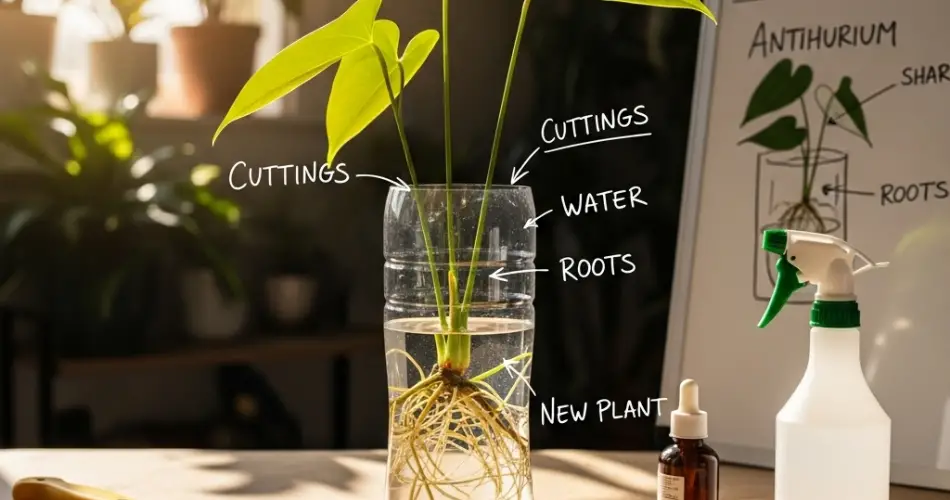
Method 2: Propagating from Stem Cuttings
For anthuriums with tall, leggy stems, propagation through stem cuttings is a great option.
Steps:
-
Use a sterilized knife to cut a section of the stem that includes at least one aerial root or node.
-
Allow the cutting to air dry for a few hours.
-
Place the cutting into a plastic bottle filled with water, ensuring the node is submerged but the leaves remain above water.
-
Change the water every 5–7 days to keep it fresh.
Alternatively, you can use damp sphagnum moss as the rooting medium and mist regularly to maintain humidity.
Care During Propagation
Keep your bottle propagation station in a warm, bright location with indirect sunlight. Avoid direct heat or cold drafts, as anthuriums prefer temperatures between 18–27°C (65–80°F).
-
Maintain consistent humidity—covering the bottle top loosely with plastic wrap can help.
-
Mist the foliage lightly to prevent drying.
-
Watch for signs of rot: blackened stems or mushy roots indicate overwatering or poor airflow.
Roots typically appear within 2–4 weeks, though this may vary depending on the propagation method and environment.
Transplanting Your New Anthuriums
Once the roots are 2–3 inches long and well developed, transplant your new plant into a breathable container with well-draining anthurium mix. A combination of orchid bark, perlite, coco coir, and a bit of potting soil works well.
-
Fill the pot halfway with mix.
-
Place the rooted cutting or division in the center.
-
Fill in around the roots and water lightly.
-
Return the plant to bright, indirect light and continue regular care.
A Creative and Sustainable Propagation Solution
Using plastic bottles to propagate anthuriums is a smart way to grow new plants while cutting down on plastic waste. It’s a hands-on, rewarding experience that doesn’t require fancy tools or expensive containers. Whether you’re expanding your own indoor jungle or growing plants to gift to others, this method brings together sustainability, simplicity, and success—all in one DIY setup.
By turning everyday materials into plant propagation stations, you’re not just multiplying greenery—you’re also cultivating a greener mindset.


