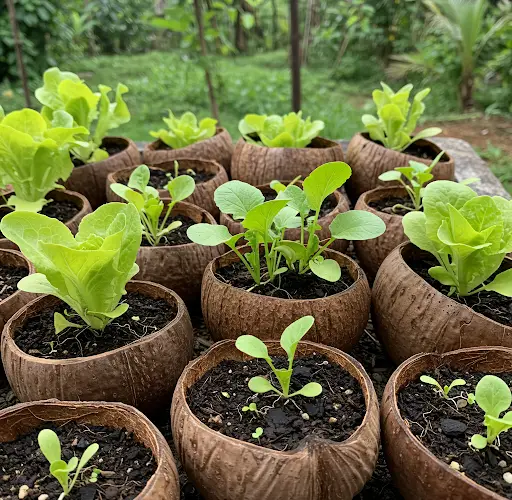
Amazing Hanging Vegetable Garden: Growing Vegetables in Dry Coconut Shells
Gardening doesn’t always require vast plots of land or expensive tools. In fact, one of the most innovative and eco-friendly ways to grow your own vegetables at home is by using dry coconut shells. Not only is this method cost-effective, but it also gives you an opportunity to recycle a natural material that would otherwise be discarded.
Growing vegetables in coconut shells is perfect for those with limited space or a desire to try something new. With a little creativity and some basic gardening supplies, you can create an amazing hanging vegetable garden right in your home, balcony, or backyard. Here’s how to do it.
Why Grow Vegetables in Coconut Shells?
Using coconut shells as planters has several advantages:
-
Sustainable and Eco-friendly: By reusing dry coconut shells, you help reduce waste and contribute to a more sustainable gardening practice.
-
Perfect for Small Spaces: Coconut shells are small, lightweight, and can be hung vertically, making them ideal for apartments, balconies, or small gardens.
-
Natural Material: The coconut shell is a natural, biodegradable material that helps retain moisture and provides excellent drainage for plants.
-
Unique Aesthetic: These rustic planters add a touch of charm and creativity to your garden or home décor.
-
Affordable: Coconut shells are typically inexpensive or free, making this method a budget-friendly gardening solution.
Materials You’ll Need
Before you start, gather these simple materials:
-
Dry coconut shells (You can find them at local markets or buy them online)
-
Small drill or nail (for making holes in the shell)
-
Potting mix or compost (make sure it’s well-draining)
-
Vegetable seeds or seedlings (lettuce, spinach, herbs, and other compact vegetables work well)
-
Twine or hanging wire (to hang your coconut shell planters)
-
Small stones or gravel (for better drainage)
-
Watering can or spray bottle
Step-by-Step Guide to Growing Vegetables in Coconut Shells
Step 1: Prepare the Coconut Shells
Start by cleaning the coconut shells. If you have whole coconuts, you can carefully crack them open and remove the coconut water and meat. If you’re using pre-dried shells, simply clean them of any residual bits of husk or coconut flesh.
Next, use a drill or a large nail to make small holes at the bottom of the shell. These holes will allow excess water to drain out, preventing the roots of your plants from becoming waterlogged.
Step 2: Create Drainage and Add Soil
Once the holes are ready, place a layer of small stones or gravel at the bottom of each coconut shell. This helps improve drainage and ensures that the soil doesn’t get compacted. Next, fill the shell with well-draining potting mix or compost, leaving about an inch of space from the top to prevent spillage when watering.
You can mix some organic compost or slow-release fertilizer into the potting mix to provide your plants with the necessary nutrients for healthy growth.
Step 3: Plant Your Vegetables
Now it’s time to plant! Choose small, compact vegetables or herbs that thrive in containers. Some great options for coconut shell planters include:
-
Lettuce
-
Spinach
-
Herbs like basil, mint, parsley, and cilantro
-
Radishes
-
Small chili peppers
-
Strawberries
Plant the seeds or seedlings according to the instructions on the seed packet. Typically, you will want to space them out evenly to give them room to grow. For herbs and leafy greens, just a few plants per shell will suffice.
Step 4: Set Up the Hanging System
To turn your coconut shells into hanging planters, you need to attach them securely to a structure. You can use strong twine, wire, or even rope. Tie the twine or wire around the top of each coconut shell, making sure it’s tight enough to support the weight of the soil and plants.
If you’re hanging multiple shells, arrange them in a vertical or staggered pattern to create a beautiful cascading effect. This is perfect for balcony gardens or small backyard spaces.
Make sure the location you choose has access to partial sunlight, as most vegetables prefer some exposure to light. However, avoid direct sunlight, especially in extremely hot climates, to prevent your plants from drying out.
Step 5: Watering and Maintenance
Water your hanging vegetable garden regularly to keep the soil moist but not soggy. Coconut shells naturally retain moisture, but you may need to water more often during hot weather or dry spells. Using a watering can or spray bottle ensures you don’t overwater, which is important to prevent root rot.
Be sure to check the plants for pests and remove any weeds that may grow. Fertilize your plants every few weeks with a liquid organic fertilizer to keep them healthy and productive.
Tips for Success
-
Choose lightweight plants: Since coconut shells are relatively small, choose lightweight plants that won’t outgrow their container.
-
Ensure proper drainage: Don’t skip the drainage holes, as they are essential for the health of your plants.
-
Use a hook or rod for hanging: A sturdy hook or rod can help ensure the shells stay securely suspended and won’t tip over when watering.
-
Rotate your plants: If your hanging system allows, rotate the coconut shells occasionally to ensure even sunlight exposure.
Final Thoughts
Growing vegetables in dry coconut shells is an innovative and fun way to start your own home garden, especially if you’re short on space. Not only does this method provide you with fresh, homegrown produce, but it’s also an eco-friendly way to reuse natural materials and create a charming garden display.
With a little creativity and minimal effort, you can create a vertical hanging garden that’s both functional and beautiful. So, gather some coconut shells, plant your favorite veggies, and watch your garden grow!


